🧢 Beautiful ✨ Detailed πŸ’ Adorable

Trick or Treat Sam Amigurumi Pattern

Trick or Treat Sam Amigurumi Pattern
4.1β˜… Rating
5-7 Hours Time Needed
3.1K Made This
βœ‚οΈ

Intermediate Level

Ideal for those with basic crochet experience, featuring slightly more advanced stitches and techniques to expand your skills.

⏱️

Weekend Treat

Takes 5-7 hours, making it an enjoyable project to finish over a couple of days.

🧸

Cute Companion

An adorable friend to cherish, handcrafted with love to bring comfort and joy for years to come.

About This Trick or Treat Sam Amigurumi Pattern

This pattern creates a small Trick or Treat Sam amigurumi with a ruffled collar, stitched face, and patched outfit. The doll is worked mostly in continuous rounds and joined construction for legs and body. A fun seasonal project that lets you add personality with embroidery, buttons, or different yarn colors.
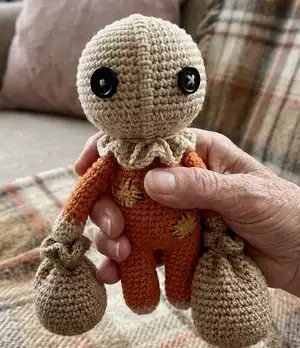
Trick or Treat Sam Amigurumi Pattern crochet pattern - detailed view of completed project

Includes full round-by-round instructions for head, legs, body, arms, patch and assembly. Photos and notes are included to guide shaping and finishing.

Why You'll Love This Trick or Treat Sam Amigurumi Pattern

I absolutely love this pattern because it turns simple stitches into a character full of personality and charm. I enjoy the combination of shaping for the head and body with a playful ruffled collar that gives Sam his unique look. The patch and embroidered details are small finishing touches that let me personalize each doll. Making Sam feels quick and rewarding, and I always enjoy sharing the finished toys with friends and family.

Trick or Treat Sam Amigurumi Pattern step 1 - construction progress Trick or Treat Sam Amigurumi Pattern step 2 - assembly progress Trick or Treat Sam Amigurumi Pattern step 3 - details and accessories Trick or Treat Sam Amigurumi Pattern step 4 - final assembly and finishing

Switch Things Up

I love how easy it is to customize Sam by changing yarn colors; try pastels for a cute baby version or deep autumn tones for a rustic look.

To make Sam larger or smaller simply change yarn weight and hook size; bulky yarn with a larger hook makes a chunky friend while fine yarn creates a tiny keychain version.

I often swap the safety eye for a decorative button or embroider both eyes for a softer, child-safe finishβ€”experiment to find the look you love.

Try adding wire inside the arms or legs for posability if you want Sam to hold a tiny accessory or be posed on a shelf.

Embroidered scars, different mouth shapes, or additional patches let you give each Sam a unique personality and story.

For a seasonal set, make small hats, scarves, or tiny props like a mini pumpkin or sack to pose beside Sam.

If you prefer a smoother collar, work extra BLO rounds or single crochet rounds instead of the ruffled pattern to simplify finishing.

I like to use variegated yarn for the patch or collar so small details pop without extra embroidery work.

To make a keychain version, switch to thinner cotton and add a keyring loop at the top of the head using a short chain and secure stitching.

When giving as a gift, consider stuffing with a small sachet of dried lavender for a lovely scented keepsake that smells delightful when handled.

Common Mistakes & How to Fix Them

βœ— Skipping counting stitches during shaping leads to uneven increases and decreases; count after each round and mark the beginning of rounds with a stitch marker. βœ— Not cutting the thread after the first leg when instructed will make joining to the body difficult; follow the step to cut the first leg thread and only continue without cutting on the second leg. βœ— Overstuffing the head or body makes seams hard to close neatly and distorts shaping; stuff gradually and evenly, adding small amounts of fiberfill while you work. βœ— Forgetting to work the BLO row as instructed will change the collar effect and subsequent shaping; carefully work the BLO round and keep the remaining loops to follow the photos and instructions. βœ— Using a much larger or smaller hook than recommended can change size and tension significantly; use a 2.00 mm hook or an appropriately sized hook to match the sample gauge and finish size. βœ— Skipping the long tail for sewing makes assembly awkward and weak; leave a long tail when fastening off to sew head and body securely and invisibly.
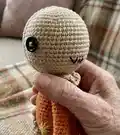
Trick or Treat Sam Amigurumi Pattern

Make a spooky-cute Trick or Treat Sam amigurumi you can gift or display for Halloween. This pattern walks you through shaping the head, body, legs, arms, and little patch details. With clear round-by-round instructions and helpful photos, you can create a charming little scarecrow in your favorite colors.

Intermediate 5-7 Hours

Materials Needed for Trick or Treat Sam Amigurumi Pattern

β€” Main Fabric

  • 01
    Alize Cotton Gold 37 (beige for head/collar)
  • 02
    Alize Cotton Gold 262 (orange for body and legs)
  • 03
    Alize Cotton Gold 60 (white or cream for patch details)
  • 04
    6 mm safety eyes (suggested)
  • 05
    Polyester Fiberfill for stuffing

β€” Tools Required

  • 01
    Crochet hook 2.00 mm (or a hook that fits your yarn)
  • 02
    6 mm safety eyes (optional, button can be used)
  • 03
    Scissors
  • 04
    Yarn needle for sewing and embroidery
  • 05
    Stitch markers
  • 06
    Polyester stuffing (fiberfill)
  • 07
    Buttons for optional eye detail (optional)
  • 08
    Pins for assembly (optional)

Progress Tracker

0% Complete

β€” Head :

Round 1 :

Rnd 1) 6 sc in magic ring (6)

Round 2 :

Rnd 2) (inc) x6 (12)

Round 3 :

Rnd 3) (sc, inc) (18)

Round 4 :

Rnd 4) (inc, 2 sc) x6 (24)

Round 5 :

Rnd 5) (3 sc, inc) x6 (30)

Round 6 :

Rnd 6) 2 sc, inc, (4 sc, inc) x5, 2 sc (36)

Round 7 :

Rnd 7) (5 sc, inc) (42)

Round 8 :

Rnd 8) 3 sc, inc, (6 sc, inc) x5, 3 sc (48)

Round 9 :

Rnd 9) (7 sc, inc) x6 (54)

Round 10 :

Rnd 10) 4 sc, inc, (8 sc, inc) x5, 4 sc (60)

Round 11-23 :

Rnd 11-23 sc around (60) (13 rnds)

Round 24 :

Rnd 24) (3 sc, dec) x12 (48)

Round 25 :

Rnd 25) (2 sc, dec) x12 (36)

Round 26 :

Rnd 26) 2 sc, dec, (4 sc, dec) x5, 2 sc (30)

Round 27 :

Rnd 27) (3 sc, dec) x6 (24)

Round 28 :

Rnd 28) BLO sc around (24) *cut the yarn.

Info :

Work with the remaining loops of the 28th row. Photos will help.

Round 29 :

Rnd 29) (inc) x24 (48)

Round 30-31 :

Rnd 30-31 sc around (48) (2 rnds)

Round 32 :

Rnd 32) ch5, slst, ch7, slst, ch9, slst, ch7, slst, ch5, slst, ........

Info :

*continue in the same way throughout the row and finish.

β€” Leg :

Round 1 :

Rnd 1) 7 sc in magic ring (7)

Round 2 :

Rnd 2) (inc) x7 (14)

Round 3-5 :

Rnd 3-5 sc around (14) *make 2 pieces.

Info :

*After making the first leg, cut the thread. When making the second leg, do not cut the thread and continue to the body.

β€” Body :

Round 6 :

Rnd 6) ch4, join the first leg with the sc. Crochet on the first leg: 2 sc, (inc, 5 sc) x2, working on the chain: inc, 2 sc, inc, crochet on the second leg: (5 sc, inc) x2, 2 sc, working on the chain: 4 sc (42)

Round 7 :

Rnd 7) (13 sc, inc) x3 (45)

Round 8-12 :

Rnd 8-12 sc around (45) (5 rnds)

Round 13 :

Rnd 13) (13 sc, dec) x3 (42)

Round 14-16 :

Rnd 14-16 sc around (42) (3 rnds)

Round 17 :

Rnd 17) (5 sc, dec) x6 (36)

Round 18-20 :

Rnd 18-20 sc around (36) (3 rnds)

Round 21 :

Rnd 21) (4 sc, dec) x6 (30)

Round 22-24 :

Rnd 22-24 sc around (30)

Round 25 :

Rnd 25) (3 sc, dec) x6, slst (24)

Info :

*Fasten off and leaving a long tail for sewing. Stuff the body. Sew the Head with the Body.

β€” Patch :

Round 1 :

Rnd 1) 6 sc in magic ring (6)

Round 2 :

Rnd 2) (inc) x6 (12)

β€” Arm :

Info :

Use the beige yarn

Round 1 :

Rnd 1) 6 sc in magic ring (6)

Round 2 :

Rnd 2) (sc, inc) x3 (9)

Round 3-4 :

Rnd 3-4 sc around (9) (2 rnds)

Info :

*switch the orange.

Round 5-11 :

Rnd 5-11 sc around (9) (7 rnds) *I don't fill arms.

Assembly Instructions

  • Fasten off the body leaving a long tail for sewing; stuff the body firmly and sew the head to the body using the long tail and a yarn needle, securing with an invisible whipstitch.
  • After making the first leg, cut the thread; complete the second leg without cutting and join both legs to the body using the chain and the instructions in Round 6 so the legs are securely attached.
  • Sew arms to the sides of the body at the upper body rounds, matching left and right placement for symmetry; the pattern notes not to stuff the arms if you want them flat and easy to attach.
  • Sew the patch to the body using yarn ends or embroidery thread, positioning it where shown in the photos and securing all edges with small stitches so it lays flat.
  • Embroider facial details and stitch on a button eye or attach a safety eye before closing the head, and use photos as a guide for eye placement and the stitched mouth and scar details.

Important Notes

  • πŸ’‘You can use yarn of any color and thickness you want, but adjust hook size accordingly and be aware this will change the finished size.
  • πŸ’‘After making the first leg you must cut the thread; when making the second leg do not cut the thread and continue to the body to join legs smoothly.
  • πŸ’‘Work the BLO round (Round 28) and keep the remaining loops as instructed to form the collar; photos in the pattern are provided to help with this step.
  • πŸ’‘Leave a long tail when fastening off the body to make sewing the head easier and stronger; weave the tail through and secure well.
  • πŸ’‘Do not overstuff small areas like arms; the pattern states the arms are not filled for a neater finish and easier sewing.

This adorable Trick or Treat Sam amigurumi is perfect for Halloween displays or as a spooky gift. The pattern balances simple construction with playful details like the ruffled collar and stitched patch. Make one in traditional orange and beige or customize the colors for your own twist. πŸ§ΆπŸŽƒ

You ask,

we answer.

FAQs

What size will the finished piece be?

The finished amigurumi size depends on your yarn and hook, but using the recommended Alize Cotton and a 2.00 mm hook will create a small doll roughly pocket-sized (about 12-17 cm tall depending on tension).

Can I use different yarn weights for this pattern?

Yes, you can use different yarn weights, but the final size will change; use an appropriate hook for your chosen yarn and expect to adjust stuffing and placement of features accordingly.

Do I need prior crochet experience for this pattern?

This pattern is rated intermediate, so basic knowledge of single crochet, increases, decreases, working in rounds, and joining pieces is recommended for the best results.

How long does this project typically take to complete?

Most crocheters complete this project in 5-7 hours, depending on experience and the amount of detailing or embroidery you add.