🧶 Beautiful ✨ Detailed 💝 Adorable

Top Hat Teddy Amigurumi Pattern

Top Hat Teddy Amigurumi Pattern
4.2★ Rating
8-10 Hours Time Needed
2.3K Made This
✂️

Intermediate Level

Ideal for those with basic crochet experience, featuring slightly more advanced stitches and techniques to expand your skills.

⏱️

All-Day Adventure

Requires 8-10 hours, ideal for a full day of immersive crocheting.

🧸

Cute Companion

An adorable friend to cherish, handcrafted with love to bring comfort and joy for years to come.

About This Top Hat Teddy Amigurumi Pattern

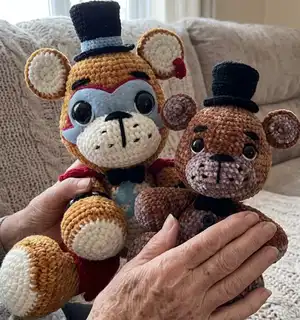
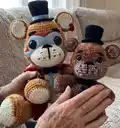
This pattern creates a lovable teddy bear complete with a top hat and felt face details, designed in two size variations (Top Hat Teddy and Rockstar Top Hat Teddy). You will crochet the body, head, snout, ears, arms, legs, hat and assemble felt overlays for a finished character with lots of personality. The pattern includes photo tutorials for felt placement and step-by-step sewing instructions for a neat finish.

Top Hat Teddy Amigurumi Pattern crochet pattern - detailed view of completed project

Detailed rounds and color-change notes are provided so you can follow along easily. The pattern also includes alternate instructions and tips for the Rockstar Top Hat Teddy variation.

Why You'll Love This Top Hat Teddy Amigurumi Pattern

I absolutely love this pattern because it blends classic amigurumi shaping with playful costume details like the top hat and felt face overlay. I enjoy the way the snout and felt pieces transform the face and give each bear its own character. The step-by-step photos make assembly feel approachable and fun, even when working with multiple materials. I also love how customizable it is—swap yarn colors or felt to create an entire family of unique teddies.

Top Hat Teddy Amigurumi Pattern step 1 - construction progress Top Hat Teddy Amigurumi Pattern step 2 - assembly progress Top Hat Teddy Amigurumi Pattern step 3 - details and accessories Top Hat Teddy Amigurumi Pattern step 4 - final assembly and finishing

Switch Things Up

I love how customizable this pattern is: change the yarn colors to create a pastel baby bear or a bold superhero-themed teddy.

You can make the bear larger or smaller by switching yarn weight and hook size; try bulky yarn with a larger hook for a squishier chunky bear or smaller yarn for a mini keychain version.

I often replace felt pieces with embroidered faces for a softer, fully yarn look—this is great for baby-safe toys (avoid small safety eyes for babies).

If you want a sturdier brim on the top hat, glue a thin piece of recycled cardboard between felt layers before sewing it together.

Try using different eye types: safety eyes for a polished look, stitched eyes for a handmade charm, or embroidered highlights for expressive faces.

For posability, consider adding pipe cleaner or floral wire inside the limbs, but secure ends carefully so they do not poke through the crochet fabric.

I sometimes add removable accessories like scarves or tiny crocheted bow ties to change the bear's look seasonally or for gifting occasions.

Want more character? Alter eyebrow placement and mouth embroidery to make the bear look surprised, grumpy, or delighted—small changes make big personality shifts.

Swap the top hat for a tiny crocheted beanie or crown to create themed collections—holiday, birthday, or fandom variations work great.

Finally, I recommend experimenting with texture by mixing plush chenille with a small contrast of regular acrylic yarn for facial details, which creates crisp edges that stand out against the fuzzy body.

Common Mistakes & How to Fix Them

✗ Skipping the invisible decrease method can leave visible gaps; use the invisible decrease for all decreases to keep a smooth finish. ✗ Not reading the entire pattern before starting can lead to confusion during shaping; read through the whole pattern first to understand placement and color changes. ✗ Forgetting to mark rounds where safety eyes are placed will make facial placement inconsistent; temporarily pin or mark eye placement and check alignment with the snout before securing. ✗ Stuffing too early or unevenly causes lumps and distorted shaping; stuff gradually and evenly while shaping, adding small amounts at a time to maintain the intended silhouette. ✗ Changing yarn weight without adjusting hook size will alter final size and stitch tension; choose a hook appropriate for your yarn weight or expect the finished toy to be larger or smaller.

Top Hat Teddy Amigurumi Pattern

Create a charming Top Hat Teddy with this detailed crochet pattern that guides you through every step from body shaping to felt face details. You will learn simple color changes, snout construction, and how to sew on felt pieces for a polished look. Perfect for crafters who enjoy plush toys with personality and decorative accessories.

Intermediate 8-10 Hours

Materials Needed for Top Hat Teddy Amigurumi Pattern

— Main Fabric

  • 01
    Premier Just Chenille yarn in the color 'Cocoa Brown' (3 skeins) for Top Hat Teddy
  • 02
    Bernat Velvet yarn in the color 'Mushroom' (1 skein) for Top Hat Teddy snout and belly
  • 03
    Red Heart Super Saver in Black (1 skein) for details
  • 04
    Red Heart Super Saver in White (1 skein) for felt sewing / details
  • 05
    Polyester stuffing (amount as needed)
  • 06
    Loops & Threads Chenille Home Slim in the color 'Mustard' (2 skeins) for Rockstar Top Hat Teddy
  • 07
    Sweet Snuggles Lite in the color 'Winter White' (1 skein) for Rockstar Top Hat Teddy snout
  • 08
    Bernat Blanket in the color 'Crimson' (1 skein) for Rockstar details
  • 09
    Yarn Bee in the color 'Charcoal' (1 skein) for Rockstar details
  • 10
    Premier Just Chenille yarn in the color 'Light Blue' (1 skein) for Rockstar Top Hat Teddy face

— Tools Required

  • 01
    Stitch markers
  • 02
    Sewing pins
  • 03
    Yarn needle
  • 04
    Scissors
  • 05
    Embroidery needle
  • 06
    Hot glue gun & hot glue
  • 07
    4mm crochet hook (for Top Hat Teddy - recommended)
  • 08
    6mm crochet hook (for Rockstar Top Hat Teddy - recommended for Super Bulky yarn)
  • 09
    2 black buttons (for Top Hat Teddy decoration)
  • 10
    2 (18mm) safety eyes (for Top Hat Teddy)
  • 11
    2 (30mm) safety eyes (for Rockstar Top Hat Teddy)
  • 12
    12 pyramid studs (for Rockstar Top Hat Teddy accessories - optional)
  • 13
    Piece of cardboard (recycled scrap) for hat/brim support
  • 14
    Black embroidery thread and white embroidery thread (optional for details)

Progress Tracker

0% Complete

— Body :

Info :

While crocheting the body, we will color change to make the belly. In the black text, are the stitches to be made in 'Cocoa Brown' for Top Hat Teddy (4mm), or Mustard for Rockstar Top Hat Teddy (6mm). In the Pink text are the stitches to be made in 'Mushroom' for Top Hat Teddy (4mm), or 'Winter White' for Rockstar Top Hat Teddy (6mm).

Round 1 :

Mr 6 sc (6)

Round 2 :

Inc x6 (12)

Round 3 :

(Sc, inc) x6 (18)

Round 4 :

sc, inc, (sc 2, inc) x5, sc (24)

Round 5 :

(sc 3, inc) x6 (30)

Round 6 :

Sc 2, inc, (sc 4, inc) x5, sc 2 (36)

Round 7 :

(sc 5, inc) x6 (42)

Round 8 :

Sc 3, inc, (sc 6, inc) x6, sc 3 (48)

Round 9 :

(sc 7, inc) x6 (54)

Round 10 :

Sc 24, sc 13, sc 17 (54)

Round 11 :

Sc 23, sc 15, sc 16 (54)

Round 12 :

Sc 22, sc 17, sc 15 (54)

Round 13 :

Sc 22, sc 17, sc 15 (54)

Round 14 :

(sc 7, dec) x2, sc 4, sc 3, dec, sc 7, dec, sc 3, sc 4, dec, sc 7, dec (48)

Round 15 :

Sc 21, sc 13, sc 14 (48)

Round 16 :

Sc 3, dec, (sc 6, dec) x2, sc 6, dec, sc 5, sc, dec, sc 6, dec, sc 3 (42)

Round 17 :

Sc 18, sc 12, sc 12 (42)

Round 18 :

(sc 5, dec) x2, sc 4, sc, dec, sc 5, dec, sc 2, sc 3, dec, sc 5, dec (36)

Round 19 :

Sc 17, sc 8, sc 11 (36)

Round 20 :

Sc 17, sc 8, sc 11 (36)

Round 21 :

Sc 2, dec, (sc 4, dec) x2, sc 2, sc 2, dec, sc 2, dec, sc 4, dec, 2sc (30)

Round 22 :

Sc around (30)

Round 23 :

(sc, dec) x10 (20)

Info :

Make a slip stitch and fasten off, leaving a long tail for sewing later. Stuff and put the finished body off to the side, and move onto the snout.

— Snout :

Info :

Use 'Mushroom' for Top Hat Teddy (4mm), or 'Winter White' for Rockstar Top Hat Teddy (6mm). Ch 11 and work in a continuous spiral around both sides of the chain.

Round 1 :

Starting in the 2nd ch from hook - inc, sc 8, inc. Now flip your work and continue onto the other side of the ch, your first sc will be in the same ch you just worked in, just on the opposite side- inc, sc 8, inc (24)

Info :

TIP: For this pattern, I crochet into the front and back loop of each chain, so on the first side, I will be crocheting into all 10 front loops. When I flip to the other side, I am crocheting into ALL 10 back loops of the chain. (ignoring the 11th chain)

Round 2 :

Sc, inc, sc 8, (sc, inc) x2, sc 9, inc (28)

Round 3 :

Sc 2, inc, sc 8, (sc 2, inc) x2, sc 10, inc (32)

Round 4 :

Sc around (32)

Round 5 :

Sc 3, inc, sc 8, (sc 3, inc) x2, sc 11, inc (36)

Round 6 :

Sc 4, inc, sc 8, (sc 4, inc) x2, sc 12, inc (40)

Info :

Finish off with a slip stitch and then fasten off your piece. Leave a long tail for sewing. Set aside for now.

— Head :

Info :

Use 'Cocoa Brown' for Top Hat Teddy (4mm), or 'Mustard' for Rockstar Top Hat Teddy (6mm).

Round 1 :

Mr 6 sc (6)

Round 2 :

Inc x6 (12)

Round 3 :

(Sc, inc) x6 (18)

Round 4 :

Sc, inc, (sc 2, inc) x5, sc (24)

Round 5 :

(sc 3, inc) x6 (30)

Round 6 :

Sc 2, inc, (sc 4, inc) x5, sc 2 (36)

Round 7 :

(sc 5, inc) x6 (42)

Round 8 :

Sc 3, inc, (sc 6, inc) x5, sc 3 (48)

Round 9 :

(sc 7, inc) x6 (54)

Round 10-15 :

Sc around (54) 6 ROUNDS

Round 16 :

Sc, inc, (sc 2, inc) x17, sc (72)

Round 17 :

(sc 3, inc) x18 (90)

Round 18 :

Sc around (90)

Round 19 :

(sc 3, dec) x18 (72)

Round 20 :

Sc around (72)

Round 21 :

Sc, dec, (sc 2, dec) x17, sc (54)

Round 22 :

Sc around (54)

Round 23 :

(sc 7, dec) x6 (48)

Round 24 :

Sc around (48)

Round 25 :

Sc 3, dec, (sc 6, dec) x5, sc 3 (42)

Round 26 :

Sc around (42)

Round 27 :

(sc 5, dec) x6 (36)

Round 28 :

Sc 2, dec, (sc 4, dec) x5, sc 2 (30)

Info :

Pause here and follow the steps on pg. 11 for Top Hat Teddy or pg. 13 for Rockstar Top Hat Teddy.

Round 29 :

(sc 3, dec) x6 (24)

Round 30 :

Sc, dec, (sc 2, dec) x5, sc (18)

Round 31 :

(Sc, dec) x6 (12)

Info :

Stuff a little more.

Round 32 :

Dec x6 (6)

Info :

Fasten off, and set aside for assembly later on.

— For Top Hat Teddy :

Step 1 :

I add stuffing temporarily to make sure I like the way everything looks before I secure the safety eyes. Place 18mm safety eyes between rounds 15-16, making them about 9-10 stitches apart, but don't secure them just yet. I like to have my snout ready to put on at this point to make sure I like the placement of the eyes in congruence with the snout. The top of the snout gets sewn on between rounds 16-17, and stretches down 8 rounds, ending between rounds 24-25. Make sure to stuff the snout before closing it off.

Step 2 :

Add all of the snout details. You can see more detailed instructions on this in step 13 (pg.18) of the Rockstar Top Hat Teddy section below. Then unstuff the head enough to secure the safety eyes and add the eye details. To do this, start with white yarn on your yarn needle and insert your needle anywhere in the head, then bring it out between rounds 15-16 just in front of the safety eye. Put your needle back into the same row on the opposite side of the safety eye. This will create the whites of the eyes. Using the same strand of yarn, do this for the other eye as well. And then tie off the yarn and tuck it into the head.

Step 3 :

Using black yarn, bring your yarn and needle between rounds 14-15 in the stitch just next to the safety eye. Then insert your needle between rounds 16-17 in the stitch just next to the eye. Using the same strand of black yarn, do this to the other eye as well. And then tie off the yarn and tuck it into the head.

Step 4 :

Sew on the eyebrows. They start between rounds 11-12 and then end between rounds 12-13, and are about 4-5 stitches in length. They are about 7 stitches away from each other. Make the eyebrows about 5-6 layers thick, or until they're your desired thickness. Tie off your yarn tails and tuck them into the head. Continue onto round 29 (pg. 10).

Assembly Instructions

  • Attach head to body by aligning the base of the head opening (closed at round 32 with 6 sts) to the top of the body opening and sew securely using a whipstitch with a long yarn tail.
  • Sew on the snout between rounds 16-17 at the top and down to rounds 24-25 at the bottom; stuff the snout before closing and stitch firmly to the head.
  • Position safety eyes between rounds 15-16, roughly 9-10 stitches apart for Top Hat Teddy (18mm eyes) and check alignment with the snout before securing.
  • Pin and sew felt face pieces (blue then red backing for the Top Hat Teddy) over the snout area following the photo guidelines; trim felt after marking to match snout shape.
  • Sew eyebrows and embroidered mouth/freckles with black embroidery thread, using the photo step guide to place freckles and mouth lines accurately.
  • Assemble top hat and brim with a piece of cardboard for support if desired, then attach hat to top of head centered between ears.

Important Notes

  • 💡This pattern is used in US terminology only; make sure you are working with US stitch names.
  • 💡The designer uses the yarn under/yarn over method; you may use whichever method you prefer but maintain consistency.
  • 💡All decreases in this pattern use the invisible decrease method to avoid large gaps; the pattern highly recommends the invisible decrease.
  • 💡Read through the entire pattern before beginning to understand placement and how pieces will come together during assembly.
  • 💡Red text indicates instructions that are specific to the Rockstar Top Hat Teddy variation only; follow those lines only if you are making that version.

Make this charming Top Hat Teddy as a special keepsake or a thoughtful handmade gift that will be loved for years. The pattern walks you through both crochet shaping and felt assembly for a polished finished friend. Enjoy the process and customize color, hat style, and facial details to make each bear uniquely yours. 🧶✨
You ask,

we answer.

FAQs

What size will the finished piece be?

The finished Top Hat Teddy size will vary with yarn weight and hook size; using the recommended chenille with a 4mm hook produces a medium plush approximately 25-30 cm tall depending on stuffing and assembly.

Can I use different yarn weights for this pattern?

Yes, you can use different yarn weights, but this will affect final size and stitch counts; the pattern includes separate notes for a Rockstar Top Hat Teddy worked in thicker yarn with a 6mm hook.

Do I need prior crochet experience for this pattern?

This pattern is rated intermediate; basic knowledge of single crochet, increases, decreases, and sewing pieces together is recommended for best results.

How long does this project typically take to complete?

Most crocheters complete this project in 8-10 hours, though time may vary based on experience level, chosen yarn, and detail work like felt assembly.