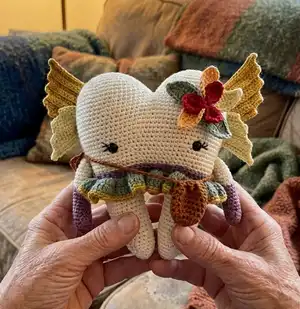
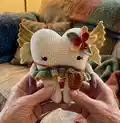
Make a whimsical Tooth Fairy amigurumi that doubles as a tiny keepsake and play friend. This pattern guides you through shaping a heart-shaped tooth body, ruffled skirt, tiny wings, leaves and a crossbody satchel. You will enjoy thoughtful shaping techniques and colorwork that make this little fairy full of charm. Perfect as a handmade gift or a sweet nursery decoration.
Progress Tracker
0% Complete
— Tooth :
Info :
NOTES: The tooth is worked in continuous rounds from the top down - do not join after each round. You will make two 'cups' which will be joined to create the top bumps. Then, you will crochet around them and continuously until you split for the roots which are also crocheted in continuous rounds. Use size 4.00mm hook for the tooth
Item Name (CUPS - make 2) :
Rnd 1: st 6 in a magic circle [6]
Round 2 :
inc in each st around [12]
Round 3 :
(sc, inc) x6 [18]
Round 4 :
(sc 2, inc) x6 [24]
Round 5 :
(sc 3, inc) x6 [30]
Round 6 :
(sc 4, inc) x6 [36]
Round 7 :
(sc 5, inc) x6 [42]
Round 8 :
(sc 6, inc) x6 [48] PHOTO 01
Round 9-13 :
sc around [48] PHOTO 02
Info :
Fasten off the first cup. Do not fasten off the second one as you will continue with your working yarn to join the cups and continue on with the rest of the tooth.
Info :
JOIN CUPS: Hold the two cups side by side and join by making 6 slip stitches through Rnd 13 of both pieces to join PHOTO 03 & 04
Info :
Begin straight away where you left off with your last sl st...
Round 14-22 :
sc around [84]
Round 23 :
(sc 12, dec) x6 [78]
Round 25 :
(sc 11, dec) x6 [72]
Round 26-27 :
sc around [72]
Round 28 :
(sc 10, dec) x6 [66]
Round 29-30 :
sc around [66]
Round 31 :
(sc 9, dec) x6 [60]
Round 32-34 :
sc around [60] PHOTO 05
Info :
Insert safety eyes between rounds 24 and 25, spaced by 20 stitches. Using a tapestry needle, embroider on eyelashes. Stuff tooth. PHOTO 06
— Roots :
Info :
NOTES: The roots are worked in continuous rounds - do not join after each round
Info :
Split your work for the roots: Each root will have 24 st, and then there will be 12 stitches (6 from front and 6 from back) that will be crocheted closed for the gap between the roots. Use stitch markers to mark these stitches as described. PHOTO 07
Info :
Give or take a few stitches to be sure your hook is positioned in the stitch just before what's about to become the gap between the roots. Hold the two sides of the tooth closed - 6 stitches against 6 stitches and slip stitch the two sides together (12 stitches - 6 from front and 6 from back) PHOTO 08 Then continue straight away into round 35 without fastening.
Round 35-46 :
sc in each st around [24] STUFF
Info :
TIPS: A) I suggest placing a stitch marker on your first st of Rnd 35 so you can easily find it as you come back around. PHOTO 09. B) the start of rnd 36 will connect the front to the back, closing the rounds for the first root.
Round 47 :
(sc 2, dec) x6 [18]
Round 48-49 :
sc around [18]
Round 50 :
(sc, dec) x6 [12]
Round 51-52 :
sc around [12] STUFF / PHOTO 10 & 11
Info :
Snip leaving a long tail and pull through final two loops. Using a tapestry needle and the yarn tail, weave through the front loops of the final 6 stitches and pull tightly to close. Bring to the inside and back out a side wall. Snip cleanly with the surface. PHOTO 12
Info :
Rejoin yarn on the other side of the 6-slip stitch-gap, and repeat Rounds 35-53 for second root. Fasten off and close as directed for first root above. PHOTO 13
— Skirt :
Info :
NOTES: The skirt is worked in continuous rounds - do not join after each round. Use size 3.00mm hook for the skirt
Info :
Start with the purple yarn.
Round 1 :
fsc 70 [70] PHOTO 14
Info :
Switch to green yarn.
Round 3 :
make 3 dc in each st around [210] PHOTO 15
Round 4 :
dc around [210] PHOTO 16
Info :
Switch to gold yarn.
Round 5 :
sc around [210] PHOTO 17
Info :
Fasten off and weave in end. Put skirt on tooth. Using a tapestry needle and a VERY long strand of purple yarn, weave the tapestry needle from front to back in between the first row (purple) of the skirt, several times to secure the skirt to the tooth. PHOTO 18
— Crossbody Satchel :
Info :
Use the brown yarn & 3.00mm hook
Round 1 :
st 6 hdc in a magic circle [6]
Round 2 :
hdc inc around [12]
Round 3 :
(hdc, hdc inc) x6 [18]
Round 4-7 :
hdc around [18]
Round 8 :
dc around [18] PHOTO 19
Info :
Fasten off and weave in end.
Info :
Make drawstring: chain 150. Knot off ends. Weave in and out of round 8 (dc round) and cinch to close. If you're using beads for the ends of the drawstring, put those on now. PHOTO 20
— Arms :
Info :
NOTES: The arms are worked in continuous rounds - do not join after each round. Use size 3.00mm crochet hook. You will start with the purple yarn for the gloves and switch to the tooth color to complete the arms
Info :
Start with purple yarn.
Round 1 :
st 6 in a magic circle [6]
Round 2 :
inc in each st around [12]
Round 3-5 :
sc around [12]
Round 6 :
4-DcBo in next st, sc in next 11 st [12]
Round 7-14 :
sc around [12]
Round 15 :
sl st around [12]
Info :
Refer to PHOTOS 21-25 below to complete the glove and color change as follows: Remove your hook from the loop and insert it under the next st from back to front. Snatch your loop and pull it to the back, then switch to white by yarning over with white and pulling it through the purple loop.
Info :
Pull on the ends to tighten. After you make a few stitches of Rnd 16, tie those purple and white ends together and stuff them inside. For round 16, you will work in the BLO of the purple from Rnd 14, found just behind the Rnd 15 of slip stitches.
Round 16 :
BLO sc around [12] PHOTO 26
Round 17-23 :
sc around [12]
Info :
Sl st to fasten off and pull through loop, leaving a long tail for sewing on. Stuff very lightly and sew arms to sides of body over round 25, spaced about 7 stitches away from the eye. PHOTOS 27-29
— Wings: Large (make 2) :
Info :
NOTES: The wings are made by crocheting turning rows of half double crochet in the BACK LOOP ONLY. You will work into a magic circle - do not close the magic circle until all the rows are complete as you will need to be making slip stitches into the magic circle (see photos 30-34 for reference). Chain 1 and turn at the end of every row. Use the gold yarn
Info :
Leaving a long starting tail, begin by making a magic circle and slip knot onto your hook - do not close the magic circle. PHOTO 30 Then, chain 23.
Round/Row 1 :
hdc in the 2nd back bump ch from hk and in each back bump ch thereafter [22] PHOTO 31
Row 2 :
BLO hdc across, sl st into the magic circle, ch 1, turn [22] PHOTO 32
Row 3 :
BLO hdc in next 19 st, leave final 3 st unworked [19]
Row 5 :
BLO hdc in next 16 st, leave final 3 st unworked [16]
Row 7 :
BLO hdc in next 13 st, leave final 3 st unworked [13]
Row 9 :
BLO hdc in next 10 st, leave final 3 st unworked [10] PHOTO 33
Info :
Fasten off and weave in end. Pull magic circle tightly to close and cinch the wing. PHOTO 34
— Wings: Small (make 2) :
Info :
NOTES: Refer to the notes and photos for 'wings: large' as the small wings are made using the same method, just using shorter rows. Use the light green yarn
Info :
Leaving a long starting tail, begin by making a magic circle and slip knot onto your hook - do not close the magic circle. Then, chain 20.
Row 1 :
hdc in 2nd back bump ch from hk and in each back bump ch thereafter [19]
Row 2 :
BLO hdc across, sl st into the magic circle, ch 1, turn [19]
Row 3 :
BLO hdc in next 16 st, leave final 3 st unworked [16]
Row 5 :
BLO hdc in next 13 st, leave final 3 st unworked [13]
Row 7 :
BLO hdc in next 10 st, leave final 3 st unworked [10]
Info :
Fasten off and weave in end. Pull magic circle tightly to close.
— Assemble and Attach the Wings :
Info :
1. Arrange the wings with the large on top and the small beneath - PHOTO 35. 2. Lay the small wings over top the large wings so that they have one row overlapping and are angled as shown in the photo - PHOTO 36 & 37. 3. Using the tail end of the small wing, sew the wings together (the stitches that show will be covered over with a leaf) - PHOTO 38. 4. Sew wings to the back of the tooth over rounds 10-15 using the photos as a guide for placement PHOTO 39
— Leaves :
Info :
NOTES: The leaves are worked by making a chain and crocheting around both sides of it. You will make 10 leaves - 5 large and 3 small will be used for the leaf flower and 2 will be used as part of the wings on the back - to cover over the stitches that show when sewing the wings together
Item Name (LARGE LEAVES) :
make 7 in your choice of color (I made 3 using the dark green yarn, 2 using the light green yarn and 2 using the peach yarn which were leftovers I had on hand): Begin by chaining 12.
Round/Row 1 :
sc in 2nd ch from hk, hdc in next ch, dc in next 2 ch, tr in next 3 ch, dc in next 2 ch, hdc in next ch, sc in next ch. PHOTO 40 Continue onto the other side of the chain, and repeat the pattern for the 2nd side of the leaf. PHOTO 41
Info :
Sl st to next st and fasten off. Leave a long tail on ONE of the leaves for sewing them all together. On the other leaves, weave in ends.
Item Name (SMALL LEAVES) :
make 3, using the red yarn: Begin by chaining 8.
Row 1 :
sc in 2nd ch from hk, hdc in next ch, dc in next ch, tr in next ch, dc in next ch, hdc in next ch, sc in next ch. Continue onto the other side of the chain, and repeat the pattern for the 2nd side of the leaf.
Info :
Sl st to next st and fasten off. Leave a long tail on ONE of the leaves for sewing them to the leaf flower. On the other leaves, weave in ends.
— Leaf Flower Assembly :
Step 1 :
Arrange 5 of the large leaves in a flower formation - PHOTO 42
Step 2 :
Using the long tail from one of the leaves, sew them together - PHOTOS 43 & 44
Step 3 :
Arrange the 3 small leaves on top of the large flower and sew them on - PHOTO 45
Step 4 :
Sew the leaf flower onto the tooth at round 16, centered on the tooth 'cup' - PHOTO 46
Step 5 :
Sew the additional 2 large flowers over the middle of the wings on the back to cover any stitches showing on the wings - PHOTO 47
This Tooth Fairy amigurumi pattern is a delightful mix of sculptural shaping and sweet accessories you can personalize with scraps of DK yarn. Create a ruffled skirt, layered wings, and a tiny crossbody satchel to make a memorable gift or nursery friend. Have fun mixing colors, and enjoy the assembly and finishing touches that make this little fairy truly special. 🧶🧚