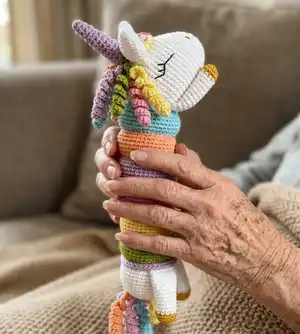
Make a cuddly, pastel striped unicorn named Tiffy with this friendly crochet pattern. You will create a sweet head, donut rings body, mane, tail and tiny wings using simple stitches. The design is beginner-friendly and perfect for gifting or nursery decor. Follow the clear step-by-step rounds and assembly instructions to bring Tiffy to life.
Progress Tracker
0% Complete
— Donut Ring (make 6) :
Info :
With color of choice
Round Ch :
Ch 24, join with sl st to the first chain / Do not twist the yarn.
Round 1 :
ch 1, sc in same space as prev. sl st, sc around, join round with sl st [24]
Round 2 :
ch 1, (3 sc, inc) x 6, join round with sl st [30]
Info :
Change color of your choice.
Round 3 :
ch 1, 2 sc, inc, (4 sc, inc) x 5, 2 sc, join round with sl st [36]
Round 4 :
ch 1, (5 sc, inc) x 6, join round with sl st [42]
Round 5 :
ch 1, 3 sc, inc, (6 sc, inc) x 5, 3 sc, join with sl st [48]
Infos :
Change color of your choice. Rnds 6-9 (4 rows): ch 1, sc around, join with sl st [48]
Round 10 :
ch 1, (6 sc, dec) x 6, join round with sl st [42]
Round 11 :
ch 1, 2 sc, dec, (5 sc, dec) x 5, 3 sc, join round with sl st [36]
Round 12 :
ch 1, (4 sc, dec) x 6, join round with sl st [30]
Info :
Change color of your choice.
Round 13 :
ch 1, (3 sc, dec) x 6, join round with sl st [24]
Round 14 :
ch 1, sc around, join round with sl st [24]
Info :
Fasten off, leaving a long tail for sewing.
Info :
Using needle and thread, sew Rnd 1 and Rnd 14 together while stuffing with fiberfill before finishing.
— Head :
Round 1 :
6 sc in magic ring [6]
Round 3 :
(sc, inc) x 6 [18]
Round 4 :
sc, inc, (2 sc, inc) x 5, sc [24]
Round 5 :
(3 sc, inc) x 6 [30]
Rounds 6 - 7 :
sc around [30]
Round 8 :
12 sc, 6 inc, 12 sc [36]
Round 9 :
12 sc, (sc, inc) x 6, 12 sc [42]
Round 10 :
12 sc, (2 sc, inc) x 6, 12 sc [48]
Round 11 :
13 sc, inc, (3 sc, inc) x 5, 14 sc [54]
Rounds 12 - 18 :
sc around [54]
Round 19 :
13 sc, dec, (3 sc, dec) x 5, 14 sc [48]
Round 20 :
12 sc, (2 sc, dec) x 6, 12 sc [42]
Round 21 :
12 sc, (sc, dec) x 6, 12 sc [36]
Round 22 :
(4 sc, dec) x 6 [30]
Round 23 :
2 sc, dec, (3 sc, dec) x 5, sc [24]
Info :
Stuff the head firmly with fiberfill.
Round 24 :
(dec, 2 sc) x 6 [18]
Info :
Fasten off, leaving a long tail for sewing and sew close.
Info :
Using your yarn needle, weave the yarn tail through the front loop of each remaining stitch and pull it tight to close.
— Butt :
Info :
Start with white yarn
Round 1 :
6 sc in magic ring [6]
Round 3 :
(sc, inc) x 6 [18]
Round 4 :
sc, inc, (2 sc, inc) x 5, sc [24]
Round 5 :
(3 sc, inc) x 6 [30]
Round 6 :
2 sc, inc, (4 sc, inc) x 5, 2 sc [36]
Round 7 :
(5 sc, inc) x 6 [42]
Round 8 :
3 sc, inc, (6 sc, inc) x 5, 3 sc [48]
Rounds 9 - 14 :
sc around [48]
Info :
Change color of your choice.
Round 15 :
(6 sc, dec) x 6 [42]
Round 16 :
3 sc, dec, (5 sc, dec) x 5, 2 sc [36]
Round 17 :
(4 sc, dec) x 6 [30]
Info :
Change color of your choice.
Round 18 :
sc, dec, (3 sc, dec) x 5, 2 sc [24]
Round 19 :
(2 sc, dec) x 6 [18]
Info :
Stuff the butt firmly with fiberfill. Fasten off, weave in ends.
Info :
Using your two thumbs, push out the center poly fiber into a hole wide and deep enough to fit the insert.
— Inside of the Butt :
Info :
With color of your choice
Round 1 :
6 sc in magic ring [6]
Round 3 :
(sc, inc) x 3 [18]
Rounds 4 - 10 :
sc around [18]
Info :
Fasten off, leaving a long tail for sewing.
Info :
Sew inside of the butt into the butt.
— Pillar :
Info :
With color of your choice
Round 1 :
6 sc in magic ring [6]
Round 3 :
(3 sc, inc) x 3 [15]
Info :
Stuff the pillar firmly with fiberfill as you go along
Rounds 4 - 47 :
sc around [15]
Info :
Fasten off, leaving a long tail for sewing and sew to the head.
— Leg (make 4) :
Info :
Starting with yellow gold yarn
Round 1 :
6 sc in magic ring [6]
Round 2 :
(sc, inc) x 3 [9]
Info :
Change color to white yarn
Rounds 4 - 14 :
sc around [9]
Info :
Stuff the leg with fiberfill.
Round 15 :
Flatten the opening of the leg and sc in each of next 4 stitches through both layers to close the opening.
Info :
Fasten off, leaving a long tail for sewing.
— Horn :
Info :
With color of your choice
Round 1 :
4 sc in magic ring [4]
Round 2 :
(sc, inc) x 2 [6]
Info :
BLO >> we'll work now in back loop only
Round 3 :
(2 sc, inc) x 2 [8]
Round 4 :
(3 sc, inc) x 2 [10]
Round 5 :
(4 sc, inc) x 2 [12]
Rounds 6 - 12 :
sc around [12]
Info :
Join with sl st, ch 1, turn
Info :
FLO >> we'll work now in front loop only
Info :
sl st in every stitch from Rnd 12 till Rnd 3.
Info :
Fasten off, leaving a long tail for sewing.
Info :
Stuff the horn with fiberfill.
— Mane :
SHORT (make 5) :
With color of your choice. Ch 30, Rnd 1: (starting from 2nd chain from hook), inc in every st to the end. Fasten off, leaving a long tail for sewing.
LONG (make 5) :
With color of your choice. Ch 40, Rnd 1: (starting from 2nd chain from hook), inc in every st to the end. Fasten off, leaving a long tail for sewing.
— Tail (make 5) :
Info :
With color of your choice
Round Ch :
Ch 30, Rnd 1: (starting from 2nd chain from hook), inc in every st to the end. Fasten off, leaving a long tail for sewing.
— Wing (make 2) :
Round 1 :
(starting from 2nd chain from hook), 4 sc, 5 sc in last ch, continue all round to other side of chain, 2 sc, ch 1, turn [11]
Round 2 :
3 sc, 3 inc, 5 sc, ch 3, turn [14]
Round 3 :
(starting from 2nd chain from hook), 2 sc, 12 sc, ch 1, turn [14]
Info :
Fasten off invisibly, leaving a long tail for sewing.
— Ear (make 2) :
Round 1 :
6 sc in magic ring [6]
Round 2 :
(sc, inc) x 3 [9]
Round 3 :
(2 sc, inc) x 3 [12]
Round 4 :
(3 sc, inc) x 3 [15]
Round 5 :
(4 sc, inc) x 3 [18]
Rounds 6 - 9 :
sc around [18]
Round 10 :
(sc, dec) x 6 [12]
Info :
Flatten the opening of the ear and sc in each of next 6 stitches through both layers to close the opening.
Info :
Fold the ear and sew a few stitches. Fasten off, leaving a long tail for sewing.
— Assembly :
Item 1 :
Sew the donut rings, using needle and thread, sew Rnd 1 and Rnd 14 together while stuffing with fiberfill before finishing.
Item 2 :
Stuff the butt with fiberfill, using your two thumbs, push out the center poly fiber into a hole wide and deep enough to fit the insert, sew inside the butt into the butt.
Item 3 :
Sew the tail to the butt. The top of each tail should be sewn between Rnd 7 and 8 of the butt, sew all the tails together to form a bunch.
Item 4 :
Sew the wings onto the donut ring between Rnd 7 and 8 of the donut ring.
Item 5 :
Sew the horn over rows 15 and 17 of the head.
Item 6 :
Sew the ears to the head, over rows 15 and 17, keep 3 stitches from the horn apart.
Item 7 :
Sew the mane to the head. Switch between long and short mane pieces for a layered effect.
Item 8 :
Sew the legs to the head. The top of each leg should be sewn between Rnd 20 and 21 of the head, between both legs keep 8 stitches apart. Sew a few extra stitches (4-5 stitches) along each leg to hold the legs snug against the head.
Item 9 :
Embroider the eyes with black yarn over rows 11 and 15.
Item 10 :
Embroider the nose with black yarn over rows 4 and 5.
Item 11 :
Sew the legs to the butt. The top of each leg should be sewn between Rnd 14 and 15 of the butt, between both legs keep 7 stitches apart. Sew a few extra stitches (4-5 stitches) along each leg to hold the legs snug against the butt.
Item 12 :
Sew the pillar to the head and attach assembled donut-ring body to the pillar. Your unicorn is finished.
Thank you for making Tiffy the Sleepy Unicorn — a whimsical, handmade friend full of pastel charm! Your finished unicorn will brighten any nursery or make a thoughtful, personalized gift. Enjoy the finishing touches and share your creation with pride. 🧶🦄