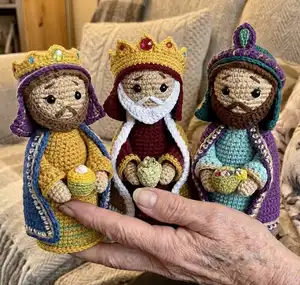
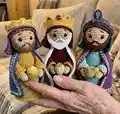
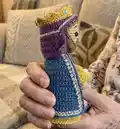
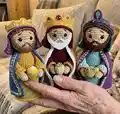
Create a charming set of three Wise Men amigurumi dolls with this detailed intermediate crochet pattern. You will make bodies, heads, beards, headpieces, mantles and tiny gifts with clear step-by-step instructions. The pattern uses sport/4-ply yarn and small hooks to achieve delicate, collectible figures you can personalize. Perfect for holiday displays or handmade gifts, each piece is fully assembled and decorated with beads and faux rhinestones.
Progress Tracker
0% Complete
— Arms (Balthazar, make 2) :
Start :
Start with beige yarn, hook 2.25 mm
Rnd 3-6 :
10 sc (4 rounds)
Info :
Change to burgundy yarn. Cut the beige yarn. (fig.1)
Rnd 7-9 :
10 sc (3 rounds)
Rnd 11-20 :
10 sc (10 rounds)
Info :
Stuff only the lower 2/3 of the arm. Fold the arm in half and crochet through two layers 5 sc. Fasten off and weave in the yarn tail inside the piece. (fig.2)
Section :
Sleeves decoration: Hold the arm with the hand pointing up, attach burgundy yarn color to the first unused front loop of round 9. (fig.3)
Rnd 1 :
(1 sc, inc)*5 (15)
Rnd 2 :
(2 sc, inc)*5 (20)
Info :
Change to mustard yarn. Cut the burgundy yarn.
Rnd 4 :
(1 sc, ch 1)*20, slst
Info :
Fasten off and weave in the yarn tail inside the piece. (fig.4)
— Body (Balthazar) :
Start :
Start with burgundy yarn, hook 2.25 mm
Rnd 3 :
(1 sc, inc)*8 (24)
Rnd 4 :
(3 sc, inc)*6 (30)
Rnd 5 :
2 sc, inc, (4 sc, inc)*5, 2 sc (36)
Rnd 6 :
(5 sc, inc)*6 (42)
Rnd 7 :
(13 sc, inc)*3 (45)
Info :
Trace the bottom of the piece on a cardboard and cut it out. (fig.5)
Info :
Change to mustard yarn. Do not cut the burgundy yarn.
Info :
Change to burgundy yarn.
Info :
Change to mustard yarn.
Info :
Change to burgundy yarn. Cut the mustard yarn. (fig.6)
Rnd 12-15 :
45 sc (4 rounds)
Rnd 16 :
(13 sc, dec)*3 (42)
Rnd 17-18 :
42 sc (2 rounds)
Rnd 19 :
6 sc, dec, (12 sc, dec)*2, 6 sc (39)
Rnd 20-21 :
39 sc (2 rounds)
Info :
Apply some glue to the cardboard. Place the cardboard inside the bottom of the piece. (fig.7)
Rnd 22 :
(11 sc, dec)*3 (36)
Rnd 23-24 :
36 sc (2 rounds)
Rnd 25 :
5 sc, dec, (10 sc, dec)*2, 5 sc (33)
Rnd 26-27 :
33 sc (2 rounds)
Info :
Start stuffing as you go.
Rnd 28 :
(9 sc, dec)*3 (30)
Rnd 29-30 :
30 sc (2 rounds)
Rnd 31 :
4 sc, dec, (8 sc, dec)*2, 4 sc (27)
Info :
Join the arms to the body in next round symmetrically on the sides. (fig.8-9)
Rnd 33 :
4 sc on the body, through both stitches of the 1st arm and the body crochet 5 sc, then on body 8 sc, through both stitches of the 2nd arm and the body crochet 5 sc, then 5 sc on the body (27)
Rnd 34 :
(7 sc, dec)*3 (24)
Rnd 35 :
(6 sc, dec)*3 (21)
Info :
Change to beige yarn. Cut the burgundy yarn.
Rnd 36 :
(5 sc, dec)*3 (18)
Info :
Stuff the body with fiberfill. Continue crocheting the head beige yarn.
— Head (Balthazar) :
Rnd 39 :
(5 sc, inc)*6 (42)
Rnd 40 :
(13 sc, inc)*3 (45)
Rnd 41-47 :
45 sc (7 rounds)
Rnd 48 :
(7 sc, dec)*5 (40)
Rnd 49 :
3 sc, dec, (6 sc, dec)*4, 3 sc (35)
Info :
Insert the eyes between round 44 and 45 with 7 sts apart. (fig.10)
Rnd 50 :
(5 sc, dec)*5 (30)
Rnd 51 :
(4 sc, dec)*5 (25)
Rnd 52 :
(3 sc, dec)*5 (20)
Info :
Stuff the head with fiberfill.
Rnd 53 :
(2 sc, dec)*5 (15)
Rnd 54 :
(1 sc, dec)*5 (10)
Info :
Using yarn needle, weave yarn through the front loops and pull it tight to close the hole. Weave in the yarn tail inside the piece. (fig.11-12)
Rnd 1 (neck finishing) :
FLO - (1 sc, ch1)*45, slst (fig.13)
Info :
Fasten off and weave in ends.
Info :
Make the head sculpting: Embroider highlights around the eyes with white thread. Pull the thread ends and tie a knot. (fig.14-17)
Info :
Embroider eyelashes with black thread. Embroider the nose between rounds 43 and 44 with beige yarn. (fig.18-21)
Info :
Embroider eyebrows with brown thread. Fasten off and cut the thread. (fig.22-24)
— Beard :
Materials :
Use white yarn, hook 2.25 mm
Rnd 1 :
ch 24. Start in the second chain from the hook: 3 sc, 3 hdc, 4 dc, 3 tr, 4 dc, 3 hdc, 3 sc. (fig.25)
Info :
Fasten off, leaving a long tail for sewing. Sew the top part of the beard to face. (fig.26-27)
Info :
Embroider the mustache with three stitches long. Fasten off. (fig.28-29)
— Headscarf (Balthazar) :
Materials :
Use burgundy yarn, hook 2.25 mm
Rnd 3 :
(1 sc, inc)*6 (18)
Rnd 4 :
(2 sc, inc)*6 (24)
Rnd 5 :
(3 sc, inc)*6 (30)
Rnd 6 :
2 sc, inc, (4 sc, inc)*5, 2 sc (36)
Rnd 7 :
(5 sc, inc)*6 (42)
Rnd 8 :
3 sc, inc, (6 sc, inc)*5, 3 sc (48)
Rnd 9-12 :
48 sc (4 rounds)
Info :
Continue crocheting in turning rows. Row 14: 28 sc, ch 1, turn (28). Row 15: 1 sc, inc, 24 sc, inc, 1 sc, ch 1, turn (30). Row 16-20: 30 sc, ch 1, turn (5 rows). Row 21: 30 sc. Fasten off and weave in the yarn tail inside the piece. (fig.30)
— Crown :
Materials :
Use yellow yarn, hook 2.0 mm
Rnd 1 :
ch 54, crochet sl st to connect the round. (fig.31)
Rnd 2-4 :
54 sc (3 rounds)
Rnd 5 :
10 sc, (skip 1 sc, into the next sc: (3 dc, ch 3 and work sl st into the first ch, 3 dc), skip 1 sc, 2 sc)*7, 8 sc, 1 sl st. (fig.32-34)
Info :
Fasten off and weave in the yarn tail inside the piece.
— Mantle (Balthazar) :
Materials :
Use mustard yarn. Crochet in turning rows, at the end of the row, do ch 1 and turn. Hook 2.5 mm
Row 1 :
ch 17, start in the second chain from the hook: 16 sc (16)
Row 2 :
(1 sc, inc)*8 (24)
Row 3 :
(1 sc, inc)*2, 16 sc, (1 sc, inc)*2 (28)
Row 4 :
(2 sc, inc)*2, 16 sc, (2 sc, inc)*2 (32)
Row 5 :
inc, 4 sc, inc, 20 sc, inc, 4 sc, inc (36)
Row 8 :
inc, 6 sc, inc, 20 sc, inc, 6 sc, inc (40)
Row 11 :
inc, 38 sc, inc (42)
Row 12-13 :
42 sc (2 rows)
Row 14 :
inc, 40 sc, inc (44)
Row 15-16 :
44 sc (2 rows)
Row 17 :
inc, 42 sc, inc (46)
Row 18-19 :
46 sc (2 rows)
Row 20 :
inc, 44 sc, inc (48)
Row 21-24 :
48 sc (4 rows)
Info :
Change to white yarn Alize softy. Cut the mustard yarn. Rnd 25: 48 sc. In the corner sc 3 in same stitch and continue crocheting sc around the mantle. In the last stitch sc 3 and sl st in the first ch. (fig.35) Fasten off white yarn.
— Gift :
Materials :
Use olive yarn, hook 2.00 mm
Rnd 4 :
(3 sc, inc)*3 (15)
Rnd 5 :
(4 sc, inc)*3 (18)
Rnd 7 :
BLO - (1 hdc, dec-hdc)*6 (12), stuff lightly
Info :
Fasten off, leaving a long tail for sewing. Using yarn needle, weave yarn through the front loops and pull it tight to close the hole. Decorate with artificial beads on top. (fig.36)
Assembly :
Put the headscarf on head. Decorate the crown with faux rhinestones. Put it on the head. Sew the gift to Balthazar's hands. Pin and then sew the mantle in several places to the body. (fig.37-39)
— Arms (Melchior, make 2) :
Start :
Start with beige yarn, hook 2.25 mm
Rnd 3-6 :
10 sc (4 rounds)
Info :
Change to turquoise yarn. Cut the beige yarn.
Rnd 7-9 :
10 sc (3 rounds)
Rnd 11-20 :
10 sc (10 rounds)
Info :
Stuff only the lower 2/3 of the arm. Fold the arm in half and crochet through two layers 5 sc. Fasten off and weave in the yarn tail inside the piece.
Section :
Sleeves decoration: Hold the arm with hand pointing up, attach turquoise yarn color to the first unused front loop of round 9.
Rnd 1 :
ch 3, (inc-dc, dc)*4, inc-dc (15)
Info :
Change to YarnArt Christmas beige yarn. Cut the turquoise yarn.
Rnd 2 :
(1 sc, ch 1)*20, slst
Info :
Fasten off and weave in the yarn tail inside the piece. (fig.1)
— Body (Melchior) :
Start :
Start with lavender yarn, hook 2.25 mm
Rnd 3 :
(1 sc, inc)*8 (24)
Rnd 4 :
(3 sc, inc)*6 (30)
Rnd 5 :
2 sc, inc, (4 sc, inc)*5, 2 sc (36)
Rnd 6 :
(5 sc, inc)*6 (42)
Rnd 7 :
(13 sc, inc)*3 (45)
Info :
Trace the bottom of the piece on a cardboard and cut it out.
Rnd 9-10 :
45 sc (2 rounds)
Info :
Change to turquoise yarn. Cut the lavender yarn.
Rnd 11-15 :
45 sc (5 rounds)
Rnd 16 :
(13 sc, dec)*3 (42)
Rnd 17-18 :
42 sc (2 rounds)
Rnd 19 :
6 sc, dec, (12 sc, dec)*2, 6 sc (39)
Rnd 20-21 :
39 sc (2 rounds)
Info :
Apply some glue to the cardboard. Place the cardboard inside the bottom of the piece.
Rnd 22 :
(11 sc, dec)*3 (36)
Rnd 23-24 :
36 sc (2 rounds)
Rnd 25 :
5 sc, dec, (10 sc, dec)*2, 5 sc (33)
Rnd 26-27 :
33 sc (2 rounds)
Rnd 28 :
(9 sc, dec)*3 (30)
Rnd 29-30 :
30 sc (2 rounds)
Rnd 31 :
4 sc, dec, (8 sc, dec)*2, 4 sc (27)
Rnd 33 :
4 sc on the body, through both stitches of the 1st arm and the body crochet 5 sc, then on body 8 sc, through both stitches of the 2nd arm and the body crochet 5 sc, then 5 sc on the body (27) (fig.3)
Rnd 34 :
(7 sc, dec)*3 (24)
Rnd 35 :
(6 sc, dec)*3 (21)
Info :
Change to beige yarn. Cut the turquoise yarn.
Rnd 36 :
(5 sc, dec)*3 (18)
Info :
Stuff the body with fiberfill. Continue crocheting the head beige yarn.
— Head (Melchior) :
Rnd 39 :
(5 sc, inc)*6 (42)
Rnd 40 :
(13 sc, inc)*3 (45)
Rnd 41-47 :
45 sc (7 rounds)
Rnd 48 :
(7 sc, dec)*5 (40)
Rnd 49 :
3 sc, dec, (6 sc, dec)*4, 3 sc (35)
Rnd 50 :
(5 sc, dec)*5 (30)
Rnd 51 :
(4 sc, dec)*5 (25)
Rnd 52 :
(3 sc, dec)*5 (20)
Rnd 53 :
(2 sc, dec)*5 (15)
Rnd 54 :
(1 sc, dec)*5 (10)
Info :
Using yarn needle, weave yarn through the front loops and pull it tight to close the hole. Weave in the yarn tail inside the piece. (fig.4)
Rnd 1 (neck) :
FLO - (1 sc, ch1)*45, slst (fig.5)
Info :
Fasten off and weave in ends.
— Beard (Melchior) :
Materials :
Use brown yarn, hook 2.25 mm
Rnd 1 :
ch 24. Start in the second chain from the hook: 3 sc, 3 hdc, 4 dc, 1 tr, 1 inc-tr, 1 tr, 4 dc, 3 hdc, 3 sc.
Info :
Fasten off, leaving a long tail for sewing. Embroider the mustache with three stitches long. (fig.7) Sew the top part of the beard to face. Fasten off and weave in the ends. (fig.8)
— Turban (Melchior) :
Materials :
Use emerald yarn, hook 2.25 mm
Rnd 3 :
(1 sc, inc)*6 (18)
Rnd 4 :
(2 sc, inc)*6 (24)
Rnd 5 :
(3 sc, inc)*6 (30)
Rnd 6 :
2 sc, inc, (4 sc, inc)*5, 2 sc (36)
Rnd 7 :
(5 sc, inc)*6 (42)
Rnd 8 :
3 sc, inc, (6 sc, inc)*5, 3 sc (48)
Rnd 9-12 :
48 sc (4 rounds)
Info :
Continue crocheting in turning rows. Row 14: 26 sc, turn (26). Row 15: ch 1, 1 sc, inc, 22 sc, inc, 1 sc, turn (28). Row 16: ch 1, 1 sc, inc, 24 sc, inc, 1 sc, turn (30). Row 17-21: 30 sc, ch 1, turn (5 rows). Row 22: 30 sc (fig.9). Fasten off and weave in the yarn tail inside the piece.
Info :
Now crochet hair. Attach brown yarn to back loops of the 14th round. Rnd 1: BLO - 48 sc. Rnd 2: (sl st, 1 hdc)*24 (48) (fig.11). Fasten off and weave in the ends.
— The second piece of the turban - Roll headpiece :
Materials :
Use purple yarn, hook 1.75 mm
Info :
Then continue crocheting 6 sc without counting the rows. Crochet a tube around the circumference of the head (I made a tube 23 cm long). (fig.12) Wrap the tube with gold thread or other contrasting threads. (fig.13)
— Third piece on the turban :
Rnd 3 :
(3 sc, inc)*2 (10)
Rnd 4-5 :
10 sc (2 rounds)
Info :
Fasten off, leaving a long tail for sewing. Decorate as desired (I cut out a detail from foamiran in the form of a drop). (fig.14) Put the turban on head. The back side of the hair should be placed lower than the front side. Sew on or glue. (fig.15-16) Sew on the second piece around the turban. Fasten the third part on top of second piece. (fig.17-18)
— Mantle (Melchior) :
Materials :
Use purple yarn. Crochet in turning rows, at the end of the row, do ch 1 and turn. Hook 2.5 mm
Row 1 :
ch 17, start in the second chain from the hook: 16 sc (16)
Row 5 :
5 sc, inc, 20 sc, inc, 5 sc (34)
Row 8 :
1 sc, inc, 4 sc, inc, 20 sc, inc, 4 sc, inc, 1 sc (38)
Row 11 :
1 sc, inc, 6 sc, inc, 20 sc, inc, 6 sc, inc, 1 sc (42)
Row 12-14 :
42 sc (3 rows)
Row 15 :
1 sc, inc, 8 sc, inc, 20 sc, inc, 8 sc, inc, 1 sc (46)
Row 16-18 :
46 sc (3 rows)
Row 19 :
1 sc, inc, 42 sc, inc, 1 sc (48)
Row 20-22 :
48 sc (3 rows)
Row 23 :
1 sc, inc, 44 sc, inc, 1 sc (50)
Row 24-26 :
50 sc (3 rows)
Info :
Fasten off and weave in the ends. (fig.19) Attach beige yarn YarnArt Christmas. Now we need to crochet a round of surface slip stitches (sl st) along the edge of the mantle. To do so insert the hook into the loop as shown on figure 20. Connect beige yarn, yarn over and pull up a loop. (fig.21-22) Crochet slip stitches (sl st) until you reach the end. Decorate the edges of the mantle (except for the neckpart) with gold or other halfbeads. (fig.23-24) Pin and then sew the mantle in several places to the body. (fig.25)
— Gift (Melchior) :
Materials :
Use YarnArt Etamin olive, hook 1.5 mm
Rnd 6 :
(2 sc, inc)*6 (24)
Rnd 7-8 :
24 sc (2 rounds)
Rnd 9 :
(2 sc, dec)*6 (18)
Rnd 10 :
(4 sc, dec)*3 (15)
Rnd 11 :
(3 sc, dec)*3 (12), lightly stuff
Rnd 12 :
(2 sc, dec)*3 (9)
Info :
Change to yellow yarn. Cut the olive yarn. Rnd 13-14: 9 sc (2 rounds). Rnd 15: (1 sc, dec)*3 (6) (fig.26). Using yarn needle, weave yarn through the front loops and pull it tight to close the hole. Weave in the yarn tail inside the piece. Sew the gift to Melchior's hands. (fig.27)
— Arms (Caspar, make 2) :
Start :
Start with beige yarn, hook 2.25 mm
Rnd 3-6 :
10 sc (4 rounds)
Info :
Change to mustard yarn. Cut the beige yarn.
Rnd 7-10 :
10 sc (4 rounds)
Rnd 12-20 :
10 sc (9 rounds)
Info :
Stuff only the lower 2/3 of the arm. Fold the arm in half and crochet through two layers 5 sc. Fasten off and weave in the yarn tail inside the piece.
Section :
Sleeves decoration: Hold the arm with the hand pointing up, attach mustard yarn color to the first unused front loop of round 10.
Rnd 1 :
ch 3, (inc-dc, dc)*4, inc-dc (15)
Rnd 3 :
(1 sc, ch 1)*15, slst
Info :
Fasten off and weave in the yarn tail inside the piece. (fig.1)
— Body (Caspar) :
Start :
Start with mustard yarn, hook 2.25 mm
Rnd 3 :
(1 sc, inc)*8 (24)
Rnd 4 :
(3 sc, inc)*6 (30)
Rnd 5 :
2 sc, inc, (4 sc, inc)*5, 2 sc (36)
Rnd 6 :
(5 sc, inc)*6 (42)
Rnd 7 :
(13 sc, inc)*3 (45)
Info :
Trace the bottom of the piece on a cardboard and cut it out.
Info :
Change to green yarn. Do not cut the mustard yarn.
Info :
Change to green yarn. Cut the mustard yarn. (fig.2)
Rnd 12-15 :
45 sc (3 rounds)
Rnd 16 :
(13 sc, dec)*3 (42)
Rnd 17-18 :
42 sc (2 rounds)
Rnd 19 :
6 sc, dec, (12 sc, dec)*2, 6 sc (39)
Rnd 20-21 :
39 sc (2 rounds)
Info :
Apply some glue to the cardboard. Place the cardboard inside the bottom of the piece.
Rnd 22 :
(11 sc, dec)*3 (36)
Rnd 23-24 :
36 sc (2 rounds)
Rnd 25 :
5 sc, dec, (10 sc, dec)*2, 5 sc (33)
Rnd 26-27 :
33 sc (2 rounds)
Rnd 28 :
(9 sc, dec)*3 (30)
Rnd 29-30 :
30 sc (2 rounds)
Rnd 31 :
4 sc, dec, (8 sc, dec)*2, 4 sc (27)
Rnd 33 :
Join the arms to the body in next round symmetrically on the sides. Rnd 33: 4 sc on the body, through both stitches of the 1st arm and the body crochet 5 sc, then on body 8 sc, through both stitches of the 2nd arm and the body crochet 5 sc, then 5 sc on the body (27) (fig.3)
Rnd 34 :
(7 sc, dec)*3 (24)
Rnd 35 :
(6 sc, dec)*3 (21)
Rnd 36 :
(5 sc, dec)*3 (18)
Info :
Stuff the body with fiberfill. Continue crocheting the head beige yarn.
This Three Wise Men set is a heartwarming and detailed crochet project that becomes a treasured holiday display. Each figure is designed with careful shaping and delightful costume details ready for beads and rhinestones. Make them as a set or create a single bespoke king to match your decor — they make lovely handmade gifts and keepsakes. 🧶✨