🧢 Beautiful ✨ Detailed πŸ’ Adorable

The Snowman Mug Amigurumi Pattern

The Snowman Mug Amigurumi Pattern
4.6β˜… Rating
5-7 Hours Time Needed
3.3K Made This
βœ‚οΈ

Intermediate Level

Ideal for those with basic crochet experience, featuring slightly more advanced stitches and techniques to expand your skills.

⏱️

Weekend Treat

Takes 5-7 hours, making it an enjoyable project to finish over a couple of days.

🧸

Cute Companion

An adorable friend to cherish, handcrafted with love to bring comfort and joy for years to come.

About This The Snowman Mug Amigurumi Pattern

This pattern creates a festive snowman who peeks out of a crochet mug, complete with a hat, scarf, twig arms and embroidered snowflakes. The project combines amigurumi shaping, small embroidery details and a bit of wirework for posable arms. Youll learn to crochet tight amigurumi rounds and construct a sturdy mug base with an internal cardboard circle. The finished piece is a sweet holiday accent or handmade gift.
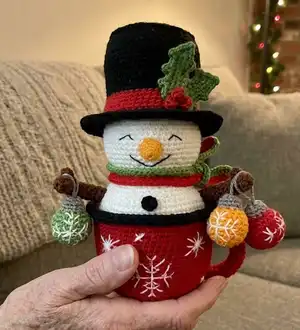
The Snowman Mug Amigurumi Pattern crochet pattern - detailed view of completed project

Clear round-by-round instructions are included for each part: mug, snowman, hat, leaves, berries, handles and assembly. Photographs and construction notes make positioning and finishing easy.

Why You'll Love This The Snowman Mug Amigurumi Pattern

I absolutely love this pattern because it brings together playful amigurumi shaping and pretty holiday embroidery in one compact project. The combination of a crocheted mug and a snowman makes it unique and gift-ready straight away. I enjoy adding tiny details like the holly leaves and embroidered snowflakes because they really make the piece feel handmade and special. The project is rewarding to finish quickly but has enough technique to keep things interesting for an intermediate maker.

The Snowman Mug Amigurumi Pattern step 1 - construction progress The Snowman Mug Amigurumi Pattern step 2 - assembly progress The Snowman Mug Amigurumi Pattern step 3 - details and accessories The Snowman Mug Amigurumi Pattern step 4 - final assembly and finishing

Switch Things Up

I love how easy it is to customize this snowman to match your holiday decor β€” change the yarn color of the mug or add stripes for a different look.

I often substitute the DK yarn for a slightly lighter weight to make a smaller version for ornaments or keychains.

I sometimes embroider different faces or add small felt cheeks for personality; swapping the eye placement gives different expressions.

Want a more rustic style? Use natural-toned yarn and skip the bright berries, or replace them with tiny wooden beads for a handcrafted effect.

I recommend trying metallic yarn for small accents like berry threads to add subtle sparkle to your finished piece.

If youd like a posable snowman, use thicker gauge wire inside the arms and handle β€” I wrap the wire in tape before inserting for long-term durability.

Try making a set of mugs in alternating colors to create a festive table display or a gift set for friends and family.

I sometimes add a tiny crochet scarf or a mini hat variation, which can be made by changing the hat rounds or using simple color changes.

For younger makers, simplify the design by omitting the embroidery and using safety eyes (if appropriate) or pre-made buttons for quicker assembly.

Finally, experiment with different embellishments like ribbon, tiny bells, or removable accessories to make each snowman truly one-of-a-kind.

Common Mistakes & How to Fix Them

βœ— Skipping stitch markers when working in continuous rounds can cause you to lose track of the beginning of the round; place a marker at the start of each round and move it up as you work. βœ— Crocheting too loosely will allow stuffing to show through the stitches and make the mug floppy; maintain a tight, consistent tension and use the recommended hook sizes for a firm fabric. βœ— Forgetting to stuff gradually results in lumps and uneven shaping; add small amounts of fiberfill while shaping to keep curves smooth and even. βœ— Not securing the wireframe ends properly can cause poking or movement later; wrap exposed wire ends with adhesive tape and secure with pliers before inserting into the body.


The Snowman Mug Amigurumi Pattern

Make a charming snowman that sits inside a crochet mugβ€”perfect for holiday gifts and seasonal decor. This pattern guides you through crocheting the mug, snowman body, hat, leaves, berries and tiny details with clear step-by-step rounds and photos. Youll enjoy shaping the wire-framed arms and adding embroidered snowflakes for a professional finish. Make one as a festive table accent or a thoughtful handmade present.

Intermediate 5-7 Hours

Materials Needed for The Snowman Mug Amigurumi Pattern

β€” Main Fabric

  • 01
    Yarn Art Jeans (DK weight, 55% cotton/45% acrylic; 50 g / 160 m) - No. 51 cherry (mug, handle), No. 28 dark grey (hat, rim), No. 90 red (berries)
  • 02
    Yarn Art Jeans (DK weight) - No. 35 yellow (nose), No. 70 dark brown (arms), No. 69 green (leaves)
  • 03
    Alize Cotton Gold (55% cotton / 45% acrylic; 100 g / 330 m) - No. 62 white (snowman body)

β€” Tools Required

  • 01
    Crochet hook size 2.0 mm or 2.25 mm
  • 02
    Stuffing material (fiberfill/polyester)
  • 03
    Tapestry needle for sewing and weaving ends
  • 04
    Scissors
  • 05
    Stitch markers (a scrap of contrasting yarn)
  • 06
    Pins for positioning parts
  • 07
    Two cardboard circles for the bottom of a mug, about 5.8 - 6 cm (2.3 - 2.4 inches)
  • 08
    Three pieces of wire, 7-8 cm (3 inches) long - for mug handle and arms
  • 09
    Adhesive tape to secure the wireframe ends
  • 10
    Pliers
  • 11
    Sewing black thread for embroidery of the eyes and mouth

Progress Tracker

0% Complete

β€” MUG :

Rnd 1 :

8 into MR

Rnd 2 :

8 inc (16)

Rnd 3 :

(1 sc, inc)*8 (24)

Rnd 4 :

(2 sc, inc)*8 (32)

Rnd 5 :

(3 sc, inc)*8 (40)

Rnd 6 :

(4 sc, inc)*8 (48)

Rnd 7 :

(5 sc, inc)*8 (56)

Rnd 8 :

(6 sc, inc)*8 (64)

Rnd 9 :

(7 sc, inc)*8 (72)

Rnd 10 :

(8 sc, inc)*8 (80)

Rnds 11-28 :

80 sc (18 rounds)

Info :

* Crochet the next round through front loops only.

Rnd 29 :

80 sc

Info :

* Crochet the next round through both loops.

Rnd 30 :

80 sc

Info :

Trace the bottom of the mug on the cardboard and cut it out. Put the template inside.

Rnd 31 :

80 sc

Info :

Attach dark grey or black yarn.

Rnd 32 :

80 HDC

β€” SNOWMAN :

Info :

Attach white yarn to round 29. (Alize Cotton Gold No. 62)

Rnds 1-5 :

80 sc (5 rounds)

Rnd 6 :

(8 sc, dec)*8 (72)

Rnd 7 :

(7 sc, dec)*8 (64)

Rnd 8 :

64 sc

Rnd 9 :

(6 sc, dec)*8 (56)

Rnd 10 :

(5 sc, dec)*8 (48)

Rnd 11 :

48 sc

Rnd 12 :

(4 sc, dec)*8 (40)

Rnd 13 :

40 sc

Info :

Stuff it with fiberfill.

Rnd 14 :

(4 sc, inc)*8 (48)

Rnd 15 :

(5 sc, inc)*8 (56)

Rnd 16 :

(6 sc, inc)*8 (64)

Rnd 17 :

64 sc

Rnd 18 :

(7 sc, inc)*8 (72)

Rnds 19-26 :

72 sc (8 rounds)

Rnd 27 :

(7 sc, dec)*8 (64)

Rnds 28-29 :

64 sc (2 rounds)

Rnd 30 :

(6 sc, dec)*8 (56)

Rnd 31 :

(5 sc, dec)*8 (48)

Rnd 32 :

48 sc

Rnd 33 :

(4 sc, dec)*8 (40)

Info :

Stuff with fiberfill.

Rnd 34 :

40 sc

Rnd 35 :

(3 sc, dec)*8 (32)

Rnd 36 :

32 sc

Rnd 37 :

(2 sc, dec)*8 (24)

Rnd 38 :

(1 sc, dec)*8 (16)

Rnd 39 :

(2 sc, dec)*4 (12)

Info :

Break yarn, leaving a long tail for tightening the hole. Stuff it with fiberfill. Do not tighten the hole!

β€” NOSE :

Rnd 1 :

4 into MR

Rnd 2 :

4 inc (8)

Rnds 3-4 :

8 sc (2 rounds)

Rnd 5 :

(1 sc, inc)*4 (12)

Rnd 6 :

12 sc, 2 sl st

Info :

Break yarn, tighten the hole, and hide the tail inside. Stuff the nose with fiberfill.

β€” ARMS (make 2) :

Rnd 1 :

6 into MR

Rnd 2 :

(1 sc, inc)*3 (9)

Rnds 3-5 :

9 sc (3 rounds)

Info :

In the next round, crochet the thumb.

Rnd 6 :

4 sc, (DC5tog cluster), 4 sc (9)

Rnds 7-20 :

9 sc (14 rounds), 2 sl st

Info :

NOTE! Try on the arm onto the wireframe. Crochet more or fewer rounds if needed. Break yarn, leaving a long tail for sewing.

β€” BUTTON :

Rnd 1 :

6 into MR, 1 sl st

Info :

Break yarn.

β€” ASSEMBLY :

Item 1 (Sew the nose) :

Insert the needle and draw it out in the hole on the top of the head. Pin the nose. Split yellow yarn in half and sew it on. Tie the ends of the yarn and hide inside the toy.

Item 2 (Embroider the eyes and mouth) :

Pin the position of the eyes. I mark between rounds 22-23 from the mug. The distance between the eyes is 8 sc, the length is 4 sc and the height of the eye is 1 sc. Embroider the eyes using black thread. Mark the position of the mouth and embroider it with black thread.

Item 3 (Sew a button) :

Sew the crocheted button to the chest using dark grey yarn.

Item 4 (Embroider snowflakes) :

Mark the borders of the snowflake. Embroider the snowflakes using a white yarn strand split in half as shown in diagrams.

Item 5 :

Stuff with fiberfill. Tighten the hole using a tapestry needle by weaving through each of the 12 front loops of the last round and pulling tight; repeat properly and hide the yarn tail inside the snowman.

Item 6 :

Sew the arms to the body. Secure the wireframe with adhesive tape additionally. Put the ready arms onto the wireframe and sew them to the snowman.

β€” MUG HANDLES :

Info :

Yarn Art Jeans No. 51 - (cherry). Chain 12 and form a circle. Crochet in a circle:

Rnds 1-4 :

12 sc (4 rounds)

Rnd 5 :

3 sc, 3 dec, 3 sc (9)

Rnds 6-21 :

9 sc (16 rounds), 1 sl st

Info :

Prepare a wireframe with the same length as the handle. Bend the ends, secure with adhesive tape. Insert wireframe into the handle and stuff with fiberfill. Bend the handle and sew it to the mug.

β€” LEAF (make 2) :

Info :

Yarn Art Jeans No. 69 (green). Chain 12, start working in the second chain from a hook in the back direction - 10 sc, 3 sc in 1 stitch.

Info :

Continue crocheting on the other side of the chain foundation - 9 sc, 3 sc in 1 stitch. (25)

Rnd 2 :

(3 sc, chain 3, 1 sc in the previous stitch)*3, 3 sc, chain 3, 1 sc in the previous stitch, (3 sc, chain 3, 1 sc in the previous stitch)*3, 2 sc, 2 sl st.

Info :

Break yarn, leaving a long tail for sewing. Iron the leaves with steam through a damp cloth for a few seconds to make them flat.

β€” BERRIES (make 3) :

Info :

Yarn Art Jeans No. 90 (red). Chain 7. Start working in the second chain from a hook 3 Bobble stitches similar to the thumb for the arm of our snowman.

Item :

Crochet in the second chain – ((dc4tog cluster), 1 sc)*3. Turn all bobbles inside out. Make 1 sl st in the first bobble. Tie the yarn tails together.

β€” HAT :

Info :

Yarn Art Jeans No. 28 - (dark grey)

Rnd 1 :

8 into MR

Rnd 2 :

8 inc (16)

Rnd 3 :

(1 sc, inc)*8 (24)

Rnd 4 :

(2 sc, inc)*8 (32)

Rnd 5 :

(3 sc, inc)*8 (40)

Rnd 6 :

(4 sc, inc)*8 (48)

Rnd 7 :

(5 sc, inc)*8 (56)

Rnd 8 :

(6 sc, inc)*8 (64)

Rnd 9 :

(7 sc, inc)*8 (72)

Info :

* In the next round, crochet through front posts.

Rnd 10 :

72 sc (through front posts)

Rnds 11-20 :

72 sc (10 rounds)

Rnd 21 :

(7 sc, dec)*8 (64)

Rnds 22-24 :

64 sc (3 rounds)

Info :

Continue crocheting the hat brim and finish as shown; crochet all next rounds through both loops unless stated otherwise.

Assembly Instructions

  • Sew the nose: Insert the needle through the hole at the top of the head, pin the nose in place, split the yellow yarn in half and sew the nose securely. Tie and hide yarn tails inside the toy.
  • Embroider the eyes and mouth: Mark eyes between rounds 22-23 from the mug (distance 8 sc, length 4 sc) and embroider with black thread; mark and embroider the mouth using black thread.
  • Sew a button to the chest using dark grey yarn to create the snowmans front detail.
  • Embroider snowflakes: Mark the snowflake borders on the mug and embroider them using a white yarn strand split in half following the snowflake diagrams.
  • Stuff and close: Stuff the head firmly then weave through the 12 front loops of the last round with a tapestry needle, tighten, repeat to secure and hide the tail inside the snowman.
  • Attach arms and handle: Secure the wireframe ends with adhesive tape, insert wireframes for arms and handle, position and sew the arms and handles in place ensuring symmetry and stability.

Important Notes

  • πŸ’‘Work tightly to avoid stuffing showing through; tight, even tension gives the best result for amigurumi and the mug walls.
  • πŸ’‘Stuff gradually while shaping the head and body to keep a smooth, even silhouette and avoid lumps.
  • πŸ’‘Secure all wireframe ends with adhesive tape and use pliers to bend and curl ends before inserting so they wont poke through the crochet.
  • πŸ’‘Pin parts in position (nose, eyes, arms, handles) before sewing to ensure correct placement and symmetry.

This snowman-in-a-mug pattern is a festive little project that combines amigurumi, embroidery and tiny wirework into a single adorable toy. It makes a heartfelt handmade gift or a charming seasonal decoration for your home. Cozy up with yarn and create yours today β€” it packs big holiday cheer into a small, joyful package! πŸŽ„πŸ§Ά

You ask,

we answer.

FAQs

What size will the finished piece be?

The finished snowman in the mug measures approximately 6 inches (15 cm) without the hat and about 7.8 inches (20 cm) tall with the hat when using the recommended yarn and hook sizes.

Can I use different yarn weights for this pattern?

Yes, you can change yarn weight, but that will affect final size and may require a different hook; using a thicker yarn and larger hook will make a chunkier toy while thinner yarn makes a miniature.

Do I need prior crochet experience for this pattern?

This pattern is rated intermediate; basic familiarity with amigurumi techniques (magic ring, invisible decrease, working in spirals) and some experience with shaping is recommended.

How long does this project typically take to complete?

Most crafters finish this project in about 5-7 hours, though time varies depending on experience and how detailed you are with embroidery and finishing.