🧢 Beautiful ✨ Detailed πŸ’ Adorable

The moonlit bralette Pattern

The moonlit bralette Pattern
4.6β˜… Rating
2-4 Hours Time Needed
4.0K Made This
βœ‚οΈ

Intermediate Level

Ideal for those with basic crochet experience, featuring slightly more advanced stitches and techniques to expand your skills.

⏱️

Bite-Sized Project

Finishes in 2-4 hoursβ€”perfect for an afternoon of creative relaxation.

πŸ‘•

Casual Chic

Relaxed style with a modern twist, perfect for everyday wear while maintaining that handcrafted uniqueness.

About This The moonlit bralette Pattern

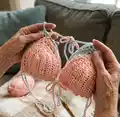
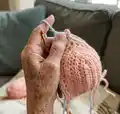
This pattern creates a lightweight, shaped bralette with two crochet cups, a decorative border and simple straps. Youll work holding two strands of DK cotton together for extra body and drape. The instructions include size options and clear row-by-row directions so you can make two identical cups.

The moonlit bralette Pattern crochet pattern - detailed view of completed project

Perfect for warm-weather wardrobes or layered looks, this bralette is customizable in color and strap length. It uses basic stitches like chains and half double crochet to shape comfy, flattering cups.

Why You'll Love This The moonlit bralette Pattern

I absolutely love this pattern because it turns simple stitches into a flattering, wearable piece that you can finish in just a few hours. I enjoy how holding two strands of DK yarn creates such a soft but supportive fabric without complicated shaping. Designing the border and straps was a highlight for me β€” small details really elevate the final piece. Sharing a pattern that feels both relaxed to make and beautiful to wear makes me excited to see your finished bralettes.

The moonlit bralette Pattern step 1 - construction progress The moonlit bralette Pattern step 2 - assembly progress The moonlit bralette Pattern step 3 - details and accessories The moonlit bralette Pattern step 4 - final assembly and finishing

Switch Things Up

I love customizing this bralette by changing colors; try a two-tone look with a contrast border for extra pop.

You can change yarn weight and hook to alter size: use a bulkier yarn with a larger hook for a chunkier bralette, or lighter yarn for a delicate mini version.

I often shorten or lengthen shoulder straps by adding or subtracting chains from the CH80 to fit personal torso length.

Try adding a decorative picot or scallop edge instead of the HDC border for a more feminine finish.

I sometimes embroider a small motif on one cup or attach a tiny crocheted flower for a unique detail.

For more support, consider sewing a narrow elastic band along the bottom strap after weaving it through the loops.

I like to make a matching bottom or shorts using the same border and stitch pattern for a coordinated set.

If you want a racerback, modify the shoulder straps to meet at the center back and sew them together securely.

I also recommend testing different strap widths β€” make a wider strap by working rows of HDC instead of a chain for a sportier look.

Lastly, I sometimes add a lining fabric to the cups for extra coverage; sew the lining inside before finishing edges for a professional result.

Common Mistakes & How to Fix Them

βœ— Skipping the instruction to hold two strands together will make the fabric too flimsy; always hold two strands of DK yarn together for the recommended texture and support. βœ— Not counting the initial chain accurately causes uneven cup shapes; check CH 14(16,18) for S,M,L before starting and recount after the turning chain. βœ— Cutting yarn too early can leave you unable to finish the border neatly; follow the instruction DO NOT CUT YARN until the cup and border are completed. βœ— Working inconsistent tension produces mismatched cups; maintain even tension and compare cups frequently to ensure they match in size and shape.

The moonlit bralette Pattern

Make a delicate, summer-ready bralette with this easy-to-follow pattern. Youll crochet two shaped cups, add a pretty border and simple straps, holding two strands of DK yarn together for a soft sturdy finish. This pattern is designed to be customizable for different sizes and styles so you can make a unique bralette to suit your wardrobe.

Intermediate 2-4 Hours

Materials Needed for The moonlit bralette Pattern

β€” Main Fabric

  • 01
    Paintbox Cotton DK yarn - 2 balls (hold two strands together during work)
  • 02
    Suggested: two colors as shown (small amounts of each color to create contrast), total approximately 100-200g depending on size

β€” Tools Required

  • 01
    4mm crochet hook
  • 02
    Scissors
  • 03
    Tapestry needle

Progress Tracker

0% Complete

β€” Materials :

Info :

1. 2 balls of paintbox cotton DK yarn. 2. 1 4mm hook 3. Scissors 4. Tapestry needle

β€” Notes :

Info :

For this pattern, we will be holding two strands of yarn together.

β€” Cups :

Round 1 :

To begin, CH 14(16,18) S,M,L

Round 2 :

R1. HDC in 3rd CH from hook and in every CH after.

Round 3 :

R2. CH2, turn. In same CH work HDC and in each CH until you get to the CH3 space at the top of this row. In this CH3 space, work 3 HDC. Continue HDC in every stitch after. Be sure to place a HDC in the very very last CH of the previous row to keep your cup straight at the bottom.

Round 4 :

R3. CH2, turn. HDC in every stitch until you get to the top where we previously placed 3 HDC. Work HDC, HDC,CH1,HDC in middle stitch of the three, HDC in the next CH. HDC as usual down the row to the bottom.

Round 5 :

Repeat Row 3. 3(5,7) more times. DO NOT CUT YARN.

Info :

Lets create a cute border now:)

Round 6 :

CH4,turn. Skip one CH, work HDC. CH1,skip 1, HDC in next CH until you reach the top where we turn. In the top middle CH, work HDC, CH2, HDC in same stitch. CH1, continue border as usual to very bottom.

Round 7 :

CH2,turn. Work HDC in each CH1 space and at the top of each HDC. So one HDC in every CH1 space and every HDC. Until you get to the top where the cup turns. In top CH space, work 2 HDC,CH1, 2HDC. Continue the border like normal down the other side. (Each CH1 space and each HDC.)

Round 8 :

Now we need to create a border of spaces along the bottom of the cup to weave in our straps we will make.

Round 9 :

CH2, immediately work HDC in the side of the very last HDC of previous border row. Along the bottom, as consistently as you can, work HDC,CH1, skip a space, HDC. Ending with a HDC in side of previous rows first HDC. Cut and tie off! Make one more cup.

β€” Straps :

Item Name (P1) :

For the shoulder straps, attach yarn at top of each cup. CH80.

Item Name (P2) :

For bottom strap, CH 150-200. Weave the strap in and out of your bottom loops. You can choose to have the bow tie in the front or in the back :)

β€” Finishing :

Info :

All done!

Info :

Feel free to contact me for support if you have any questions!

Info :

Please do not sell, alter or giveaway this pattern.

Info :

Feel free to sell items made using this pattern!

Info :

Hanna Christena 2017

Assembly Instructions

  • Make two identical cups following the Cups section, keeping tension consistent to ensure they match in size and shape.
  • Attach shoulder straps by joining yarn at the top edge of each completed cup and chaining 80 stitches, securing ends neatly.
  • Create the bottom strap by chaining 150-200 stitches, then weave this strap through the bottom CH1 spaces created in the border, adjusting tension to sit flat.
  • Decide whether you want the bow to be in the front or back, weave and tie the ends accordingly, then trim and weave in all loose ends with a tapestry needle.

Important Notes

  • πŸ’‘Hold two strands of DK yarn together throughout to achieve the recommended fabric density and drape.
  • πŸ’‘Do not cut yarn between shaping and border work; finish the border row as instructed before fastening off.
  • πŸ’‘Compare both cups as you work and repeat rows exactly to ensure symmetrical cups for a balanced bralette.

This Moonlit Bralette pattern brings sweet handmade style to your wardrobe with simple shaping and a pretty border. Make it in your favorite colors, adjust strap lengths, and enjoy a custom-fitted piece youll wear again and again. 🧢✨

You ask,

we answer.

FAQs

What size will the finished piece be?

The finished size depends on the chain count you choose (CH 14 for S, CH 16 for M, CH 18 for L) and your tension; gauge will affect final fit.

Can I use different yarn weights for this pattern?

Yes, but changing yarn weight will affect the final size and drape; if you use a different weight, adjust hook size and chain count accordingly.

Do I need prior crochet experience for this pattern?

This pattern is rated intermediate and uses basic stitches like chains and half double crochet, so familiarity with these stitches is recommended.

How long does this project typically take to complete?

Most crocheters finish this bralette in 2-4 hours depending on experience, size chosen, and any customizations.