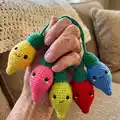
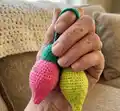
About This The Festive Lights Amigurumi Pattern
This pattern creates a set of plush, decorative lightbulbs that can be joined into a charming garland. Each bulb is worked in the round and finished with a textured screw-cap and socket to hold the bulb snugly. The design uses blanket-style bulky yarn for a soft, squishy finish and quick progress. Detailed photo cues and stitch notes help you get neat results.
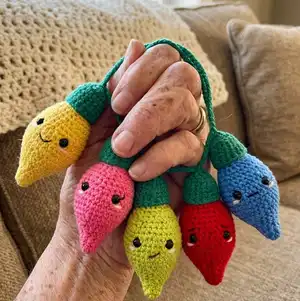
Make multiple bulbs in bright or muted palettes for seasonal decor or gifts. The pattern includes instructions for the bulb body, cap coil, sockets and how to chain them together for hanging.
Why You'll Love This The Festive Lights Amigurumi Pattern
I absolutely love this pattern because it transforms simple stitches into a playful, tactile garland that brightens any room. I enjoy how quickly each bulb works up thanks to the chunky blanket yarn, making it satisfying to create a whole string in a weekend. The textured cap and snug socket give the bulbs a fun twist — literally — when you screw them in. I also love how customizable this project is; you can mix colors, faces, and sizes to suit your style.
Switch Things Up
I love personalising these bulbs with different colour palettes — try pastels for a nursery garland or jewel tones for dramatic holiday decor.
I sometimes change the yarn weight and hook to make mini versions for keychains or larger plush bulbs as tree ornaments.
I often embroider different facial expressions to give each bulb a unique personality; tiny eyes, smiles, or winking faces are all adorable.
If you want a sturdier cap, I will add a length of chain stitch coil with a tighter tension to make a firmer screw section.
I like to swap the coil technique and use a little embroidery floss to wrap the cap for a different texture contrast.
For outdoor or porch decor, I recommend using acrylic or outdoor-safe yarn and sealing safety eyes with a dab of clear glue to help secure them.
I will sometimes add a small loop of ribbon or cord to the socket ends so the garland hangs more easily from hooks.
To make a more vintage look, I switch to muted, worn-looking yarns and add small stitched details like freckles or stitched eyelashes.
I also create multi-colour bulbs by changing the bulb body colour every few rounds to make striped or ombre bulbs.
If I want the bulbs to be posable, I will insert a short piece of bendable wire into the fill before closing and secure it well.
Try adding tiny bead lights inside (LED micro lights) before closing the bulb for a glowing garland — be mindful of safety and battery placement.
I enjoy making matching sets with coordinating sockets and cords; play with CH spacing (CH 20 or CH 30) to vary distance between bulbs.
Common Mistakes & How to Fix Them
✗ Placing safety eyes too high or too low can ruin the bulb's expression; place safety eyes between rounds 15 and 16 about 5 stitches apart for the best look.
✗ Forgetting to stuff the tip first results in a floppy pointy end; start stuffing from the tip and add fill gradually to keep the shape even.
✗ Ignoring the back-loop-only (BLO) instruction for the cap prevents the screw coil from forming; work IN BLO as instructed and leave the front loops for later slip stitches.
✗ Using inconsistent tension makes sockets either too loose or too tight for the bulbs; test tension with one bulb and adjust hook size or tension until the bulb fits snugly into the socket.
✗ Skipping stitch markers when marking the start and end of the coil makes creating the screw difficult; use different coloured markers to mark the coil start and end as described.