🧢 Beautiful ✨ Detailed πŸ’ Adorable

The Elephant Queen Amigurumi Pattern

The Elephant Queen Amigurumi Pattern
4.6β˜… Rating
5-7 Hours Time Needed
3.8K Made This
βœ‚οΈ

Intermediate Level

Ideal for those with basic crochet experience, featuring slightly more advanced stitches and techniques to expand your skills.

⏱️

Weekend Treat

Takes 5-7 hours, making it an enjoyable project to finish over a couple of days.

🧸

Cute Companion

An adorable friend to cherish, handcrafted with love to bring comfort and joy for years to come.

About This The Elephant Queen Amigurumi Pattern

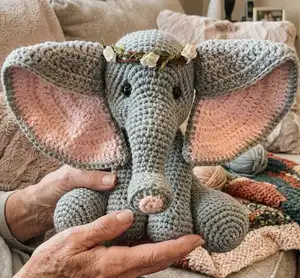
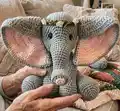
This pattern creates a sweet elephant amigurumi with large foldable ears, a long trunk, and a rounded body. The design uses 4-ply yarn and a 3.5mm hook for a neat, dense fabric. Instructions are written in rounds with clear placement guidance for safety eyes, ears, and limbs. The pattern includes ear assembly steps and an optional mouth piece.

The Elephant Queen Amigurumi Pattern crochet pattern - detailed view of completed project

You will make separate pieces β€” trunk, head, body, legs, arms, ears, tail β€” and sew them together for a polished finish. The ear assembly is shown step-by-step to get the fold and placement right.

Why You'll Love This The Elephant Queen Amigurumi Pattern

I absolutely love this pattern because it balances simple crochet construction with adorable, character-filled details like the folded ears and long trunk. I enjoy how the ear assembly lets you shape a face with personality and expression. The piece feels sturdy and cuddly thanks to working in a tight gauge and stuffing as you go. Sewing the parts together is satisfying and really brings the Elephant Queen to life.

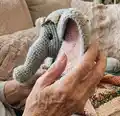
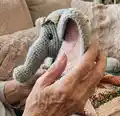
The Elephant Queen Amigurumi Pattern step 1 - construction progress The Elephant Queen Amigurumi Pattern step 2 - assembly progress The Elephant Queen Amigurumi Pattern step 3 - details and accessories The Elephant Queen Amigurumi Pattern step 4 - final assembly and finishing

Switch Things Up

I love customizing this elephant by swapping colors β€” try soft pastels for a nursery-themed Elephant Queen or jewel tones for a bold decorative piece.

I often change yarn weight and hook size to change the scale; bulky yarn gives a large, squishy elephant while fingering weight makes a tiny collectible.

I like to vary eye sizes and use embroidered eyes for a vintage look or larger safety eyes for expressive features.

I sometimes embroider eyelashes or add a tiny felt crown to make the Elephant Queen even more regal and unique.

For posability, I add thin armature wire inside the trunk or limbs so I can pose the ears or trunk for photos.

Try adding tiny accessories like a crocheted flower crown, scarf, or removable cape to expand the character possibilities.

Make a mini keychain version by using thinner yarn and a smaller hook and attaching a key ring to the top of the head.

Swap the ear interior color for patterned yarn or ombre yarn to give a fun textured look inside the ear folds.

To make a baby-safe version, embroider the eyes instead of using safety eyes and secure all seams tightly.

I also stitch different mouth expressions or use a small blush on the cheeks with pastel chalk for personality.

Common Mistakes & How to Fix Them

βœ— Skipping stitch markers and joining rounds incorrectly can make shaping confusing; work in a continuous spiral and place a marker at the beginning of each round to track your stitches. βœ— Forgetting to stuff as you go causes lumps or a collapsed shape; add small amounts of stuffing gradually, especially in the trunk and head, to keep consistent shaping. βœ— Not placing safety eyes at the recommended rounds will misplace facial features; place safety eyes between rounds 25 and 26 as instructed, 18 stitches apart for proper alignment. βœ— Overstuffing limbs before shaping makes them bulgy and hard to sew; stuff firmly but stop stuffing early (about round 20 for legs, round 24 for arms) so you can close and attach neatly. βœ— Fastening off outer ear pieces will prevent proper assembly; do NOT fasten off the outer earpieces β€” use the working yarn to sew inner and outer pieces together for a clean edge.

The Elephant Queen Amigurumi Pattern

Create a charming Elephant Queen amigurumi with this complete crochet pattern. You will work in continuous rounds to shape a sweet elephant with large ears, a long trunk, and detailed assembly instructions. The pattern uses 4-ply yarn and a 3.5mm hook and includes clear placement notes for eyes, ears, and limbs. Perfect for gifting or keeping as a cuddly handmade companion.

Intermediate 5-7 Hours

Materials Needed for The Elephant Queen Amigurumi Pattern

β€” Main Fabric

  • 01
    I Love This Yarn (4ply) - Gray (main color) - amount not specified in pattern
  • 02
    I Love This Yarn (4ply) - Light Pink (inner ear and trunk tip) - amount not specified in pattern
  • 03
    Any 4ply fingering/sock weight yarn can be used as an alternative

β€” Tools Required

  • 01
    Crochet hook size 3.5mm (E)
  • 02
    15mm safety eyes (2 pieces)
  • 03
    Stitch marker
  • 04
    Scissors
  • 05
    Tapestry/needle for sewing
  • 06
    Fiberfill stuffing (poly-fil)
  • 07
    Pins for assembly (optional)

Progress Tracker

0% Complete

β€” Supplies :

Info :

Yarn: I Love This Yarn (Any 4ply yarn will do). Colors: Gray & Light Pink. 3.5mm (E) Hook. 15mm Safety Eyes. Stitch Marker. Scissors. Needle. Fiberfill Stuffing.

β€” Abbreviations :

Infos :

MR- Magic ring- crochet single crochet stitches into the adjustable loop. (Ch 2 and inserting stitches into 1st chain can be used if desired and is usually the easier method for beginners). Ch- chain. Sc-single crochet. SL-Slip Stitch. INC- increase, 2sc in same stitch. St- stitch. BLO- Back Loop Only. Dc-Double Crochet. Dec- Decrease (crochet two stitches together using the decrease method). F/O-Fasten Off.

β€” Notes :

Info :

-Do NOT join rounds unless stated work in continuous spiral. -Use stitch marker to mark the beginning of each round. -All stitches are worked in both loops unless stated otherwise.

β€” Trunk :

Info :

Start with Pink: Lightly stuff with poly-fil as you go!!

Round 1 :

MR-6sc (6)

Round 2 :

INC x6 (12) CHANGE COLOR- Gray

Round 3 :

(Hdc, Hdc INC) x6 (18)

Round 4 :

Sc in BLO each st around (18)

Round 5 :

(4sc, Dec) x3 (15)

Round 6 :

Sc each st around (15)

Round 7 :

(3sc, Dec) x3 (12)

Round 8-12 :

Sc each st around (12) 5 rounds

Round 13 :

(3sc, INC) x3 (15)

Round 14 :

Sc each st around

Round 15 :

(4sc, INC) x3 (18)

Round 16-17 :

Sc each st around (18) 2 rounds

Round 18 :

(4sc, INC) x3, Sc next 3st (21)

Round 19 :

Sc each st around (21)

Round 20 :

(5sc, INC) x3, Sc next 3st (24)

Round 21 :

Sc each st around (24)

Round 22 :

(6sc, INC) x3, Sc next 3st (27)

Round 23 :

(7sc, INC) x3, Sc next 3st (30)

Info :

This completes the trunk. DO NOT FASTEN OFF. Continue to head ->

β€” Head :

Round 24 :

6sc, (2sc, INC) x6, 6sc (36)

Round 25 :

6sc, (3sc, INC) x6, 6sc (42)

Round 26 :

6sc, (4sc, INC) x6, 6sc (48)

Round 27 :

6sc, (5sc, INC) x6, 6sc (54)

Round 28-35 :

Sc each st around (54) 8 rounds

Info :

At this time place safety eyes between rounds 25 & 26, before the 2nd INC and after the 5th INC, 18st apart. From this point on stuff with poly-fil accordingly!

Round 36 :

(7sc, Dec) x6 (48)

Round 37 :

Sc each st around (48)

Round 38 :

(6sc, Dec) x6 (42)

Round 39 :

(5sc, Dec) x6 (36)

Round 40 :

(4sc, Dec) x6 (30)

Round 41 :

(3sc, Dec) x6 (24)

Round 42 :

(2sc, Dec) x6 (18)

Info :

Finish stuffing firmly!

Round 43 :

(1sc, Dec) x6 (12)

Round 44 :

Dec x6 (6)

Info :

F/O. Cinch up the opening and weave in end.

β€” Body :

Round 1 :

MR- 6sc (6)

Round 2 :

INC each st around (12)

Round 3 :

(1sc, INC) x6 (18)

Round 4 :

(2sc, INC) x6 (24)

Round 5 :

(3sc, INC) x6 (30)

Round 6 :

(4sc, INC) x6 (36)

Round 7 :

(5sc, INC) x6 (42)

Round 8 :

(6sc, INC) x6 (48)

Round 9 :

(7sc, INC) x6 (54)

Round 10 :

(8sc, INC) x6 (60)

Round 11-14 :

Sc each st around (60) 4 rounds

Round 15 :

(8sc, Dec) x6 (54)

Round 16-17 :

Sc each st around (54) 2 rounds

Round 18 :

15sc, (2sc, Dec) x6, 15sc (48)

Round 19-20 :

Sc each st around (48) 2 rounds

Round 21 :

15sc, (1sc, Dec) x6, 15sc (42)

Round 22-23 :

Sc each st around (42) 2 rounds

Round 24 :

15sc, Dec x6, 15sc (36)

Round 25-26 :

Sc each st around (36) 2 rounds

Round 27 :

(4sc, Dec) x6 (30)

Round 28 :

Sc each st around (30)

Round 29 :

(3sc, Dec) x6 (24)

Round 30 :

Sc each st around (24)

Round 31 :

(2sc, Dec) x6 (18)

Round 32-33 :

Sc each st around (18) 2 rounds

Info :

F/O. Leave long tail for sewing the body to the head. Stuff firmly with poly-fil!!

β€” Legs :

Info :

Make 2. Gray

Round 1 :

MR- 6sc (6)

Round 2 :

INC each st (12)

Round 3 :

(1sc, INC) x6 (18)

Round 4 :

(2sc, INC) x6 (24)

Round 5 :

(3sc, INC) x6 (30)

Round 6 :

(4sc, INC) x6 (36)

Round 7 :

Sc BLO each st around (36)

Round 8-9 :

Sc each st around (36) 2 rounds

Round 10 :

(4sc, Dec) x6 (30)

Round 11 :

Sc each st around (30)

Round 12 :

(3sc, Dec) x6 (24)

Round 13 :

Sc each st around (24)

Round 14 :

(2sc, Dec) x6 (18)

Round 15-24 :

Sc each st around (18) 10 rounds

Info :

Stuff firmly with poly-fil until about round 20! Pinch opening together and Sc stitches together to close. F/O. Leave tail for sewing to body.

β€” Arms :

Info :

Make 2. Gray

Round 1 :

MR- 6sc (6)

Round 2 :

INC each st around (12)

Round 3 :

(1sc, INC) x6 (18)

Round 4 :

(2sc, INC) x6 (24)

Round 5 :

(3sc, INC) x6 (30)

Round 6 :

Sc BLO each st around (30)

Round 7 :

Sc each st around (30)

Round 8 :

(3sc, Dec) x6 (24)

Round 9 :

Sc each st around (24)

Round 10 :

(2sc, Dec) x6 (18)

Round 11 :

Sc each st around (18)

Round 12 :

Dec, Sc next 16st (17)

Round 13-14 :

Sc each st around (17) 2 rounds

Round 15 :

Dec, Sc next 15st (16)

Round 16-17 :

Sc each st around (16) 2 rounds

Round 18 :

Dec, Sc next 14st (15)

Round 19 :

(3sc, Dec) x3 (12)

Round 20-23 :

Sc each st around (12) 4 rounds

Round 24 :

(2sc, Dec) x3 (9)

Round 25-28 :

Sc each st around (9) 4 rounds

Info :

Stuff firmly with poly-fil until about round 24!! Pinch opening together and Sc stitches together to close. F/O. Leave tail for sewing to body.

β€” Ears :

Info :

Make 4. 2 pink-inner earpieces. 2 Gray- Outer earpieces.

Round 1 :

MR- ch3, 5Dc (6)

Round 2 :

Ch1, Turn, 2 Dc each st around (12)

Round 3 :

Ch1, Turn, (1Dc, Dc INC) x6 (18)

Round 4 :

Ch1, Turn, (2Dc, Dc INC) x6 (24)

Round 5 :

Ch1, Turn, (3Dc, Dc INC) x6 (30)

Round 6 :

Ch1, Turn, (4Dc, Dc INC) x6 (36)

Round 7 :

Ch1, Turn, (5Dc, Dc INC) x6 (42)

Round 8 :

Ch1, Turn, (6Dc, Dc INC) x6 (48)

Round 9 :

Ch1, Turn, (7Dc, Dc INC) x6 (54)

Info :

** F/O inner earpieces & cut short tail.

Info :

**Do NOT F/O outer earpieces. Continue using working yarn to sew the inner and outer earpieces together. See 'Assembly' section for directions!!

β€” Tail :

Round 1 :

MR-6sc (6)

Round 2 :

INC x6 (12)

Round 3-14 :

Sc each st around (12) 10 rounds

Info :

Do not stuff with poly-fil. Attach to bum between rounds 10 & 11.

β€” Mouth :

Info :

Gray (Optional Piece)

Round 1 :

MR- 6sc (6)

Round 2 :

INC x6 (12)

Round 3-4 :

Sc each st around (12) 2 rounds

Info :

Fold, match up stitches, sc the opening shut and attach under the trunk between rounds 23 & 24.

β€” Assembly :

Info :

Head/Body: Sew the Head to the Body!! Make sure head is centered over the opening of the body. Also, make sure the trunk is centered over the belly!!

Info :

Assembling the Ears: After making all 4 pieces (2 inner and 2 outer).

Item Name (P1) :

Match 1 inner and 1 outer earpiece. Sc all the way around the 2 pieces using the working yarn from the outer earpiece. Once you have sc all the way around, Fold the top of the ear down to the center.

Info :

This should be your result!! LEFT & RIGHT EARS WILL BE FOLDED OVER AT OPPOSITE ENDS. BE SURE TO HOLD THE EARS UP TO THE ELEPHANTS HEAD BEFORE SEWING TO KNOW THAT YOU ARE FOLDING AND SEWING THE RIGHT END!!

Info :

Attach the ears to the side of the head slightly up from the eyes. Folds of the ears should be at the top. Ears should be placed between rounds 32 & 33!

Info :

Legs: Sew the closed end of the legs to the sides of the body between rounds 10-16.

Info :

Arms: Sew the closed end of the arms to the seam between the head and the body directly about the legs!

Info :

Tail: Sew to the bum between rounds 10 & 11!!

Assembly Instructions

  • Sew the head to the body making sure the head is centered over the opening of the body and the trunk is centered over the belly.
  • Assemble each ear by matching one inner pink earpiece to one outer gray earpiece, single crochet all the way around using the working yarn from the outer piece, then fold the top of the ear down to the center before finishing.
  • Attach ears to the side of the head slightly above the eyes with the folds at the top; position ears between rounds 32 and 33 for correct placement.
  • Sew the closed end of each leg to the sides of the body between rounds 10 and 16, spacing legs evenly for stability.
  • Sew the closed end of each arm to the seam between the head and body just above the legs for a natural placement.
  • Attach the tail to the bum between rounds 10 and 11 and do not stuff the tail prior to sewing.

Important Notes

  • πŸ’‘Do NOT join rounds unless stated; work in a continuous spiral and use a stitch marker to track the beginning of each round.
  • πŸ’‘Place safety eyes between rounds 25 and 26, before the 2nd INC and after the 5th INC, roughly 18 stitches apart for proper facial placement.
  • πŸ’‘Stuff firmly but not too tightly; stuff head and body as you go and stop stuffing limbs slightly earlier to allow sewing and shaping.
  • πŸ’‘Do not fasten off the outer ear pieces; use the working yarn to sew inner and outer earpieces together for a neat edge.

This Elephant Queen amigurumi pattern brings a whimsical, foldable-eared companion to life with step-by-step instructions and photos. The design is perfect for gifting, nurseries, or as a cozy handmade keepsake. Enjoy every stitch and assembly moment as your elephant grows from pieces into a charming friend. 🧢🧡

You ask,

we answer.

FAQs

What size will the finished piece be?

The finished amigurumi size will depend on your tension and yarn, but using the suggested 4ply yarn and 3.5mm hook yields a small-to-medium stuffed elephant suitable for display or gentle play.

Can I use different yarn weights for this pattern?

Yes, you can use different yarn weights but this will alter the final size and require an adjusted hook; use thicker yarn and a larger hook for a chunky elephant or finer yarn for a smaller mini.

Do I need experience with amigurumi to make this?

This pattern is rated intermediate and assumes familiarity with working in continuous rounds, increases, decreases, and basic assembly; it includes clear instructions for ear assembly and placement.

How long does this project typically take to complete?

Most crocheters finish this pattern in about 5-7 hours, though time may vary based on experience, small adjustments, and how quickly you sew and stuff the pieces.