🧢 Beautiful ✨ Detailed πŸ’ Adorable

The Boho Book Nook Pattern

The Boho Book Nook Pattern
3.9β˜… Rating
2-4 Hours Time Needed
4.0K Made This
βœ‚οΈ

Beginner Friendly Level

Perfect for those just starting their crochet journey, with clear instructions and simple techniques

⏱️

Bite-Sized Project

Finishes in 2-4 hoursβ€”perfect for an afternoon of creative relaxation.

🏑

Cozy Accent

A warm touch for your space that transforms ordinary corners into inviting nooks filled with handmade charm.

About This The Boho Book Nook Pattern

This pattern creates a hanging boho-style book nook pocket with two small arms that slip onto dowel rods for easy hanging. It is worked flat in rows using two strands of worsted weight yarn held together, then joined to form tubes that slide onto dowels. The design requires minimal seaming and includes photo-referenced construction steps to make assembly straightforward. The finished pocket is sturdy and decorative, great for displaying a paperback or small journal.

The Boho Book Nook Pattern crochet pattern - detailed view of completed project

The pocket measures approximately 12 inches wide by 11 inches long after assembly, not including the hanging string. The pattern includes full row-by-row instructions for the pocket and both arms plus detailed construction notes for creating the beginning and end tubes.

Why You'll Love This The Boho Book Nook Pattern

I absolutely love this pattern because it turns simple stitches into a functional, decorative piece that adds personality to any room. I enjoy how the two-strand technique creates a dense, durable fabric perfect for holding books without sagging. The no-seam construction is one of my favorite features β€” it keeps the finish clean and professional while being easy to assemble. I also love that the pattern is highly adaptable, so you can change yarns, colors, or dowel sizes to suit your space and style.

The Boho Book Nook Pattern step 1 - construction progress The Boho Book Nook Pattern step 2 - assembly progress The Boho Book Nook Pattern step 3 - details and accessories The Boho Book Nook Pattern step 4 - final assembly and finishing

Switch Things Up

I love how easy it is to customize the Boho Book Nook by changing yarn colors, so try ombre or striped schemes to match your decor.

Want a chunkier look? Use a bulkier yarn and a larger hook while still holding two strands; this creates a sturdier, more rustic pocket.

If you prefer a delicate look, switch to fingering or sport weight yarn and use a smaller hook for a finer, more detailed pocket.

Try substituting one strand with a metallic or textured novelty yarn to add subtle sparkle or visual interest to the fabric.

You can shorten or lengthen the pocket by adding or subtracting rows before creating the beginning tube; just be mindful of the even/odd row rule for seaming.

For larger books, increase the foundation stitch count (odd number) and make matching adjustments to the arms for balanced support.

Add a fabric lining or interfacing inside the pocket for extra rigidity if you plan to hold heavier items or protect delicate book covers.

Decorate the bottom edge with tassels, fringe, or a crocheted trim to give the piece a unique boho flair.

Swap dowel rods for wooden curtain rods, decorative branches, or painted sticks for an organic or eclectic look.

I often personalize projects by embroidering a small initial or adding a tiny crocheted flower to the pocket front for a custom touch.

Consider making a set of smaller pockets stacked vertically for a modular wall storage system that holds stationery or small plants.

To make it kid-friendly, use colorful, washable acrylic yarn and secure all ends well; you can also add velcro tabs inside to secure items for travel or playrooms.

Common Mistakes & How to Fix Them

βœ— Skipping the gauge check can lead to a pocket that is too wide or narrow for your dowel rods; always check the gauge and adjust hook size to match the specified 5 1/2 sts and 6 rows = 2-inch square. βœ— Not holding two strands together consistently will change the fabric density and final size; keep both strands under equal tension and hold them together for every stitch in this pattern. βœ— Forgetting to note whether you used an even or odd number of rows can make seaming or tube placement tricky later; mark whether you used an even or odd row count before creating the tubes. βœ— Failing to keep unused loops on the correct side when instructed can prevent the end tube from forming correctly; follow the instruction to work row 35 or row 19 in BLO (or FLO when required) to preserve the unused loops for the end tube. βœ— Pulling the slip-stitch seam too tight when creating the tube can twist or distort the piece; use even tension when joining loops to create a smooth tube that fits the dowel snugly without warping. βœ— Not measuring after row 2 may cause the pocket to be the wrong length; piece should measure approximately 9 inches after row 2 so check and add or remove rows before proceeding.

The Boho Book Nook Pattern

Make a stylish boho hanging Book Nook that neatly stores a book or two while adding handmade charm to your wall. This pattern uses two strands of worsted yarn held together for a sturdy, textured pocket with hidden seams. Clear row-by-row instructions guide you through creating the pocket, tubes for dowel rods, and two arms for hanging. Perfect for gifting or sprucing up a reading corner with a cozy, bohemian touch.

Beginner Friendly 2-4 Hours

Materials Needed for The Boho Book Nook Pattern

β€” Main Fabric

  • 01
    Worsted weight yarn (#4), approximately 350 yards total (two strands held together throughout)
  • 02
    Suggested yarn used in sample: I Love This Cotton in Antique Gold - 2 skeins (approximate; sample used two skeins)
  • 03
    Two strands of the chosen worsted yarn held together to create a denser fabric

β€” Tools Required

  • 01
    6mm crochet hook (or hook needed to match gauge)
  • 02
    Yarn needle (for weaving in ends and sewing if needed)
  • 03
    Scissors
  • 04
    2 12-inch by 5/16-inch dowel rods
  • 05
    Extra scrap yarn for tying hanging strings

Progress Tracker

0% Complete

β€” Pocket :

Round 1 :

Row 1: Fsc 25 (alternatively, ch 26, sc in second ch and across). (25 sc)

Round 2 :

Row 2: Ch 1 and turn. Sc in same st and each st across. Piece should measure 9 inches long. (25 sc)

Round 3-5 :

Row 3-5: Ch 1 and turn. Sc in same st and each st across. (25 sc)

Info :

At this point, check that the piece will fit around your dowel rod (photo 1). If it is still short, add or subtract sc rows as needed, but make note of whether you need an even or odd number of rows for later.

Round 6 :

Row 6: Ch 1 and turn. Sc through both loops of row 5 and bottom loops of row 1 to create a tube (photos 2 and 3). This is the beginning tube. (25 sc)

Round 7 :

Row 7: Ch 4 (counts as dc + ch 1) and turn. Sk same st and next st, dc in next st, *ch 1, sk 1, dc in next st* to end. (13 dc, 12 ch 1 sp)

Round 8 :

Row 8: Ch 1 and turn. Sc in same st, sc in each st and ch sp across, sc in 3rd ch of ch 4 from previous row. (25 sc)

Round 9 :

Row 9: Ch 1 and turn. Sc in same st, ch 1, sk 1, mini bean in next st, *sk 1 st, mini bean in next st* across until there are 2 stitches left, sk 1 st, sc in last st. (2 sc, 11 beans)

Round 10-13 :

Row 10-13: Repeat row 9. (2 sc, 11 beans)

Round 14 :

Row 14: Ch 3 (counts as dc) and turn. Sk same st, dc in next st and each st across. (25 dc)

Round 15 :

Row 15: Ch 1 and turn. Sc in same st, ch 1, sk 1, mini bean in next st, *sk 1 st, mini bean in next st* across until there are 2 stitches left, sk 1 st, sc in ch 3 from previous row. (2 sc, 11 beans)

Round 16-19 :

Row 16-19: Repeat row 9. (2 sc, 11 beans)

Round 20 :

Row 20: Repeat row 14. (25 dc)

Round 21 :

Row 21: Repeat row 15. (2 sc, 11 beans)

Round 22-25 :

Row 22-25: Repeat row 9. (2 sc, 11 beans)

Round 26 :

Row 26: Repeat row 14. (25 dc)

Round 27 :

Row 27: Repeat row 15. (2 sc, 11 beans)

Round 28-31 :

Row 28-31: Repeat row 9. (2 sc, 11 beans)

Round 32 :

Row 32: Repeat row 14. (25 dc)

Round 33 :

Row 33: Ch 4 (counts as dc + ch 1) and turn. Sk same st and next st, dc in next st, *ch 1, sk 1, dc in next st* to end. (13 dc, 12 ch 1 sp)

Round 34 :

Row 34: Ch 1 and turn. Sc in same st, sc in each st and ch sp across, sc in 3rd ch of ch 4 from previous row. (25 sc)

Info :

If you used an odd number of rows to fit around your dowel rod, continue with the pattern as written. If you used an even number of rows, work row 35 in the front loops only instead of the back loops. This will keep your unused loops on the correct side for seaming.

Round 35 :

Row 35: Ch 1 and turn. Sc in same st in blo, sc in each st across in blo (you will be using the unused loops for row 40). (25 sc)

Round 36-39 :

Row 36-39: Ch 1 and turn. Sc in same st and across. (25 sc)

Info :

If you needed more or fewer rows for the beginning tube, do the same thing here for the end tube.

Round 40 :

Row 40: Using the unused loops from row 35, sl st through both loops of row 39 and the loops from row 35 across to create the end tube (photos 4 and 5). Tie off. Weave in all ends.

β€” Arms :

Round 1 :

Row 1: Ch 3, sc in second ch and last ch. (2 sc)

Round 2-5 :

Row 2-5: Ch 1 and turn. Sc in same st and last st. (2 sc)

Info :

If you needed more or fewer rows for the beginning tube on the pocket, do the same thing here for both arms, but again, make note of whether you need an even or odd number of rows for later.

Round 6 :

Row 6: Ch 1 and turn. Sc through both loops of row 5 and bottom loops of row 1 to create a tube (photos 2 and 3). This is the beginning tube. (2 sc)

Round 7-18 :

Row 7-18: Ch 1 and turn. Sc in same st and last st. (2 sc)

Info :

If you used an odd number of rows to fit around your dowel rod, continue with the pattern as written. If you used an even number of rows, work row 19 in the front loops only instead of the back loops. This will keep your unused loops on the correct side for seaming.

Round 19 :

Row 19: Ch 1 and turn. Sc in same st in blo, sc in last st in blo (you will be using the unused loops for row 24). (2 sc)

Round 20-23 :

Row 20-23: Ch 1 and turn. Sc in same st and last st. (2 sc)

Info :

If you needed more or fewer rows for the beginning tube, do the same thing here for the end tube.

Round 24 :

Row 24: Using the unused loops from row 19, sl st through both loops of row 23 and the loops from row 19 across to create the end tube (photos 4 and 5). Tie off. Weave in all ends.

Info :

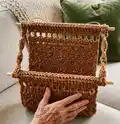
Review photos 6-9 for final assembly!

β€” Construction :

Info :

Beginning tube (this process is the same for the pocket and the arms). Photo 1: Check if your piece fits around your dowel rod. Photo 2: Sc the ends together to create a tube. You do not have to do this around the dowel rod, but it is shown for clarification. Photo 3: Finished beginning tube!
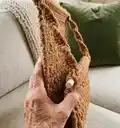
Info :

End tube (this process is the same for the pocket and the arms). Photo 4: Sl st in both loops of last row and unused loops from row 35 (or row 19 for the arms) across to create another tube. Photo 5: Finished end tube!

Info :

Final construction: Photo 6: Slip the beginning tube of the pocket onto the first dowel rod, and the end tube on the bottom dowel rod with the sl st seam facing you so the seam hides inside the folded pocket. Photo 7: For both arms, slip the beginning tube onto the end of the top dowel rod, twist a couple of times leaving the sl st seam facing in, and fold the pocket up to meet the arms. Photo 8: Slip the bottom tube onto bottom dowel rod. Tie 12-inch piece of yarn to each end of your dowel rod as desired for hanging. Photo 9: The hanging wall basket is complete!

Assembly Instructions

  • Slip the beginning tube of the pocket onto the top dowel rod and slide the end tube onto the bottom dowel rod, positioning the sl st seam facing inward so the seam is hidden when the pocket is folded up.
  • For each arm, slip the beginning tube onto the end of the top dowel rod, twist a couple times with the sl st seam facing inward, then fold the pocket up to meet the arms and slide the arms into position.
  • After both dowel rods are in place, tie a 12-inch piece of yarn to each end of the top dowel as desired to create a hanging string, adjusting length for your preferred hanging height.
  • Use the unused loops method (row 35 or row 19 procedure) to create the end tubes, sl st through the corresponding loops to form finished tubes, tie off, and weave in all ends securely.
  • Before finalizing, ensure the pocket holds your book by checking the fit on the dowels and making any minor adjustments to the arm placement or twists to keep the pocket stable.

Important Notes

  • πŸ’‘Work with two strands of worsted weight yarn held together throughout the pattern to achieve the correct density and gauge.
  • πŸ’‘Ch 1 at the beginning of the row when turning does not count as a stitch; ch 3 counts as a dc and ch 4 counts as dc + ch 1 throughout the pattern.
  • πŸ’‘After row 2, the piece should measure about 9 inches long; if it is longer or shorter, check gauge or adjust hook size before proceeding.
  • πŸ’‘Keep track of whether you used an odd or even number of rows to fit around your dowel rod, as this affects whether you work row 35 (or row 19 for arms) in BLO or FLO for correct seaming.

This Boho Book Nook turns simple crochet into a beautiful hanging wall basket you can use to display a favorite book or small items. It uses two strands for durability and minimal seaming for a clean finish. Perfect for gifting or decorating a cozy reading corner. 🧢✨

You ask,

we answer.

FAQs

What size will the finished piece be?

The finished Book Nook measures approximately 12 inches wide and 11 inches long after completion, not including the hanging string.

What yarn and hook are recommended?

Use worsted weight (#4) yarn held as two strands together; the pattern suggests approx 350 yards total. A 6mm hook was used to match the gauge; adjust hook size if needed to meet gauge.

Do I need to be an experienced crocheter to make this?

This pattern is rated Beginner Friendly (advanced-beginner) and uses basic stitches plus a mini bean stitch; you should be comfortable with single crochet, double crochet, and working in BLO/FLO.

How long does this project take to complete?

Most crocheters finish this project in 2-4 hours depending on experience and whether you make adjustments to size or additional repeats.

Can I make the pocket wider or longer?

Yes β€” you can foundation single crochet an odd number of stitches for a wider pocket and add pattern repeats for length, but be aware this may affect how the pocket fits on the dowel rod and its load capacity.