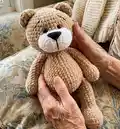
🧢 Beautiful ✨ Detailed πŸ’ Adorable

Teddy Bear Amigurumi Pattern

Teddy Bear Amigurumi Pattern
4.2β˜… Rating
5-7 Hours Time Needed
1.3K Made This
βœ‚οΈ

Intermediate Level

Ideal for those with basic crochet experience, featuring slightly more advanced stitches and techniques to expand your skills.

⏱️

Weekend Treat

Takes 5-7 hours, making it an enjoyable project to finish over a couple of days.

🧸

Cute Companion

An adorable friend to cherish, handcrafted with love to bring comfort and joy for years to come.

About This Teddy Bear Amigurumi Pattern

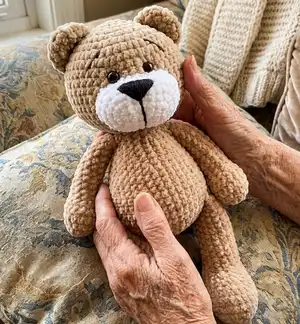
This pattern teaches you how to crochet a soft plush teddy bear using plush yarn and basic amigurumi techniques. You will make the head, ears, muzzle, arms, legs, body and tail with round-by-round instructions. The pattern highlights finishing steps like eye tightening and embroidered details for an expressive face. It is ideal for making a special handmade gift or keepsake.

Teddy Bear Amigurumi Pattern crochet pattern - detailed view of completed project

Includes full materials list, abbreviations and clear assembly directions. Suitable for crocheters comfortable with single crochet, increases, decreases and simple shaping.

Why You'll Love This Teddy Bear Amigurumi Pattern

I absolutely love this pattern because the plush yarn creates the softest, most huggable finish that kids and adults adore. I enjoy how the simple shaping comes together quickly and yields a very professional-looking bear. The muzzle and eye-tightening steps add so much personality with just a few finishing touches. I also love that you can easily customize colors and small details to make each bear unique.

Teddy Bear Amigurumi Pattern step 1 - construction progress Teddy Bear Amigurumi Pattern step 2 - assembly progress Teddy Bear Amigurumi Pattern step 3 - details and accessories Teddy Bear Amigurumi Pattern step 4 - final assembly and finishing

Switch Things Up

I love how easily you can customize this teddy β€” I often change the main color to pastel shades for baby gifts or rich browns for a classic look.

I sometimes use a bulkier plush yarn and larger hook to make a chunkier, cuddlier bear, or a finer yarn for a mini keychain-size version.

I like to add tiny clothes or accessories like scarves, hats, or a crocheted romper to personalize the bear for the recipient.

Try swapping safety eyes for embroidered eyes for a fully soft, child-safe toy suitable for younger children.

I sometimes embroider different facial expressions with the black yarn to create a smiling, surprised, or sleepy look β€” placement changes the personality dramatically.

To make the bear poseable, I add a thin wire armature in the limbs before stuffing, which lets me position arms and legs for play displays.

If you want a vintage look, I lightly needle-felt a bit of blush on the cheeks or use muted colors and matte buttons for accents.

I also experiment with different muzzle shapes β€” you can shorten or lengthen chains in the muzzle to change its profile.

For a gift set, I make matching mini bears in contrasting colors using the same pattern scaled down with thinner yarn and a smaller hook.

I recommend practicing the eye-tightening on a scrap piece first so you can adjust tension and spacing to your taste before working on the real muzzle.

Common Mistakes & How to Fix Them

βœ— Skipping stitch markers during rounds can cause you to lose track of the beginning of each round; place a marker at the start of every round to stay accurate. βœ— Forgetting to stuff gradually leads to lumps or misshapen limbs; stuff small amounts at a time and shape as you go to maintain even firmness. βœ— Not tightening the eyes with a long strong yarn will give a flat face; follow the tightening instructions carefully and pull gently to set the eyes securely. βœ— Sewing parts without pinning first can make them uneven or crooked; pin or baste the ears, muzzle and limbs in place before sewing them permanently.

Teddy Bear Amigurumi Pattern

Make a cuddly plush teddy bear with this clear step-by-step crochet pattern. You will work with soft plush yarn to create a squishy head, body, limbs and sweet muzzle details. The pattern includes full round-by-round instructions, materials and assembly notes so you can complete a charming handmade gift. Follow the guidance for finishing touches like eye tightening and embroidered brows for a professional result.

Intermediate 5-7 Hours

Materials Needed for Teddy Bear Amigurumi Pattern

β€” Main Fabric

  • 01
    Plush yarn (approx. 120 m / 100 g, e.g., Himalaya Dolphin Baby) - main color brown: two skeins (about 1.5 skeins consumed)
  • 02
    Plush yarn light white - small amount for muzzle and face design
  • 03
    Black YarnArt Jeans yarn - for embroidering eyebrows and nose
  • 04
    Strong yarn in bear color - for sewing parts and tightening face
  • 05
    Polyester stuffing / fiberfill - enough to stuff head, body and limbs
  • 06
    Safety eyes (screw mount) black - 12 mm (2 pieces)

β€” Tools Required

  • 01
    Crochet hook 4.5 mm
  • 02
    Crochet hook 2.0 mm
  • 03
    Scissors
  • 04
    Polyester stuffing (fiberfill)
  • 05
    Black YarnArt Jeans yarn for embroidering eyebrows and nose
  • 06
    Safety eyes on a screw mount, black, 12 mm (2 pcs)
  • 07
    Sewing needle for details
  • 08
    Strong yarn for sewing on parts and tightening the face
  • 09
    Stitch markers (or thin yarn of contrasting color)

Progress Tracker

0% Complete

β€” Head :

Round 1 :

R 1: 6 sc in mc (6)

Round 2 :

R 2: (inc)x6 (12)

Round 3 :

R 3: (1 sc, inc)x6 (18)

Round 4 :

R 4: (2 sc, inc)x6 (24)

Round 5 :

R 5: (3 sc, inc)x6 (30)

Round 6 :

R 6: (4 sc, inc)x6 (36)

Round 7 :

R 7: (5 sc, inc)x6 (42)

Round 8 :

R 8: (6 sc, inc)x6 (48)

Round 9-14 :

R 9-14: 48 sc (6 rows)

Info :

Insert safety eyes between R 9 and R 10.

Round 15 :

R 15: (6 sc, dec)x6 (42)

Round 16 :

R 16: (5 sc, dec)x6 (36)

Round 17 :

R 17: (4 sc, dec)x6 (30)

Round 18 :

R 18: (3 sc, dec)x6 (24)

Round 19 :

R 19: (2 sc, dec)x6 (18)

Info :

Stuff with fiberfill. F.o.

β€” Ears (make 2) :

Round 1 :

R 1: 8 sc in mc (8)

Round 2 :

R 2: (inc)x8 (16)

Round 3 :

R 3: 16 sc

Round 4 :

R 4: (3 sc, inc)x4 (20) F.o.

β€” Muzzle :

Info :

With white yarn: Make 7 ch. Make an oval starting from the 2nd ch from hook, work on both sides of the chain.

Round 1 :

R 1: From the 2nd ch from hook: 5 sc, 3 sc in last st,turn and crochet on the opposite side of the chain: 4 sc, inc (14)

Round 2 :

R 2: 1 ch, inc, 4 sc, (inc)x3, 4 sc, (inc)x2 (20)

Round 3 :

R 3: 1 ch, inc, 5 sc, (1 sc, inc)x4, 5 sc, inc (26)

Round 4 :

R 4: 1 ch, inc, 6 sc, (2 sc, inc)x4, 6 sc, inc (32)

Round 5 :

R 5: 32 sc F.o.

Info :

Sew muzzle to the head, put some stuffing inside the muzzle before you finish. Sew ears to the head. Embroider eye brows and nose with black yarn.

β€” Arms (make 2) :

Round 1 :

R 1: 6 sc in mc (6)

Round 2 :

R 2: (inc)x6 (12)

Round 3 :

R 3: (5 sc, inc)x2 (14)

Round 4 :

R 4: (3 sc, inc)x3, 2 sc (17)

Round 5 :

R 5: 17 sc

Round 6 :

R 6: dec, (1 sc, dec)x5 (11)

Round 7-11 :

R 7-11: 11 sc (5 rows)

Round 12 :

R 12: 9 sc, dec (10)

Round 13-14 :

R 13-14: 10 sc (2 rows)

Round 15 :

R 15: 8 sc, dec (9)

Round 16-17 :

R 16-17: 9 sc (2 rows) Stuff 3/4 full.

Info :

Fold top of arm flat and 5 sc through both sides across. F.o.

β€” Legs (make 2) :

Info :

Make 7 ch. Make an oval starting from the 2nd ch from hook, work on both sides of the chain.

Round 1 :

R 1: From the 2nd ch from hook: 5 sc, 4 sc in last st, turn and crochet on the opposite side of the chain: 4 sc, 3 sc in one st (16)

Round 2 :

R 2: inc, 4 sc, (inc)x4, 4 sc, (inc)x3 (24)

Round 3 :

R 3: inc, 1 sc, 4 sc, (inc, 1 sc)x4, 4 sc, (inc, 1 sc)x3 (32)

Round 4 :

R 4: BLO 32 sc

Round 5 :

R 5: 32 sc

Round 6 :

R 6: 7 sc, (dec)x6, 8 sc, (dec)x2, 1 sc (24)

Round 7 :

R 7: 6 sc, (dec)x4, 10 sc (20)

Round 8 :

R 8: 3 sc, (dec)x6, 5 sc (14)

Round 9-13 :

R 9-13: 14 sc (5 rows)

Round 14 :

R 14: 12 sc, dec (13)

Round 15 :

R 15: 13 sc

Round 16 :

R 16: 11 sc, dec (12)

Round 17-19 :

R 17-19: 12 sc (3 rows) Stuff with fiberfill.

Info :

Fold top of leg flat and 6 sc through both sides across. F.o.

β€” Boddy :

Round 1 :

R 1: 6 sc in mc (6)

Round 2 :

R 2: (inc)x6 (12)

Round 3 :

R 3: (1 sc, inc)x6 (18)

Round 4 :

R 4: (2 sc, inc)x6 (24)

Round 5 :

R 5: (3 sc, inc)x6 (30)

Round 6 :

R 6: (4 sc, inc)x6 (36)

Round 7 :

R 7: (5 sc, inc)x6 (42)

Round 8 :

R 8: 42 sc

Round 9 :

R 9: 8 sc, 6 sc together with sc of the 1st leg, 14 sc, 6 sc together with sc of the 2nd leg, 8 sc (42)

Round 10-11 :

R 10-11: 42 sc (2 rows)

Round 12 :

R 12: (5 sc, dec)x6 (36)

Round 13-14 :

R 13-14: 36 sc (2 rows)

Round 15 :

R 15: (4 sc, dec)x6 (30)

Round 16 :

R 16: 30 sc

Round 17 :

R 17: (3 sc, dec)x6 (24)

Round 18-19 :

R 18-19: 24 sc (2 rows)

Round 20 :

R 20: (2 sc, dec)x6 (18)

Round 21 :

R 21: 3 sc, (5 sc together with sc of the 1st arm, 4 sc, 5 sc together with sc of the 2nd arm, 1 sc (18)

Round 22 :

R 22: 18 sc

Info :

Stuff with fiberfill. F.o.

β€” Tail :

Round 1 :

R 1: 6 sc in mc (6)

Round 2 :

R 2: (inc)x6 (12)

Round 3 :

R 3: 12 sc F.o.

Info :

Sew tail to the body.

β€” Assembly :

Info :

After we have connected all the parts, we proceed to the assembly. Sew on the details with a thin strong yarn in the color of the bear’s yarn. We sew the ears to the head. Place the ear on the side of the head. Make sure that the ears are in a vertical line with the feet.

Info :

Sew on the muzzle. Place the top edge of the muzzle just under the eyes. Sew on with strong yarn. Before you sew to the end, do not forget to fill the muzzle with filler. Sew the nose onto the muzzle. You can choose any place on the tummy, as well as on the head. In my description, I propose to do as follows:

Info :

Tightening. Next, you need to make a tightening on the eyes. This requires a long needle and strong yarn. We introduce the needle in the center at the bottom of the head, as close as possible to the seam of the joint between the head and the body. We bring it out near the right eye from the outside. At the bottom we leave the tail of the yarn, for which we will pull it. We introduce the needle from the back of the same eye and draw the muzzle at the bottom. We repeat the first step.When the needle is near the eye, at the same time we pull (slightly, gently) by the tail of the yarn at the bottom and by the needle, we correct the crocheting with our hands, forming a tightening. We do this again so that the tightening holds. We do the same from the side of the second (left) eye. After the tightening result suits you, we remove the needle from the bottom of the muzzle and tie a knot.

Info :

We continue to tighten. Next, we need to bring our eyes slightly closer to each other. We introduce the needle from the bottom of the muzzle and withdraw it from the inside of the right eye. Insert the needle at the top of the right eye from the inside and draw it out at the top of the inside of the opposite (left) eye. We insert the needle at the bottom along the inner side of the left eye, draw it out on the right eye. Slightly tighten the yarn, adjust the crocheting by hand.

Info :

Pull the needle and yarn out from the bottom of the muzzle, tie a knot and hide both ends of the yarn in crocheting. We embroider eyebrows with black yarn, a mouth on the face, We also make stitches on the head, tummy and lower legs.

Assembly Instructions

  • Sew the ears to the head, placing each ear on the side of the head so they align vertically with the feet, pin first to check symmetry.
  • Sew the muzzle to the head with strong yarn, placing the top edge just under the eyes; stuff the muzzle lightly before finishing the seam.
  • Use a long needle and strong yarn to tighten the eyes: pass from the bottom center of the head near the seam, draw out at the eye, pass behind and pull gently to create the correct indent for each eye.
  • Attach arms by sewing the top row of arm to the body at the positions indicated (work 5 sc together with body stitches as noted), making sure both arms mirror each other.
  • Sew legs to the body by joining the leg edges to the body at the positions shown in R9 of the body, then stuff body and close securely.

Important Notes

  • πŸ’‘Use stitch markers to mark the beginning of each round and to keep track of increases and decreases for accurate shaping.
  • πŸ’‘Stuff pieces gradually and evenly to avoid lumps; check shape frequently and add stuffing in small amounts.
  • πŸ’‘Pin parts in place before sewing them to ensure even positioning and symmetry across the finished toy.
  • πŸ’‘Weave in ends and hide knots inside the plush crocheting to achieve a neat final appearance.

This cuddly Teddy Bear Amigurumi pattern lets you create a soft, huggable friend with plush yarn and simple shaping. Follow the full round-by-round instructions and thoughtful assembly notes for a polished finish. Perfect as a handmade gift or nursery companionβ€”creative, cozy, and heartwarming. 🧢🧸

You ask,

we answer.

FAQs

What size will the finished piece be?

The finished amigurumi size will depend on your tension and yarn, but using the recommended plush yarn and hooks it will be a medium-size teddy suitable for hugging (approx. 30-40 cm tall depending on crochet tension).

Can I use different yarn weights for this pattern?

Yes, you can use different yarn weights but that will change the final size; if you choose a thicker bulky yarn use a larger hook and expect a chunkier bear, while finer yarn and smaller hooks yield a smaller toy.

Do I need prior crochet experience for this pattern?

This pattern is rated intermediate; basic knowledge of single crochet, increases, decreases, working in the round, and simple assembly techniques is recommended for the best results.

How long does this project typically take to complete?

Most crocheters complete this project in 5-7 hours, though actual time varies by experience and the level of finishing detail you choose to add.