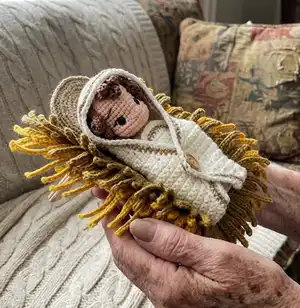
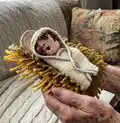
Create a charming Baby Jesus amigurumi complete with a straw bed, halo, wooden manger, and diaper wrap. This pattern guides you through each piece step-by-step with photos and helpful shaping notes so you can build a special keepsake for the holidays. Youll use fine yarn and small hooks to craft a delicate, detailed miniature that makes a beautiful addition to your nativity display or a heartfelt gift.
Progress Tracker
0% Complete
— Supplies :
Info :
One Sweet Handfuls Mini Baby Doll (base doll) made in desired skin tone, no hair, eyes open or closed. Size 1.5mm hook. Size 2.0mm hook. Size 2 (super fine weight) yarn in colors (or choose your own!): White or Natural White, Light Brown, Golden Yellow, Olive (or light brown), Metallic Gold.
Info :
I used Hobbii Rainbow Cotton 8/4 in Natural White (002), Light Brown (006), Curry (056), Olive (072), and Go Handmade Cocktail Deluxe in Gold (metallic) (also from Hobbii).
Info :
Stitch markers or paper clips. 14 Craft sticks (popsicle sticks). Scissors. Craft glue. Craft paint or spray paint (optional). Tapestry needle. Stick pins (lots of these!). Large Styrofoam or thick foam piece for wet blocking. Medium wooden button.
— Abbreviations :
Info :
Rnd - Round. mr - magic ring. ch - chain. sc - single crochet. dc - double crochet. INC - increase. DEC - decrease. inv DEC - invisible decrease. slst - slip stitch. st - stitch. sts - stitches. sk - skip. sp - space. BLO - back loops only. (...)x - repeat the indicated number of times.
— Notes on Level and Yarn :
Info :
Level: INTERMEDIATE. A Note about Yarn Over vs. Yarn Under: when making clothes or blankets for the Sweet Handfuls Dolls I generally use Yarn Over (v-stitch) for softer look. The dolls themselves are made using Yarn Under (x-stitch). Differences can result in slightly different tension, shaping, and sizing. These are guidelines and not requirements. Wet Blocking: The Straw Bed will require wet blocking to tame the crazy pieces of straw and make them more manageable. Hook Sizing Explained: 1.5mm hook used on the dolls; pattern indicates 1.5mm and 2.0mm. If you used a larger hook for the dolls, use that same hook when 1.5mm is indicated, and 0.5mm larger when 2.0mm is indicated.
— Manger Templates :
Info :
You will need 14 craft sticks (popsicle sticks) to construct the wooden manger. The sticks used were approximately 4 1/2" (11 1/2 cm) long, and 3/8" (1 cm) wide for reference. Template A (Make 2) - You will need 4 craft sticks. Glue craft sticks in this position. Template B (Make 4) - You will need 4 craft sticks; lay craft stick on template, mark lines, and cut as shown. Glue to x-shape to form a double layer for support.
— Manger :
Info :
The wooden manger is constructed using regular sized craft sticks and craft glue (or hot glue). Craft glue is less bulky but takes longer to dry. This manger will work for dolls made with size 2 yarn and are roughly 5" long. For size 3 yarn use jumbo craft sticks; size 4 yarn may require larger wood pieces.
Item Name (P1) :
Make two X shapes from 4 craft sticks each (Template A). Make four shorter center pieces by cutting craft sticks (Template B). Glue smaller cut pieces onto the X shape to reinforce it so you end up with 2 double thick X shapes. Prop up the X shapes and glue two center craft sticks, spacing equal to length of a craft stick. Continue adding glue and craft sticks so that there are 3 on each half (forming the trough). Let glue dry and remove props.
— Straw bed :
Info :
Using Yarn Over (v-stitch) or your preference. Using 2.0mm hook (0.5mm larger hook size than doll). Using Golden Yellow yarn. Note: Turning ch (ch1) will not be included in the stitch count. Start with Ch17.
Row 1 :
Starting in 2nd ch from hook, 16sc, ch1, turn (16)
Row 2-27 :
16sc, ch1, turn (26 rows) (16)
Row 28 :
16sc (do not turn) (Fig. 1) (16)
Info :
Border and Straw: Place marker, and start continuous rounds.
Rnd 1 :
27 sc across ends of rows, 3sc in corner, 14sc, 3sc in corner, 27sc across ends of rows, 3sc in corner, 14sc, 3sc in corner (Fig. 2) (94)
Rnd 2 :
BLO - [28sc, INC (in corner), 16sc, INC (in corner), 29sc, INC (in corner), 17sc, INC (in corner)] (Fig. 3) (98)
Rnd 3 :
(2 pieces of straw) *(ch10 (Fig. 4), starting 2nd ch from hook - 9slst, 1sc in next sc (Fig. 5), ch15, starting 2nd ch from hook - 14slst, 1sc in next sc (Fig. 6)), continue from * around, (last piece of straw will be a ch15 piece) (Fig. 7) (98 pieces of straw)
Info :
Finish off, and sew in ends.
Info :
Join Olive (or light brown) yarn to exposed front loops from Rnd 2. (Fig. 8)
Interior Rnd :
* (Ch12, starting 2nd ch from hook - 11slst, 1sc in next sc, ch8, starting 2nd ch from hook - 7slst, 1sc in next sc (Fig. 9)), continue from * around (Fig. 10) (92 pieces of straw)
Info :
Finish off, and sew in ends. Wet the straw bed and wring out the excess water. Lay out the damp straw bed on a thick piece of foam or Styrofoam, and carefully stretch each piece of straw, keeping it straight, and pin down with stick pins. Let dry overnight or length of time necessary for it to completely dry. Wet blocking will help the straw to lay more neatly (also see Notes on page 4.)
— Hair :
Info :
Using Yarn Under (x-stitch). Using 1.5mm hook (same hook size as doll). Using Light Brown yarn.
Rnd 3 :
(1sc, INC) x7 (21)
Rnd 4 :
(2sc, INC) x7 (Fig. 14) (28)
Rnd 5 :
(This round will be crocheting the pieces of hair, and each piece will be numbered)
1) :
*Ch15, starting in 2nd ch from hook - INC, 1sc, INC, 11sc, 1sc in next sc (on Rnd) (Fig. 15, 16)
2) :
**Ch17, starting in 2nd ch from hook - INC, 1sc, INC (Fig. 17), 13sc, 1sc in next sc (on Rnd) (Fig. 18)
6) :
***Ch13, starting in 2nd ch from hook - INC, 1sc, INC, 9sc, 1sc in next st (on Rnd)
Space :
3sc (in next 3sts on Rnd, forming a gap between hair strands)
9) :
Ch7, starting in 2nd ch from hook - 6sc, 1sc in next sc (on Rnd)
10) :
Ch9, starting in 2nd ch from hook - 8sc, 1sc in next sc (on Rnd)
11) :
Ch11, starting in 2nd ch from hook - 10sc, 1sc in next sc (on Rnd)
12) :
Ch9, starting in 2nd ch from hook - 8sc, 1sc in next sc (on Rnd)
13) :
Ch7, starting in 2nd ch from hook - 6sc, 1sc in next sc (on Rnd)
14) :
***Ch13, starting in 2nd ch from hook - INC, 1sc, INC, 9sc, 1sc in next st (on Rnd)
17) :
*Ch15, starting in 2nd ch from hook - INC, 1sc, INC, 11sc, 1sc in next sc (on Rnd)
18) :
**Ch17, starting in 2nd ch from hook - INC, 1sc, INC, 13sc, 1sc in next sc (on Rnd)
Info :
You should have 21 pieces of hair, with 2 spaces. (Fig. 19, 20)
Note :
The hair piece will be placed on the head with the back side facing out, so that the curls are curling under. Using stick pins, fasten the middle section of the hair piece to the head, carefully centering the 5 shorter strands in front (back strands will reach the back of the neck area).
Info :
When you are satisfied with placement, you can glue the middle of the hair piece to the top of the head, and re-pin it. Starting from the center of the back, carefully place glue under the 2 middle strands, gluing down to just above the curl. Pin down each strand; hair strands should be touching each other and neatly lying flat around the back of the head (except for the curl at the end of each strand which will be loose).
Info :
Continue to glue down and pin each strand around the back of the head, alternating between each side, until all 10 strands of hair on the back of the head are glued in place. After the 10 strands on the back are glued and pinned in place, find the 6 strands above the ears (3 on each side - these were the ch13 pieces). Apply glue under the 3 side hair strands down to the ear. Glue down the middle strand first, with curl falling just in front of the ear, and pin in place. The 2 strands on either side of the middle strand will fall with their 2 curls above the middle strand curl. Glue and pin into place. Repeat on the other side.
Info :
Next, glue the shorter hair (bangs) in the front of the forehead. Start with the middle strand of the 5 front strands, gluing it centered on the forehead. Then glue the 2 outer strands; because they are shorter, the curls will be higher on the forehead than the middle curl. Add more glue if needed to attach the final 2 strands of hair. Allow time for craft glue to dry, then carefully remove stick pins.
— Diaper Wrap :
Info :
Using Yarn Over (v-stitch). Using 1.5mm hook (same hook size as doll). Using White or Natural White yarn. Start with Ch28, then join in a circle by making a sc into the beginning chain, careful not to twist the row of chains. Place your marker and begin working in continuous rounds. Note: When you sew in your ends (after making the diaper wrap), you can make an invisible join with your starting tail.
Rnd 1-3 :
28sc (3 rounds) (Fig. 22) (28)
Info :
Leaving the marker in place, you will now change to Rows to form the crotch section. Note: Turning ch (ch1) will not be included in the stitch count, and the crotch rows will be designated with letters.
Row A :
BLO 8sc (skipping the rest of the round), ch1, turn (Fig. 23) (8)
Row B :
DEC, 4sc, DEC, ch1, turn (4)
Row C :
6sc, ch1, turn (6)
Row D :
DEC, 2sc, DEC, ch1, turn (Fig. 24) (4)
Row E-H :
4sc, ch1, turn (4 rows) (Fig. 25) (4)
Row I :
INC, 2sc, INC, ch1, turn (6)
Row J :
INC, 4sc, INC (Fig. 26) (8)
Info :
Cut yarn, leaving a tail for sewing. Sew crotch piece to waistband using a whipstitch through the inside loop (Fig. 28) on the waistband and both loops on the crotch piece (leaving the loop to the outside exposed for later). Be careful to center it (there will be 6sts on the waistband over each leg hole) (Fig. 27). Sew in ends.
Info :
Return to where your marker was, and continue with Round 4.
Rnd 4 :
(working into exposed front loops, and FLO) (3sc, INC) x7 (see photos below) (35)
Rnd 5 :
FLO 35sc (Fig. 29) (35)
Rnd 6 :
10sc, (INC, 1sc) x6, 13sc (41)
Rnd 7-8 :
41sc (2 rounds) (41)
Rnd 9 :
FLO 41sc (Fig. 30) (41)
Info :
Finish off with invisible join. Sew in ends. With garment facing you (join on the starting round of chains on the waistband should be on the back side (see Fig. 32)). Take the right side and pinch it into creases (Fig. 33). Using a bit of white yarn, sew through the creases from bottom to top and back again to hold them in position. Pull the yarn tight and knot it, sew in the ends (Fig. 37, 38).
— Halo :
Info :
Using Yarn Under (x-stitch). Using 2.0mm hook (0.5mm larger hook size than doll). Using Metallic Gold yarn.
Rnd 3 :
(1sc, INC) x8 (24)
Rnd 4 :
BLO - (1sc, INC, 1sc) x8 (32)
Rnd 5 :
(3sc, INC) x8 (40)
Rnd 6 :
(2sc, INC, 2sc) x8 (48)
Rnd 7 :
BLO - (5sc, INC) x8 (56)
Rnd 8 :
(3sc, INC, 3sc) x8 (64)
Rnd 9 :
(7sc, INC) x8 (Fig. 39) (72) Do not finish off. Set aside to make second circle.
Info :
Using Golden Yellow yarn make matching circle: Rnd1 8sc in mr (8). Rnd2 (INC) x8 (16). Rnd3 (1sc, INC) x8 (24). Rnd4 (1sc, INC, 1sc) x8 (32). Rnd5 (3sc, INC) x8 (40). Rnd6 (2sc, INC, 2sc) x8 (48). Rnd7 (5sc, INC) x8 (56). Rnd8 (3sc, INC, 3sc) x8 (64). Rnd9 (7sc, INC) x8 (72). Finish off with invisible join. Sew in ends.
Info :
Cut a piece of plastic canvas, cardboard, (or other thin, sturdy material) into a circle slightly smaller than the crocheted circles. Place the 2 crocheted circles back-to-back, use the yarn from the Metallic Gold circle to crochet through both loops of matching sc on both circles. When you reach about 2/3 of the way around, insert the plastic canvas piece between the 2 circles. Continue with sc around until circles are fully sewn together. Finish off. Sew in ends. Optional: add a little fiber fill between the canvas piece and the Golden Yellow circle to puff out the back of the halo like a thin pillow if needed.
This Sweet Handfuls Baby Jesus set brings a handmade touch to your holiday traditions with tiny, detailed crochet work and a cozy straw bed. Whether you craft a single keepsake or a whole nativity display, these pieces are designed to delight and last for years. Enjoy the process of assembling, wet-blocking, and finishing each delicate element — its a labor of love that becomes a cherished heirloom. 🧶✨🧵