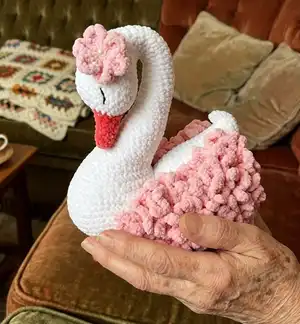
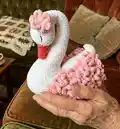
Make a sweet, fluffy swan amigurumi using plush Himalaya Dolphin Baby yarn. This pattern guides you step-by-step through the beak, head, neck and body shaping, plus decorative curly wings and a pretty flower. With clear stitch counts, marker placement tips and photos, you can create a 23 cm (approx.) cuddly swan to gift or display.
Progress Tracker
0% Complete
— Beak :
Info :
Use yarn Himalaya Dolphin Baby in coral color, with a crochet hook size № 4. Marker is in the center of the side of the beak. If necessary, crochet a shifting stitch to be in the center. Combinations, highlighted in blue, should be located relatively on the center of the front part of the beak.
Round 1 :
Make 4 ch. Start crocheting in the second ch from the hook – 3 sc, continue crocheting on the second side of chain – 3 sc (6)
Round 3 :
inc, 1 sc, inc, 3 sc (8)
Round 5 :
2 sc, 3 sc into 1, 5 sc (10)
Round 7 :
2 sc, 3 sc into 1, 7 sc (12)
Round 8 :
3 sc, 3 sc into 1, 4 sc, 3 slst – on this finish crocheting this row (do not crochet 1 loop from the row ) (14)
Info :
When crocheting the last slst, change coral color thread to the white color thread. Put holofiber into the beak. Next move on to crochet the head.
— Head+Neck+Body :
Info :
Crochet the head around the beak with Himalaya Dolphin Baby yarn in white color, with a crochet hook size № 4. Stuff the legs with filler as you crochet. Distribute the filler well. The lower part of the head and body has a flat shape – keep this in mind when filling. Optional – you can use a wire frame. Combinations, highlighted in blue, should be located relatively on the center of the front part of the head. All SLST should be located relatively on the center of the bottom part of the head.
Info :
IMPORTANT!!! The last loop of each row should be located in the center of the lower part of the head!!! The marker passes next to this loop. If necessary, crochet a shifting stitch. Shifting stitch is crochet with sc BEFORE COMBINATION with SLST. Example 3rd row: 2 slst, inc, 6 sc, 7 hdc, 6 sc, inc, 1 shifting stitch with SC, 3 slst (26).
Round 1 :
2 slst, inc, 2 sc, 1 hdc, 5 hdc into 1, 1 hdc, 2 sc, inc, 3 slst (20)
Round 2 :
2 slst, inc, 5 sc, 1 hdc, 5 hdc into 1, 1 hdc, 5 sc, inc, 3 slst (26)
Round 3 :
2 slst, inc, 6 sc, 7 hdc, 6 sc, inc, 3 slst (28)
Round 4 :
2 slst, inc, 9 sc, 1 hdc, 3 hdc into 1, 1 hdc, 9 sc, inc, 3 slst (32)
Round 5 :
2 slst, 11 sc, 5 hdc, 11 sc, 3 slst (32)
Round 6 :
2 slst, 11 sc, 5 hdc, 11 sc, 1 slst, remove marker (move it 1 stitch forward), crochet 3 stitch together with slst (30)
Round 7 :
1 slst, 11 sc, 5 hdc, 11 sc, – remove marker (move it 1 stitch forward), crochet 3 stitch together with slst (28)
Round 8 :
1 slst, 5 sc, dec, 3 sc, 5 hdc, 3 sc, dec, 5 sc, – remove marker (move it 1 stitch forward), crochet 3 stitch together with slst (24)
Round 9 :
1 slst, 8 sc, 5 hdc, 8 sc, remove marker (move it 1 stitch forward), crochet 3 stitch together with slst (22)
Round 10 :
1 slst, 4 sc, dec, 1 sc, 5 hdc, 1 sc, dec, 4 sc, – remove marker (move it 1 stitch forward), crochet 3 stitch together with slst (18)
Round 11 :
1 slst, 2 sc, dec, 1 sc, 5 hdc, 1 sc, dec, 2 sc, – remove marker (move it 1 stitch forward), crochet 3 stitch together with slst (14)
Round 12 :
1 slst, 3 sc, 5 hdc, 3 sc, – remove marker (move it 1 stitch forward), crochet 3 stitch together with slst (12)
Round 13 :
1 slst, 2 sc, 5 hdc, 2 sc, 2 slst (12)
Round 14 :
1 slst, 2 sc, 5 hdc, 2 sc, 1 slst, back loop only – 1 slst (I advise you to put markers on the back loops so as not to lose them) (12)
Round 15 :
1 slst, 2 sc, 5 hdc, 2 sc, 2 slst (12)
Round 16 :
1 slst, 3 sc, 3 hdc, 3 sc, 2 slst (12)
Round 17 :
1 slst, 4 sc, 1 hdc, 4 sc, 1 slst, 1 slst, grabbing the back loop of the stitch, left in the 14th row (as shown in the photo) (12), remove the marker, crochet another 5-6 sc to reach the center of the back of the neck, set the marker.
Info :
The MARKER now runs down the center of the BACK OF THE NECK, moving to the CENTER OF THE BACK. If necessary, crochet a shifting stitch to be in the center. Combinations, highlighted in red, should be located relatively on the center of the inner part of the neck – from the side of the head.
Round 18 :
5 sc, inc, 6 sc (13)
Round 19 :
5 sc, 3 slst, 5 sc (13)
Round 20 :
6 sc, inc, 6 sc (14)
Round 21 :
1 sc, dec, 2 sc, inc, 2 sc, inc, 2 sc, dec, 1 sc (14)
Round 22 :
6 sc, 2 inc, 6 sc (16)
Round 23 :
6 sc, 4 slst, 6 sc (16)
Round 24 :
6 sc, inc, 2 sc, inc, 6 sc (18)
Round 25 :
1 sc, dec, 5 sc, 2 inc, 5 sc, dec, 1 sc (18)
Round 27 :
1 sc, dec, 4 sc, inc, 2 sc, inc, 4 sc, dec, 1 sc (18)
Round 28 :
8 sc, 2 inc, 8 sc (20)
Round 29 :
1 sc, dec, 5 sc, inc, 2 sc, inc, 5 sc, dec, 1 sc (20)
Round 30 :
9 sc, 2 inc, 9 sc (22)
Round 31 :
9 sc, inc, 2 sc, inc, 9 sc (24)
Round 32 :
11 sc, 2 inc, 11 sc (26)
Round 33 :
1 sc, dec, 9 sc, 2 inc, 9 sc, dec, 1 sc (26)
Round 34 :
11 sc, inc, 2 sc, inc, 11 sc (28)
Round 35 :
1 sc, dec, 10 sc, 2 inc, 10 sc, dec, 1 sc (28)
Round 36 :
12 sc, inc, 2 sc, inc, 12 sc (30)
Round 37 :
1 sc, dec, 6 sc, inc, 4 sc, 2 inc, 4 sc, inc, 6 sc, dec, 1 sc (32)
Round 38 :
1 sc, dec, 9 sc, inc, 2 sc, 2 inc, 2 sc, inc, 8 sc, 1 slst, dec with slst, 1 slst (34)
Round 39 :
6 slst, 22 sc, 3 slst, back loop only – 3 slst (I advise you to put markers on the back loops so as not to lose them) (34)
Round 40 :
Back loop only – 3 slst (I advise you to put markers on the back loops so as not to lose them), for both loops – 6 sc, inc, 6 sc, 2 inc, 6 sc, inc, 6 sc, 3 slst, grabbing the back loop of the stitch, left in the 39th row (38)
Round 41 :
3 slst, grabbing the back loop of the stitch, left in the 40th row, 5 slst, 5 sc, inc, 10 sc, inc, 5 sc, 5 slst, back loop only – 3 slst (I advise you to put markers on the back loops so as not to lose them) (40)
Round 42 :
Back loop only – 3 slst (I advise you to put markers on the back loops so as not to lose them), for both loops – 5 sc, inc, 6 sc, inc, 3 sc, 2 inc, 3 sc, inc, 6 sc, inc, 5 sc, 3 slst, grabbing the back loop of the stitch, left in the 41st row (46)
Round 43 :
3 slst, grabbing the back loop of the stitch, left in the 42nd row, 7 slst, 9 sc, inc, 6 sc, inc, 9 sc, 7 slst, back loop only – 3 slst (I advise you to put markers on the back loops so as not to lose them) (48)
Round 44 :
Back loop only – 3 slst (I advise you to put markers on the back loops so as not to lose them), for both loops – 12 sc, inc, 16 sc, inc, 12 sc, 3 slst, grabbing the back loop of the stitch, left in the 43rd row (50)
Round 45 :
3 slst, grabbing the back loop of the stitch, left in the 44th row, 9 slst, 2 sc, inc, 9 sc, 2 inc, 9 sc, inc, 2 sc, 9 slst, back loop only – 3 slst (I advise you to put markers on the back loops so as not to lose them) (54)
Round 46 :
Back loop only – 3 slst (I advise you to put markers on the back loops so as not to lose them), for both loops – 48 sc, 3 slst (54)
Round 47 :
14 slst, 3 sc, inc, 18 sc, inc, 3 sc, 14 slst (56)
Round 48 :
3 slst, 7 sc, inc, 34 sc, inc, 7 sc, 3 slst (58)
Round 49 :
16 slst, 26 sc, 16 slst (58)
Round 50 :
3 inc, grabbing the back loop of the stitch, left in the 46th row, 10 inc, dec, 4 sc, (dec, 3 sc)*2, (3 sc, dec)*2, 4 sc, dec, 10 inc, 3 inc, grabbing the back loop of the stitch, left in the 45th row (78)
Round 51 :
(1 sc, inc)*5, 10 sc, (1 sc, inc)*3, dec, 22 sc, dec, (inc, 1 sc)*3, 10 sc, (inc, 1 sc)*5 (92)
Info :
Further, according to the scheme, markers will be placed on the front loops of the loops of certain combinations. Wings are tied along them at the end of the crocheting of the body. We put marker for convenience and visibility of loops. They are not required, therefore, in the absence of the required number/ color of markers, navigate visually along the canvas or use thread segments as a marker.
Round 52 :
13 sc, back loop only – 10 sc (place green marker on the front bow of the first and last loop of the combination), for both loops – 11 sc, dec, 3 sc, dec, (2 sc, dec)*3, 3 sc, dec, 11 sc, back loop only – 10 sc (place green marker on the front bow of the first and last loop of the combination), for both loops – 13 sc (86)
Round 53 :
(6 sc, inc)*4, 5 sc, (dec, 4 sc)*3, dec, 5 sc, (inc, 6 sc)*4 (90)
Round 54 :
5 sc, inc, 5 sc, back loop only – (inc, 5 sc)*2 (place orange marker on the front bow of the first and last loop of the combination), for both loops – inc, 5 sc, inc, (dec, 3 sc)*3, (3 sc, dec)*3, inc, 5 sc, inc, back loop only – (inc, 5 sc)*2 (place orange marker on the front bow of the first and last loop of the combination), for both loops – 5 sc, inc, 5 sc (94)
Round 55 :
(7 sc, inc)*4, (3 sc, dec)*3, (dec, 3 sc)*3, (inc, 7 sc)*4 (96)
Round 56 :
11 sc, back loop only – 14 sc (place purple marker on the front bow of the first and last loop of the combination), for both loops – 8 sc, (dec, 3 sc)*3, (3 sc, dec)*3, 8 sc, back loop only – 14 sc (place purple marker on the front bow of the first and last loop of the combination), for both loops – 11 sc (90)
Round 57 :
(6 sc, inc)*4, 2 sc, (3 sc, dec)*3, (dec, 3 sc)*3, 2 sc, (inc, 6 sc)*4 (92)
Round 58 :
9 sc, back loop only – 15 sc (place blue marker on the front bow of the first and last loop of the combination), for both loops – 7 sc, (dec, 3 sc)*3, (3 sc, dec)*3, 7 sc, back loop only – 15 sc (place blue marker on the front bow of the first and last loop of the combination), for both loops – 9 sc (86)
Round 59 :
(6 sc, inc)*4, (3 sc, dec)*3, (dec, 3 sc)*3, (inc, 6 sc)*4 (88)
Round 60 :
7 sc, back loop only – 17 sc (place pink marker on the front bow of the first and last loop of the combination), for both loops – 5 sc, (dec, 3 sc)*3, (3 sc, dec)*3, 5 sc, back loop only – 17 sc (place pink marker on the front bow of the first and last loop of the combination), for both loops – 7 sc (82)
Round 61 :
(5 sc, inc)*4, 2 sc, (3 sc, dec)*3, (dec, 3 sc)*3, 2 sc, (inc, 5 sc)*4 (84)
Round 62 :
5 sc, back loop only – 19 sc (place yellow marker on the front bow of the first and last loop of the combination), for both loops – 3 sc, (dec, 3 sc)*3, (3 sc, dec)*3, 3 sc, back loop only – 19 sc (place yellow marker on the front bow of the first and last loop of the combination), for both loops – 5 sc (78)
Round 63 :
(5 sc, inc)*4, (3 sc, dec)*3, (dec, 3 sc)*3, (inc, 5 sc)*4 (80)
Round 64 :
25 sc, (dec, 3 sc)*3, (3 sc, dec)*3, 25 sc (74)
Round 65 :
(6 sc, inc)*4, (1 sc, dec)*3, (dec, 1 sc)*3, (inc, 6 sc)*3, inc, 3 sc, (3 sc into 1)*3 (82)
Round 66 :
(3 sc into 1)*3, 29 sc, 6 dec, 38 sc (76)
Round 67 :
40 sc, 1 slst – on this we finish crocheting a row
Info :
Fix the thread, do not cut it, put a long piece of thread to the stitch the back of the body (about 50-60 cm). Add holofiber.
Info :
Using the remaining piece of the thread, sew the resulting hole in the back of the toy – 38 stitches in total. Fix the thread, hide it.
— WINGS (2 details) :
Info :
Use yarn Himalaya Dolphin Baby in pink color, with a crochet hook size № 4. Attach the pink thread to the last front bow of the loop of the 52nd row, as shown in the photo, make 5 chain.
Info :
Next, in each loop crochet the following combination: (dtr, ch, dtr, 3 ch, sc in the third loop from the hook).
— Right Wing :
Round 1 :
On the 52nd row from green to green marker, crochet this combination 10 times – under each left front loops. Turn the toy for convenience and go to the 54th row.
Round 2 :
On the 54th row from orange to orange marker, crochet this combination 12 times – under each left front loops. Turn the toy for convenience and go to the 56th row.
Round 3 :
On the 56th row from purple to purple marker, crochet this combination 14 times – under each left front loops. Turn the toy for convenience and go to the 58th row.
Round 4 :
On the 58th row from blue to blue marker, crochet this combination 15 times – under each left front loops. Turn the toy for convenience and go to the 60th row.
Round 5 :
On the 60th row from pink to pink marker, crochet this combination 17 times – under each left front loops. Turn the toy for convenience and go to the 62nd row.
Round 6 :
On the 62nd row from yellow to yellow marker, crochet this combination 19 times – under each left front loops. Make 4 ch and attach the chain to the last slst in the 60th row with slst – as shown in the photo. Fix, cut the thread, hide it. Optionally – threads from the crocheting of the wings (beginning and end) with a needle, bring out at 1 point, tie together into 2-3 knots and hide in the canvas.
Info :
Similarly crochet the LEFT WING following the same sequence of markers and repetitions for symmetry.
— Legs :
Info :
Use yarn Himalaya Dolphin Baby in coral color, with a crochet hook size № 4.
Round 1 :
Make 5 ch. Start crocheting in the second ch from the hook – 4 sc, continue crocheting on the second side of chain – 4 sc (8)
Round 3 :
3 sc, dec, 2 sc, remove marker, crochet more 1 dec and 3 sc (6)
Info :
Fill a little leg with holofiber. Fold in half, connect by crocheting 3 sc. Leave thread for sewing.
Info :
Sew the legs to the body between the 57th and 58th rows at a distance 6-7 sc.
— Flower :
Info :
Start to crocheting with Himalaya Dolphin Baby yarn in powdery color, with a crochet hook size № 4. Leave a piece of thread at the beginning of crocheting with a length of 10-15 cm.
Round 1 :
AR, 6 sc in AR (6). When crocheting the last sc, change powdery color thread to the pink color thread.
Round 2 :
Next, in each loop crochet the following combination: (2 ch, 2 trc, 2 ch, 1 slst). Fasten the thread. Using the remaining pieces of thread, sew a flower to the head or neck of the toy.
— Finishing :
Info :
Embroider eyes on the 3rd – 4th row of the head at a distance of 11 sc. Embroider nostrils between 1st and 2nd row of the beak at a distance of 1-2 sc.
This delightful Swan Amigurumi pattern makes a charming, soft décor piece and a thoughtful handmade gift. 🦢 The plush texture and curly wings add whimsical personality and tactile appeal to every creation. Perfect for crafters who love shaping and decorative finishing touches — enjoy every stitch! 🧶