🧢 Beautiful ✨ Detailed πŸ’ Adorable

Super Simple Socks Pattern

Super Simple Socks Pattern
4.5β˜… Rating
5-7 Hours Time Needed
1.6K Made This
βœ‚οΈ

Beginner Friendly Level

Perfect for those just starting their crochet journey, with clear instructions and simple techniques

⏱️

Weekend Treat

Takes 5-7 hours, making it an enjoyable project to finish over a couple of days.

πŸ‘•

Casual Chic

Relaxed style with a modern twist, perfect for everyday wear while maintaining that handcrafted uniqueness.

About This Super Simple Socks Pattern

This pattern creates a cosy adult-sized pair of crochet socks using one 100g ball of yarn and a 5mm hook. It uses simple half-treble stitches and easy shaping to form the foot and ankle. The cuff is worked flat and attached afterwards for a neat finish and versatile styling.
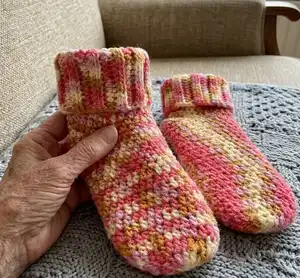
Super Simple Socks Pattern crochet pattern - detailed view of completed project

Designed in UK crochet terms for clarity, the pattern is ideal for self-striping yarn to hide joins. Finished socks measure roughly 32cm cuff down and fit up to a UK size 8 foot.

Why You'll Love This Super Simple Socks Pattern

I absolutely love this pattern because it transforms a single ball of yarn into a warm, wearable accessory with minimal fuss. I enjoy how forgiving the stitch pattern is β€” it hides joins well and works beautifully with self-striping yarn. The cuff attachment method gives a clean professional finish that I am proud to share. It is simple enough to relax with, but rewarding because the finished socks are both comfortable and durable.

Super Simple Socks Pattern step 1 - construction progress Super Simple Socks Pattern step 2 - assembly progress Super Simple Socks Pattern step 3 - details and accessories Super Simple Socks Pattern step 4 - final assembly and finishing

Switch Things Up

I love customizing these socks by changing yarn weight and hook size to create different sizes and textures.

I often use thicker yarn with a larger hook for a chunky, cosy slipper-sock perfect for winter evenings.

For a daintier pair, I switch to a finer yarn and a smaller hook to make lightweight summer versions.

You can vary the cuff height by adjusting the number of cuff rows to make ankle socks or taller boot socks.

Try colour-blocking: work the foot in a solid colour and the cuff in a contrasting shade for a modern look.

I like to add non-slip dots to the sole for safety on smooth floors using fabric paint or puffy paint.

Embroidery or small appliques on the cuff make great personalization for gifts and children’s sizes.

To make a matching set, change hook or yarn slightly to ensure both socks are identical; make the cuff before attaching to keep consistency.

Experiment with ribbing patterns on the cuff such as front-loop ribs or extended BL ribs for different stretch and style.

I sometimes add a folded decorative edge by making one extra row in front loops only before seaming the cuff.

Common Mistakes & How to Fix Them

βœ— Not checking gauge before starting can lead to socks that are too large or too small; make a 4" x 4" gauge swatch and adjust hook size if necessary. βœ— Skipping the magic ring start makes the toe look bulky and uneven; use a magic ring and pull tight to form a neat toe. βœ— Fastening off too early when making the cuff will prevent attachment to the sock; do not fasten off at the end of the cuff rows and attach as instructed. βœ— Forgetting to work into the back loops for the cuff ribs will change the texture and stretch; be sure to work BL only for the cuff rows to get the ribbed effect. βœ— Pulling stitches too tight when attaching the cuff can distort the sock top; use even tension and check placement before continuing.
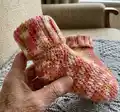
Super Simple Socks Pattern

Make a cosy pair of adult socks using a single 100g ball of self-striping yarn and a 5mm hook. This easy-to-follow pattern is written in UK terms and includes full instructions for the main sock, cuff and how to attach and seam the cuff. Perfect for relaxed evenings, these socks sit just above the ankle with the cuff down and can be worn cuff-up for extra height.

Beginner Friendly 5-7 Hours

Materials Needed for Super Simple Socks Pattern

β€” Main Fabric

  • 01
    Aldi's So Crafty acrylic/wool mix (50/50) - 1 Ball (100g) - main colour (self-striping recommended)
  • 02
    Cascade Pacific Multis - alternative self-striping option (worsted weight equivalent)
  • 03
    Stylecraft Life Heritage - worsted weight alternative for similar drape and warmth

β€” Tools Required

  • 01
    5mm Crochet hook
  • 02
    Scissors
  • 03
    Tapestry Needle

Progress Tracker

0% Complete

β€” Materials :

Info :

This pattern is written in standard UK crochet terms

Infos :

1 Ball (100g) of chosen yarn - I used Aldi's So Crafty acrylic/wool mix (50/50) but any wool mix yarn will be appropriate. Alternatives include Cascade Pacific Multis or Stylecraft life heritage. I used self-striping yarn for my socks for two reasons. One it was easier to disguise the joins of the rounds and two because it meant I did not need to work any colour changes. 5mm Crochet hook. Scissors. Tapestry Needle.

β€” Sizes and measurements :

Info :

Finished sock length 32cm (cuff down). 40cm Cuff up (can be worn either way). Socks sit at just above ankle height with cuff down.

Info :

Finished sock width 12cm. Made to fit adult sized foot size UK 8 or below.

β€” Gauge :

Info :

13 Htr x 11 rows = 4" square using a 5mm hook and worsted weight yarn. To ensure your socks will become the required size I would recommend hooking up a gauge swatch prior to commencement of the pattern and adjust yarn / hooks accordingly.

β€” Abbreviations used :

Infos :

Ch - Chain stitch. Sl st - Slip Stitch. Htr - Half Treble crochet. Inc - Increase. St - Stitch. FO - fasten off your yarn. () - Indicate how many stitches you should have at the end of each round. WS - wrong side of your work. BL - work into the back loops only of the work.

β€” Skill Level :

Info :

Easy - Project includes simple increases, shaping and stitches.

β€” Instructions :

Main Sock :

Round 1. Work 9 Htr stitches into a magic ring. Pull the ring closed and Sl St to the beginning Htr. (9)

Round 2 :

Ch2 (does not count as a stitch). Htr Inc in the stitch at the bottom of the Ch2, Htr inc into each st around. (18).

Round 3 :

Ch2 (does not count as a stitch). Htr in the stitch at the bottom of the Ch2, 2HTr into the next stitch. *Htr 1, Htr inc into the next*. Repeat from *to* around. Sl St to the top of the first Htr. (27).

Round 4-37 :

Ch2 (does not count as a stitch), work 1Htr into the stitch at the bottom of the Ch2, 1Htr into each stitch around.

Info :

At the end of Round 37 FO. We will work the cuff of the sock separately and attach to the sock at the end.

β€” Sock Cuff :

Row 1 :

Ch 14, 1Htr into the 3rd Ch from the hook and each of the next 11 stitches. Ch 2 and turn.

Row 2 :

1 Htr into the BL of each stitch to the end. Ch2 and turn.

Rows 3-27 :

1Htr into the BL of each stitch, Ch2 and turn. At the end of row 27 omit the Ch2 and turn DO NOT FASTEN OFF. We will now attach the cuff to the sock.

Info :

With the WS of the sock facing you flatten the sock and determine the central point. We will begin attaching the cuff using a simple DC at the central point of the sock when flat. Insert your hook through one row of the cuff and one stitch of the sock top, yarn over and pull through, yarn over and pull through both loops to make a stitch. You will continue around the top of the sock attaching the cuff in this manner. One stitch on the sock body will coincide with the top of each of the rows on the cuff.

Info :

When you reach the end of the top rim do not fasten off, we will now seam the cuff. Dc the cuff seam together in the same way as you attached the cuff to the sock. You will have 12 stitches down the seam. Once you have completed the cuff seam FO and weave in the ends.

Info :

Enjoy your new super simple socks. They are particularly cosy worn with pyjamas and enjoyed with a hot drink of your choice πŸ˜‰

Assembly Instructions

  • Flatten the sock with the wrong side (WS) facing you and determine the central point at the top rim where the cuff will be attached.
  • Attach the cuff to the sock top by working a simple DC through one row of the cuff and one stitch of the sock top around the entire opening so the cuff rows align with top stitches.
  • When you reach the end of the attachment do not fasten off; seam the cuff by DCing the cuff edges together in the same manner as the attachment.
  • You will have 12 stitches down the cuff seam; once seamed, FO (fasten off) and weave in all ends securely with a tapestry needle.
  • Weave in ends and check the seam for even tension so the cuff sits neatly around the ankle; block lightly if required for an even finish.

Important Notes

  • πŸ’‘Work a gauge swatch to match 13 Htr x 11 rows = 4" square using a 5mm hook to ensure correct sizing.
  • πŸ’‘Use self-striping yarn to disguise round joins and avoid frequent colour changes for a cleaner finish.
  • πŸ’‘Do not fasten off at the end of the cuff rows; leave yarn attached to join and seam the cuff in place before finishing.

Thank you for choosing this Super Simple Socks pattern β€” designed to be quick, cosy and satisfying to make. Whether you make them for yourself or as a gift, these socks are a warm, handmade treat. Happy crocheting and stay cosy! πŸ§Άβ˜•οΈ

You ask,

we answer.

FAQs

What size will the finished piece be?

The finished sock measures approximately 32 cm long with the cuff down and is made to fit adult foot size UK 8 or below.

Can I use different yarn weights for this pattern?

Yes, you can use different yarn weights but this will affect the final size; make a gauge swatch and adjust hook size to achieve the correct measurements.

Do I need prior crochet experience for this pattern?

This pattern is rated beginner friendly; basic knowledge of chain, half treble stitches and working in the round is recommended.

How long does this project typically take to complete?

Most crocheters complete this project in 5-7 hours, though time may vary depending on experience and pace.