About This Succulent Turtle Amigurumi Pattern
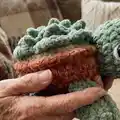
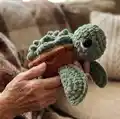
This pattern creates a succulent-topped turtle amigurumi using super-bulky chenille yarn for a plush, textured finish. The design includes separate pieces for legs, tail, head and a layered shell with a spiral succulent top for a standout look. Clear round-by-round instructions and simple shaping techniques make assembly straightforward.
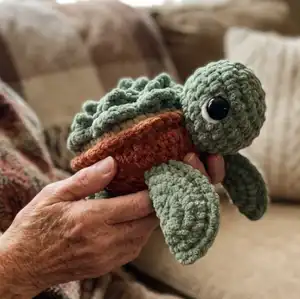
You will work in both back and front loops to form the shell and add an eye-catching succulent layer on top. The pattern includes placement tips for eyes and sewing guidance so your turtle looks neat and balanced.
Why You'll Love This Succulent Turtle Amigurumi Pattern
I absolutely love this pattern because the succulent top transforms a simple turtle into a whimsical keepsake. I enjoy how the front- and back-loop work creates depth on the shell and gives you room to customize colors and texture. Sewing the legs and tail directly into the body round makes assembly tidy and secure, which I find very satisfying. The pattern uses chunky yarn for quick progress, so you get a beautiful finished piece in just a few sessions.
Switch Things Up
I love how easily this pattern adapts to color changes; try using pastels for a softer, nursery-friendly turtle or bold contrasting colors for a playful look.
You can change the size by switching yarn weight and hook size: a bulkier yarn gives a chunky cuddly piece, while a sport or DK weight with a smaller hook makes a mini keychain-sized turtle.
I often substitute different textured yarns for the succulent to create unique surface effects and tactile interest.
Try adding embroidered markings or small felt shapes to the shell underside for personalized details and color contrast.
For more poseability, I sometimes add a short length of wire inside the legs before stuffing so they can be gently shaped and repositioned.
If you want a sturdier toy for children, consider using safety eyes with washers and sewing seams firmly, or embroider the eyes instead of using plastic safety eyes.
Experiment with leaf shapes by changing the stitch sequence for the succulent petals to make longer or shorter leaves for different styles.
I like to create matching sets by making several turtles in coordinated color palettes for display or gifting as a group.
To make a hanging ornament, leave a long yarn tail and form a loop before finishing; hang the little turtle by the shell for a cute decoration.
Don't be afraid to mix yarn brands and textures—each choice changes the final personality of your turtle, so have fun trying combinations!
Common Mistakes & How to Fix Them
✗ Not using stitch markers while working with fluffy chunky yarn can make rounds hard to track; use stitch markers to mark round starts and key loops so you do not lose your place.
✗ Folding the leg circle incorrectly can change the shape of the leg; fold the circle neatly in half and align the stitches before working through both layers for an even half-circle.
✗ Forgetting to leave a long tail on the head makes sewing difficult later; leave about 8-9 inches when finishing the head so you have enough yarn to attach securely.
✗ Skipping stuffing until late can result in uneven firmness; stuff gradually while shaping the body so the piece looks smooth and holds the intended form.