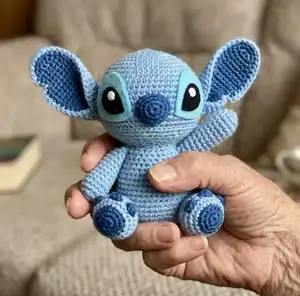
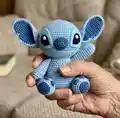
Create an adorable Stitch amigurumi with this friendly, photo-referenced crochet pattern. You will make a cuddly toy with clear step-by-step rounds for the head, body, ears, limbs and details. The pattern uses simple shaping and color blocking to capture Stitch's look while allowing creative customization. Perfect for gifting or decorating your craft collection.
Progress Tracker
0% Complete
— Head :
Round 1 :
using BLUE: Ch2, 7 sc in 2nd chain from hook [7]
Round 2 :
2 sc in each st around [14]
Round 3 :
Sc in next st, 2 sc in st after, repeat til end [21]
Round 4 :
Sc in each of the next 2 sts, 2scs in st after, repeat til end [28]
Round 5 :
Sc in each of the next 3 sts, 2scs in st after, repeat til end [35]
Round 6 :
Sc in each of the next 4 sts, 2scs in st after, repeat til end [42]
Round 7 :
Sc in each of the next 5 sts, 2scs in st after, repeat til end [49]
Round 8-13 :
Sc all around [49]
Round 14 :
Sc in each of the next 6 sts, 2scs in st after, repeat til end [56]
Round 15 :
Sc in each of the next 13 sts, 2scs in st after, repeat til end [60]
Round 16 :
Sc all around [60]
Round 17 :
using POWDER BLUE: Sc in each of the next 13 sts, sc2tog, repeat til end [56]
Round 18 :
using POWDER BLUE: Sc in each of the next 5 sts, sc2tog, repeat til end [48]
Round 19 :
using POWDER BLUE: Sc in each of the next 4 sts, sc2tog, repeat til end [40]
Round 20 :
using POWDER BLUE: Sc in each of the next 3 sts, sc2tog, repeat til end [32]
Round 21 :
using POWDER BLUE: Sc in each of the next 2 sts, sc2tog, repeat til end [24]
Round 22 :
using POWDER BLUE: Sc in each of the next 2 sts, sc2tog, repeat til end [18]
Info :
fasten off. do not weave in the ends!!!!!
— Eyes :
Round 1 :
using POWDER BLUE: Ch 2, 8 sc in 2nd ch from hook [8]
Round 2 :
using POWDER BLUE: 2sc in each of the next 2 sts, 2hdc in each of the next 4 sts, 2 sc in each of the remaining 2 sts [16]
Round 3 :
using POWDER BLUE: *Sc in next st, 2sc in st after* repeat 2x; *hdc in next st, 2hdc in st after* repeat 4x; *Sc in next st, 2sc in st after* repeat 2x [24]
Info :
fasten off leaving a long tail for sewing
Round 1 :
using BLACK: Ch 2, 5 sc in 2nd ch from hook [5]
Round 2 :
using BLACK: 2sc in each of the next 2 sts, 2hdc in next st, 2sc in each of the remaining 2 sts [10]
Info :
fasten off leaving a long tail for sewing
Round 1 :
using WHITE: Ch 2, 4 sc in 2nd ch from hook [4]
Info :
fasten off leaving a long tail for sewing
— Nose :
Round 1 :
using NAVY BLUE: Ch2, 6 sc in 2nd chain from hook [6]
Round 2 :
using NAVY BLUE: 2 sc in each st around [12]
Round 3 :
using NAVY BLUE: Sc in next st, 2 sc in st after, repeat til end [18]
Round 4 :
using NAVY BLUE: Sc all around [18]
Info :
fasten off leaving a long tail for sewing
— Ears :
Item Name (Inner Ear) :
using SALMON PINK: rnd 1: ch 21, sc in 2nd ch from hook until the end [this makes 20sc], flip it to face the opposite side and sc all around [this makes another 20 sc] [total: 40]
Round 2 :
using SALMON PINK: Sc in each of the next 12 sts, hdc in each of the next 6 sts, 2hdc in each of the next 4 sts, hdc in each of the next 6 sts, sc in each of the last remaining 12 sts [44]
Round 3 :
using SALMON PINK: Hdc in each of the next 10 sts, Dc in each of the next 10 sts, 2dc in each of the next 4 sts, dc in each of the next 10 sts, hdc in each of the remaining 10 sts [48]
Round 4-5 :
using SALMON PINK: Sc all around [48]
Info :
fasten off leaving a really long tail for sewing
Item Name (Outer Ear) :
using BLUE: rnd 1: ch 21, sc in 2nd ch from hook until the end [this makes 20sc], flip it to face the opposite side and sc all around [this makes another 20 sc] [total: 40]
Round 2 :
using BLUE: Sc in each of the next 12 sts, hdc in each of the next 6 sts, 2hdc in each of the next 4 sts, hdc in each of the next 6 sts, sc in each of the last remaining 12 sts [44]
Round 3 :
using BLUE: Hdc in each of the next 10 sts, Dc in each of the next 10 sts, 2dc in each of the next 4 sts, dc in each of the next 10 sts, hdc in each of the remaining 10 sts [48]
Round 4-5 :
using BLUE: Sc all around [48]
Info :
fasten off hiding all ends
— Body :
Round 1 :
using BLUE: Ch2, 6 sc in 2nd chain from hook [6]
Round 2 :
using BLUE: Sc in next st, 2 sc in st after, repeat til end [9]
Round 3 :
using BLUE: 2 sc in each st around [18]
Round 4 :
using BLUE: Sc in the next st, 2scs in st after, repeat til end [27]
Round 5 :
using BLUE: Sc in each of the next 2 sts, 2scs in st after, repeat til end [36]
Round 6 :
using BLUE: Sc in each of the next 3 sts, 2scs in st after, repeat til end [45]
Round 7 :
using BLUE: Sc in each of the next 4 sts, 2scs in st after, repeat til end [54]
Info :
note: the color blocking in this section does not always work out, so you can just alternate the color blocking as: first bunch = normal, second bunch = moving 1sc to the right for the color blocking, third bunch = moving 1 sc to the right for the color blocking [all in reference to the original color blocking; and repeat this until the last color blocking bunch]
Round 8-12 :
[54] using BLUE: Sc in each of the next 18 sts. using POWDER BLUE: Sc in each of the next 18 sts. using BLUE: Sc in each of the next 18 sts
Round 13 :
[45] using BLUE: Sc in each of the next 4 sts, sc2tog, 3x. using POWDER BLUE: Sc in each of the next 4 sts, sc2tog, 3x. using BLUE: Sc in each of the next 4 sts, sc2tog, 3x
Round 14-16 :
[45] using BLUE: Sc in each of the next 15 sts. using POWDER BLUE: Sc in each of the next 15 sts. using BLUE: Sc in each of the next 15 sts
Round 17 :
[36] using BLUE: Sc in each of the next 3 sts, sc2tog, 3x. using POWDER BLUE: Sc in each of the next 3 sts, sc2tog, 3x. using BLUE: Sc in each of the next 3 sts, sc2tog, 3x
Round 18-21 :
[36] using BLUE: Sc in each of the next 12 sts. using POWDER BLUE: Sc in each of the next 12 sts. using BLUE: Sc in each of the next 12 sts
Round 22 :
[27] using BLUE: Sc in each of the next 2 sts, sc2tog, 3x. using POWDER BLUE: Sc in each of the next 2 sts, sc2tog, 3x. using BLUE: Sc in each of the next 2 sts, sc2tog, 3x
Round 23-24 :
[27] using BLUE: Sc in each of the next 9 sts. using POWDER BLUE: Sc in each of the next 9 sts. using BLUE: Sc in each of the next 9 sts
Info :
fasten off leaving a long tail for sewing
— Arms :
Round 1 :
using BLUE: Ch2, 5 sc in 2nd chain from hook [5]
Round 2 :
using BLUE: 2 sc in each st around [10]
Round 3 :
using BLUE: Sc in next st, 2 sc in st after, repeat til end [15]
Round 4-15 :
using BLUE: Sc all around [15]
Info :
fasten off leaving a long tail for sewing
— Fingers :
Item Name (Finger) :
using NAVY BLUE; make 4: ch 4, sc in 2nd ch from hook until end [3sc]
Info :
fasten off leaving a tail for sewing
— Legs :
Round 1 :
using BLUE: Ch2, 6 sc in 2nd chain from hook [6]
Round 2 :
using BLUE: 2 sc in each st around [12]
Round 3 :
using BLUE: Sc in next st, 2 sc in st after, repeat til end [18]
Round 4 :
using BLUE: Sc in each of the next 2 sts, 2scs in st after, repeat til end [24]
Round 5-6 :
using BLUE: Sc all around [24]
Round 7 :
using BLUE: Sc in each of the next 9 sts, sc2tog 3x, sc in each of the remaining 9 sts [21]
Round 8 :
using BLUE: Sc in each of the next 7 sts, sc2tog 3x, sc in each of the remaining 8 sts [18]
Round 9 :
using BLUE: Sc in each of the next 6 sts, sc2tog 3x, sc in each of the remaining 6 sts [15]
Round 10 :
using BLUE: through front loops, sc in each of the next 6 sts; through back loops, sc in each of the next 3 sts; through front loops again, sc in each of the remaining 6 sts [15]
Round 11-15 :
using BLUE: Sc all around [15]
Info :
fasten off leaving a long tail for sewing
— Toes and Palm :
Item Name (Toe) :
using NAVY BLUE; make 4: rnd 1: Ch2, 5 sc in 2nd chain from hook [5]
Info :
fasten off leaving a tail for sewing
Item Name (Palm) :
rnd 1: Ch2, 5 sc in 2nd chain from hook [5]. rnd 2: 2 sc in each st around [10]
Info :
fasten off leaving a long tail for sewing
— Tail :
Round 1 :
using BLUE: Ch2, 5 sc in 2nd chain from hook [5]
Round 2 :
using BLUE: 2 sc in each st around [10]
Round 3 :
using BLUE: Sc in next st, 2 sc in st after, repeat til end [15]
Round 4 :
using BLUE: Sc in each of the next 2 sts, 2scs in st after, repeat til end [20]
Round 5 :
using BLUE: Sc all around [20]
Info :
fasten off leaving a long tail for sewing
— Assembly :
Infos :
Assembly - use the "tail" of the body part being sewn unless stated otherwise
Round 1 :
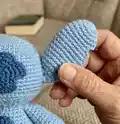
1. Sew on the fingers to the tip of the arm. make sure that you are only sewing the tip of the fingers [see pictures below for reference]
Round 2 :
2. sew on the "palms" of the feet to the bottom of the legs [see pictures below for reference]
Round 3 :
3. sew on the tip of the toes aka the bottom of the circle to the legs. make sure that it's proportioned to your leg's "palm" [see pictures below for reference]
Round 4 :
4. sew on the white part of the eye to the black. sew the black part to the blue part. make sure that when sewing the black part to the blue, it's towards the bottom of it. do not cover the part where it's made up of hdc
Round 5 :
5. sew on the inner ear to the outer ear. use the tail of the outer ear in sewing the inner ear. note that you should NOT cut off the excess tail from sewing. this will be used again
Round 6 :
6. sew on the ears to the head of your stitch! use the excess tail from when you sewed on the inner ear to the outer ear
Round 7 :
7. semi-stuff the head just to get a gist of the shape
Round 8 :
8. sew on the left eye first. make sure it's proportioned to the ears
Round 9 :
9. stuff the nose
Round 10 :
10. sew on the nose approximately 2 sts away from the eye [horizontally], to make it proportioned-ish, i aligned it as well to the black part of the eye
Round 11 :
11. sew on the right eye with respect to the left eye and the nose
Round 12 :
12. stuff the entire head completely
Round 13 :
13. stuff the arms, legs and tail as well now. make sure that you do NOT overstuff them
Round 14 :
14. sew on the tail and legs to the bottom of the body. make sure that the legs are half within the powder blue part of the body and the other half is on the blue part of the body. make sure than when sewing the tail, it's equidistant from the right and left leg.
Round 15 :
15. stuff the body halfway
Round 16 :
16. sew on the stuffed arms to the upper body.
Round 17 :
17. fully stuff the body of stitch
Round 18 :
18. sew on the head to the body using the excess tail from the body.
Round 19 :
19. your stitch is now ready to be loved-up and hugged!
This adorable Stitch-inspired amigurumi pattern brings a beloved character to life with friendly shaping and playful details. Make one for yourself or as a heartfelt handmade gift that will delight fans and crafters alike. Enjoy every stitch and the satisfaction of creating a cuddly companion by hand! 🧶💙