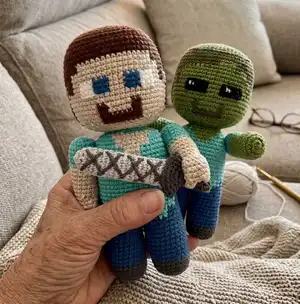
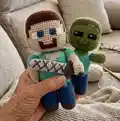
Make your own adorable Steve and Zombie amigurumi with clear, photo-guided instructions. This pattern walks you through crocheting heads, bodies, arms, legs and a tiny sword with colorwork details. Perfect for gifting or display, you will enjoy assembling these pixel-inspired characters step by step.
Progress Tracker
0% Complete
— Head :
Info :
Start in brown color.
Round 1 :
8 sc in a MR [8]
Round 2 :
(1sc, 3in1)*4 [16]
Round 3 :
2 sc, (3in1, 3 sc)*3, 3in1, 1 sc [24]
Round 4 :
3 sc, (3in1, 5 sc)*3, 3in1, 2 sc [32]
Round 5 :
4 sc, (3in1, 7 sc)*3, 3in1, 3 sc [40]
Round 6 :
5 sc, (3in1, 9 sc)*3, 3in1, 4 sc [48]
Round 7 :
6 sc, (3in1, 11 sc)*3, 3in1, 5 sc [56]
Round 8 :
7 sc, (3in1, 13 sc)*3, 3in1, 6 sc [64]
Round 10-12 :
(3 rounds): 64 sc [64]
Info :
In the next rounds alternate brown, blue, white and beige colors.
Rounds 13-14 :
25 sc (brown), 15 sc (beige), 24 sc (brown) [64]
Rounds 15-16 :
23 sc (brown), 19 sc (beige), 22 sc (brown) [64]
Rounds 17-18 :
18 sc (brown), 3 sc (beige), 2 sc (brown), 2 sc (beige), 3 sc (white), 3 sc (blue), 3 sc (beige), 3 sc (blue), 3 sc (white), 2 sc (beige), 2 sc (brown), 3 sc (beige), 17 sc (brown) [64]
Round 19 :
18 sc (brown), 7 sc (beige), 3 sc (white), 3 sc (blue), 3 sc (beige), 3 sc (blue), 3 sc (white), 7 sc (beige), 17 sc (brown) [64]
Rounds 20-21 :
18 sc (brown), 29 sc (beige), 17 sc (brown) [64]
Rounds 22-23 :
18 sc (brown), 10 sc (beige), 2 sc (brown), 5 sc (beige), 2 sc (brown), 10 sc (beige), 17 sc (brown) [64]
Round 24 :
15 sc (brown), 13 sc (beige), 9 sc (brown), 13 sc (beige), 14 sc (brown) [64]
Round 25 :
15 sc (brown), 13 sc (beige), 9 sc (brown), 27 sc (beige) [64]
Info :
Continued on the next page =>
Info :
Next, crochet only in beige color.
Round 26 :
7 sc, (sc3tog, 13 sc)*3, sc3tog, 6 sc [56]
Round 27 :
6 sc, (sc3tog, 11 sc)*3, sc3tog, 5 sc [48]
Round 28 :
5 sc, (sc3tog, 9 sc)*3, sc3tog, 4 sc [40]
Info :
Stuff the head tightly and evenly with fiberfill and continue:
Round 29 :
4 sc, (sc3tog, 7 sc)*3, sc3tog, 3 sc [32]
Round 30 :
3 sc, (sc3tog, 5 sc)*3, sc3tog, 2 sc [24]
Round 31 :
2 sc, (sc3tog, 3 sc)*3, sc3tog, 1 sc [16]
Round 32 :
1 sc, (sc3tog, 1 sc)*3, sc3tog [8]\
Info :
Sl st at the end, cut the yarn, pull off the hole to close and fasten off.
— Arms :
Item Name (Palms) :
PALMS (make 2). Crochet in beige color. Ch 5, start in the second chain from the hook.
Round 1 :
1 inc, 2 sc, 3 sc in the last chain, on the other side of the chain 3 sc [10]
Rounds 2-9 :
(8 rounds): 10 sc [10]
Info :
Do not stuff, fold in half and crochet 5 sc through both sides (photo1).
Info :
Then crochet the fingers. From the last stitch: ch 4, 3 sc (along the chain), 3 sl st (along the last round of the palm), ch4, 3 sc (along the chain) (photo2).
Info :
Sew the fingers to round 1 of the palm (see photo on the next page).
Item Name (Arms) :
ARMS (make 2). Crochet in beige color:
Round 1 :
8 sc in a MR [8]
Round 2 :
(1 sc, 3in1)*4 [16]
Info :
Sew the crocheted part to the palm as shown in the photo
Rounds 4-8 :
(5 rounds): 16 sc [16]
Info :
Change color to turquoise:
Rounds 9-14 :
(6 rounds): 16 sc [16]
Info :
Leave the yarn end about 40 cm long to finish the arm after fastening it to the body.
— Legs :
Info :
(make 2) Start in dark gray color.
Round 1 :
8 sc in a MR [8]
Round 2 :
(1 sc, 3in1)*4 [16]
Round 3 :
2 sc, (3in1, 3 sc)*3, 3in1, 1 sc [24]
Info :
To keep the soles flat, cut out a piece of thick plastic to fit the shape of the sole and put it inside (see photo1). So after stuffing it will not be rounded.
Info :
Change color to blue:
Rounds 8-15 :
(8 rounds): 24 sc [24]
Round 16 :
17 sc (short round), cut the yarn, leaving a long end for sewing.
Info :
Crochet the second leg in the same way from Rnd 1 to Rnd 15, and finish Rnd 16 to the end:
Info :
After the second leg is done, do not cut the yarn. From this point, we will continue to crochet the body.
— Body :
Info :
Place the legs as shown in photo 1 and sew up 6 sc on the right and 6 sc on the left leg (photo 1). Before sewing, pay attention to how the square is located at the base of the legs. Sew the stitches together along the side of this square. After sewing, continue to crochet from the last stitch on the second leg. Work around both legs, making extra sc at the sewing points (see photo 3):
Round 1 :
4 sc, 2 extra sc between the legs, 13 sc (blue), 2 sc (turquoise), 3 sc, 2 extra sc between the legs, 14 sc (blue) [40]
Round 2 :
19 sc (blue), 2 sc (turquoise), 19 sc (blue) [40]
Rounds 3-4 :
17 sc (blue), 6 sc (turquoise), 17 sc (blue) [40]
Info :
Change color to turquoise:
Round 5 :
(work in back loops along blue stitch and in both loops along turquoise stitches): 40 sc [40]
Rounds 6-14 :
(9 rounds): 40 sc [40]
Rounds 15-16 :
24 sc (turquoise), 4 sc (beige), 12 sc (turquoise) [40]
Rounds 17-18 :
22 sc (turquoise), 8 sc (beige), 10 sc (turquoise) [40]
Round 19 :
6 sc (turquoise), move the marker of the round beginning into the last stitch and start a new round:
Round 20 :
5 sc, sc3tog, 3 sc, sc3tog, 1 sc (turquoise), 10 sc (beige), 1 sc, sc3tog, 3 sc, sc3tog, 5 sc (turquoise) [32]
Info :
Stuff the legs and body tightly with fiberfill, next crochet only in turquoise color:
Round 21 :
4 sc, sc3tog, 1 sc, sc3tog, 10 sc, sc3tog, 1 sc, sc3tog, 4 sc [24]
Round 22 :
4 sc, sc3tog, 10 sc, sc3tog, 1 sl st.
Info :
Cut the yarn, leaving a long end for sewing the head.
— Assembly :
Info :
In order for Steve's arms to be movable, I'll use safety eyes instead of joints (cotter pins). Insert eyes into the body between rounds 18 and 19 symmetrically on both sides (see photos 1,2). Now pass these eyes through the arms (move 2 rounds down from the edge), as shown in photo 3. Pay attention that the arms after joining are placed correctly (fingers back). Put washers on the legs of the eyes and stuff the body and arms tightly with fiberfill.
Info :
Sl st at the end, stuff the upper part tightly with fiberfill, pull off the hole to close and fasten off.
Info :
Sew the head to the last round of the body around the perimeter. See more assembly photos on the next page.
Round 15 :
Finish crocheting the arms: (1 sc, sc3tog)*4 [8].
— Sword :
Item Name (Blade) :
BLADE. Crochet in light gray color:
Round 1 :
6 sc in a MR [6]
Rounds 4-19 :
(16 rounds): 12 sc [12]
Info :
Fold in half and crochet 6 sc through both sides. Cut the yarn, fasten off.
Item Name (Grip) :
GRIP. Start in dark gray color:
Round 1 :
6 sc in a MR [6]
Info :
Change color to brown:
Round 4 :
2 sc, 1 dec, 2 sc [5]
Rounds 5-7 :
(3 rounds): 5 sc [5]
Info :
Change color to dark gray:
Round 11 :
(1 sc, 1 inc)*10 [30]
Info :
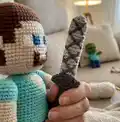
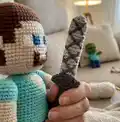
Sl st at the end, cut the yarn, leaving a long end for sewing pieces. Insert the blade into the grip (see photo) and sew the last round of the grip with the blade. After that, if desired, embroider stripes on the blade. Cut the yarn, fasten off.
— Steve is ready :
Info :
So we have done our Steve!
— Zombie :
Info :
Start crocheting the head in dark green color.
Round :
Rounds 1-9 are the same as for Steve.
Info :
In the next rounds alternate dark green, green and black colors.
Rounds 11-12 :
32 sc (dark green), 4 sc (green), 28 sc (dark green) [64]
Rounds 13-14 :
25 sc (dark green), 15 sc (green), 24 sc (dark green) [64]
Rounds 15-16 :
23 sc (dark green), 19 sc (green), 22 sc (dark green) [64]
Rounds 17-18 :
18 sc (dark green), 3 sc (green), 2 sc (dark green), 2 sc (green), 6 sc (black), 3 sc (green), 6 sc (black), 2 sc (green), 2 sc (dark green), 3 sc (green), 17 sc (dark green) [64]
Round 19 :
18 sc (dark green), 7 sc (green), 6 sc (black), 3 sc (green), 6 sc (black), 7 sc (green), 17 sc (dark green) [64]
Rounds 20-21 :
18 sc (dark green), 29 sc (green), 17 sc (dark green) [64]
Rounds 22-23 :
18 sc (dark green), 10 sc (green), 2 sc (dark green), 5 sc (green), 2 sc (dark green), 10 sc (green), 17 sc (dark green) [64]
Round 24 :
15 sc (dark green), 13 sc (green), 9 sc (dark green), 13 sc (green), 14 sc (dark green) [64]
Round 25 :
15 sc (dark green), 13 sc (green), 9 sc (dark green), 27 sc (green) [64]
Info :
Finish the head as for Steve (Rnds 26-32) but in green color.
Item Name (Arms for Zombie) :
Arms for Zombie: I crocheted without the palms. Rounds 1-8 are the same as for Steve (but in green color), then work:
Rounds 9-13 :
(5 rounds): 16 sc [16]
Info :
Change color to turquoise and work Rnds 14-19 as for Steve (Rnds 9-14).
— Zombie is ready :
Info :
Crochet the legs and body of Zombie in the same way as for Steve, but replace the beige color with green. Optionally, embroider highlights in front of the eyes with a white thread. Fasten the arms, finish them and sew the head in the same way as we did when assembling Steve.
This adorable Steve & Zombie set brings blocky pixel charm to a cuddly amigurumi form. Perfect for Minecraft fans and handmade gift-givers, the pattern includes step-by-step rounds and assembly tips. Make both characters and a tiny sword to complete the scene. 🧶✨