🧶 Beautiful ✨ Detailed 💝 Adorable

Standing and Sitting Goofy Amigurumi Pattern

Standing and Sitting Goofy Amigurumi Pattern
4.8★ Rating
5-7 Hours Time Needed
3.6K Made This
✂️

Intermediate Level

Ideal for those with basic crochet experience, featuring slightly more advanced stitches and techniques to expand your skills.

⏱️

Weekend Treat

Takes 5-7 hours, making it an enjoyable project to finish over a couple of days.

🧸

Cute Companion

An adorable friend to cherish, handcrafted with love to bring comfort and joy for years to come.

About This Standing and Sitting Goofy Amigurumi Pattern

This pattern creates two versions of Goofy: a standing and a sitting amigurumi, with full head, ears, arms, legs, body, jacket, hat and nose instructions. The design uses 4-ply cotton and a very small hook for neat detail, including optional wire in the ears and clear assembly photos. Every round is provided so you can follow along precisely and finish confident, polished toys.

Standing and Sitting Goofy Amigurumi Pattern crochet pattern - detailed view of completed project

Youll get color-change notes, stuffing guidance and sewing placement tips to align pieces correctly. Ideal for gift making or as a collectible set for your handmade toy shelf.

Why You'll Love This Standing and Sitting Goofy Amigurumi Pattern

I absolutely love this pattern because it captures Goofys character in a compact, highly detailed format that is both fun and satisfying to crochet. I enjoy the precision of small-hook work and how it makes the facial details really pop. The pattern balances shaping and simple construction so you can practice increases, decreases and front-loop work while creating a finished toy. Sewing and assembly are guided with photos, which I find invaluable when finishing small pieces. I also love that you can make both a standing and a sitting version from the same instructions — it feels like getting two projects in one.

Standing and Sitting Goofy Amigurumi Pattern step 1 - construction progress Standing and Sitting Goofy Amigurumi Pattern step 2 - assembly progress Standing and Sitting Goofy Amigurumi Pattern step 3 - details and accessories Standing and Sitting Goofy Amigurumi Pattern step 4 - final assembly and finishing

Switch Things Up

I love how easy it is to customize this Goofy pattern—start by changing yarn colors to create different outfits or entirely new characters.

If you want a larger Goofy, I switch to a bulkier yarn and a bigger hook; conversely, a thinner yarn and smaller hook makes a tiny keychain-sized version.

I often add embroidered eyebrows or a sewn smile rather than using safety features to soften the toy for babies.

Try substituting safety eyes with French knot embroidered eyes for a fully fabric-safe toy for small children.

I like to experiment with different stuffing levels: slightly firmer for standing stability, softer for a plush sitting version.

Adding a small wire inside the ears gives posability; I insert soft craft wire before sewing the ear base closed when I want movable ears.

For seasonal variations I change the jacket color and hat top—red or green for festive versions, pastels for baby-friendly designs.

I sometimes make tiny accessories like a crocheted scarf or a miniature hat decoration to personalize each Goofy doll.

To create a set, I vary facial expression placement slightly—moving eyes a stitch or two changes the character from surprised to sleepy.

I recommend testing one modification at a time so you can see its impact on final proportions and refine your favorite variations gradually.

Common Mistakes & How to Fix Them

✗ Skipping stitch markers during rounds can make counting difficult later; place a marker at the beginning of each round to avoid confusion and recount frequently. ✗ Overstuffing limbs and head causes distorted shaping and tight seams; stuff gradually and evenly, adding small amounts of stuffing as you complete shaping rounds. ✗ Changing colors without securing ends will result in loose tails and messy joins; fasten off properly and weave in ends as you go or use the invisible join for neater color changes. ✗ Not checking stitch counts after increases or decreases leads to wrong shapes; always count stitches at the end of each round, especially after shaping rounds and color changes.

Standing and Sitting Goofy Amigurumi Pattern

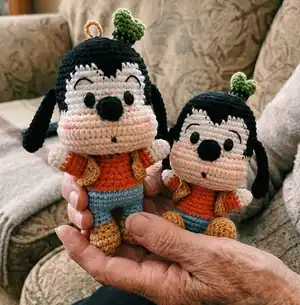
Make a charming standing and sitting Goofy amigurumi with this detailed pattern designed for intermediate crocheters. Youll crochet two playful poses with clear round-by-round instructions and helpful assembly photos. The pattern uses 4-ply cotton yarn and small hooks for crisp stitch definition—perfect for collectors or thoughtful handmade gifts. Follow the step-by-step rounds, stuffing notes, and finishing tips to create your own lovable Goofy duo.

Intermediate 5-7 Hours

Materials Needed for Standing and Sitting Goofy Amigurumi Pattern

— Main Fabric

  • 01
    4 Ply cotton yarn (main requirement)
  • 02
    Black yarn - small amounts for head top, ears, nose and detailing
  • 03
    White yarn - small amount for face and hands
  • 04
    Skin-colour yarn (light peach/skin tone) - small amount for face and muzzle area
  • 05
    Orange yarn - for shirt (small amount)
  • 06
    Blue yarn - for pants (small amount)
  • 07
    Brown yarn - for shoes and jacket details (small amount)
  • 08
    Green yarn - for hat top (small amount)

— Tools Required

  • 01
    Crochet hook size 1.8mm
  • 02
    Oval plastic eyes 0.6 x 0.8 cm
  • 03
    Optional nose 1.4 cm plastic (or crochet nose with black yarn)
  • 04
    Scissors
  • 05
    Yarn needle for sewing and weaving ends
  • 06
    Stitch markers
  • 07
    Polyester stuffing (cotton fill)
  • 08
    Pins for assembly
  • 09
    Soft wire for ears (optional for posability)
  • 10
    Pink blush makeup powder or pink acrylic paint for cheeks

Progress Tracker

0% Complete

— Materials :

Info :

Yarn: 4 Ply cotton yarn. Materials: 1.8mm hook, Oval Plastic Eyes 0.6x0.8cm, Nose 1.4cm (Optional: You can crochet nose with black yarn).

— Abbreviations :

Infos :

CH=Chain X=Single crochet V=Increase A=Decrease W=3 Single crochet into 1 stitch T=Half double crochet TV= Half double crochet increase (2hdc in 1) F=Double crochet FV= Double crochet increase (2dc in 1) FLO= Front Loops Only

— Head :

Round 1 :

Magic Ring 6X (6)

Round 2 :

6V (12)

Round 3 :

6 (X, V) (18)

Round 4 :

6 (X, V, X) (24)

Round 5 :

6 (3X, V) (30)

Round 6 :

6 (2X, V, 2X) (36)

Round 7 :

6 (5X, V) (42)

Round 8 :

6 (3X, V, 3X) (48)

Round 9 :

48X (48)

Round 10 :

18X, 4X, 4X, 4X, 18X (48)

Round 11 :

17X, 6X, 2X, 6X, 17X (48)

Round 12-15 :

16X, 16X, 16X (48)

Round 16 :

17X, 14X, 17X (48)

Round 17 :

12X, A, 20X, A, 12X (46)

Round 18 :

12X, FLO X, FLO 3V, FLO 7 (X, V), FLO 3V, FLO X, 12X (59)

Round 19 :

12X, 35X, 12X (59)

Round 20 :

12X, X, 33T, X, 12X (59)

Round 21-22 :

12X, 35X, 12X (59)

Round 23 :

12X, X, 3A, 7 (X, A), 3A, X, 12X (46)

Round 24 :

X, 3 (X, A, X), 5 (X, A, X), X, A, X, 2 (X, A, X), X (35)

Info :

ON R24, Begin to cotton in.

Round 25 :

X, 3 (X, A), 5 (X, A), X, A, 2 (X, A), X (24)

Round 26 :

6 (X, A, X) (18)

Info :

Color notes as shown in pattern: BLACK TEXT=BLACK. RED TEXT=WHITE. BLUE TEXT=SKIN COLOUR YARN.

— Ear (MAKE 2) :

Round 1 :

Magic Ring 5X (5)

Round 2 :

5V (10)

Round 3-5 :

10X (10)

Round 6 :

A, 3X, A, 3X (8)

Round 7-10 :

8X (8)

Round 11 :

A, 2X, A, 2X (6)

Round 12-14 :

6X (6)

Info :

You don’t have to cotton in the ears. You may insert soft wire.

— Arms (MAKE 2) :

Round 1 :

Magic Ring 6X (6)

Round 2 :

3 (X, V) (9)

Round 3 :

9X (9)

Round 4 :

4X, In one stitch: 3HDC, 4X (9)

Round 5 :

9X (9)

Round 6 :

A, 7X (8)

Round 7-8 :

8X (8)

Info :

For the arms, you don’t have to cotton in too full. HDC = Half Double Crochet.

— Leg + Body (STANDING) :

Round 1 :

5CH, working on 2nd stitch: 3X, W, 2X, V (10)

Round 2 :

V, 2X, 3V, 2X, 2V (16)

Round 3-4 :

16X (16)

Round 5 :

4X, 4A, 4X (12)

Round 6 :

A, 2X, 2A, 2X, A (8)

Round 7-8 :

8X. Fasten Off first leg, Repeat R1-8 to make second leg, you don’t have to fasten off second leg. (8)

Round 9 :

4CH, connect both leg, On Legs 8X+ On CH 4X+ On Legs 8X+ On CH 4X (24)

Round 10 :

6X, 4 (X, V), 6X, 2 (X, V) (30)

Round 11 :

30X (30)

Round 12 :

6 (2X, V, 2X) (36)

Round 13-14 :

36X (36)

Round 15 :

6 (2X, A, 2X) (30)

Round 16 :

6X, 4 (X, A), 6X, 2 (X, A) (24)

Round 17 :

24X (24)

Round 18 :

6 (X, A, X) (18)

Round 19-20 :

18X (18)

— Leg (SITTING) :

Round 1 :

5CH, working on 2nd stitch: 3X, W, 2X, V (10)

Round 2 :

V, 2X, 3V, 2X, 2V (16)

Round 3-4 :

16X (16)

Round 5 :

4X, 4A, 4X (12)

Round 6 :

A, 2X, 2A, 2X, A (8)

Round 7-8 :

8X (8)

— Body (SITTING) :

Round 1 :

Magic Ring 8X (8)

Round 2 :

8V (16)

Round 3 :

8 (X, V) (24)

Round 4 :

24X (24)

Round 5 :

X, V, 6X, 4 (X, V), 7X, V (30)

Round 6 :

30X (30)

Round 7 :

6 (2X, V, 2X) (36)

Round 8 :

36X (36)

Round 9 :

6 (2X, A, 2X) (30)

Round 10 :

X, A, 6X, 4 (X, A), 7X, A (24)

Round 11 :

24X (24)

Round 12 :

6 (X, A, X) (18)

Round 13-14 :

18X (18)

Info :

On R11, Begin to cotton fill. Once done, leave long tail for sewing.

— Jacket (WORK IN LINES) :

Round 1 :

25CH, working on 2nd stitch: 24X (24)

Round 2 :

1CH Flip over, 6 (3X, V) (30)

Round 3 :

1CH Flip over, 3X, 6CH, Empty 6 stitches , X, 10T, X, 6CH, Empty 6 stitches , 3X (30)

Round 4 :

1CH Flip over, 9X, TV, 10T, TV, 9X (32)

— Nose :

Round 1 :

Magic Ring 6X (6)

Round 2 :

6V (12)

— Hat :

Round 1 :

Magic Ring 6X (6)

Round 2 :

6X. Fasten off the first one. Repeat R1-R2 to make a second one. (6)

Round 3 :

Insert hook into the first one to connect both pieces: 6X+6X (12)

Round 4 :

2 (2X, A, 2X) (10)

Round 5 :

10X (10)

Round 6 :

10X (10)

— Assembly & Finishing :

Info :

Position for the ears as shown in photo; place ears symmetrically on the head top area.

Info :

Position sewing legs for the sitting Goofy. Distance between both legs around 4 or 5 stitches on the center.

Info :

You can join rounds with slip stitch or turn. Use a stitch marker or a piece of yarn to mark the ending of the round.

Info :

It’s highly recommended that you read through the pattern completely before beginning to crochet.

Assembly Instructions

  • Position the ears on the head top area as shown in the reference photo and sew them symmetrically for balance.
  • Position sewing legs for the sitting Goofy with the distance between both legs around 4 or 5 stitches at the center before securing them in place.
  • On the body R11 (sitting body), begin stuffing (cotton fill) to achieve the correct firmness then leave a long tail for sewing when finished.
  • For the ears you may insert soft wire before sewing to give posability; if not using wire, avoid overstuffing so the ears remain flexible.
  • Fasten off and leave a long tail for sewing on all parts that will be joined; sew the head to the body securely and weave in ends after assembly.

Important Notes

  • 💡Use stitch markers or a piece of contrasting yarn to mark the end of each round for consistent shaping and counting.
  • 💡Stuff pieces gradually and evenly—start stuffing when the pattern advises (for example ON R24 for the head and R11 for the sitting body).
  • 💡You can join rounds with a slip stitch or turn them; choose whichever gives you the smoother seam for your preferred finish.
  • 💡Pin all parts in place before sewing to ensure correct placement, symmetry and a neat final appearance.

This Standing and Sitting Goofy pattern brings a timeless Disney friend to life with careful shaping and tiny details. Your finished Goofy duo will make heartwarming gifts, shelf decorations, or playful keepsakes to cherish. Happy stitching and enjoy every round of the journey! 🧶🧵

You ask,

we answer.

FAQs

What size will the finished piece be?

Finished size varies by yarn and hook, but using 4-ply cotton and the recommended 1.8mm hook yields a small collectible roughly 10-18 cm tall depending on standing or sitting version.

Can I use different yarn weights for this pattern?

Yes, you can use different yarn weights but the finished size and stitch definition will change; choose an appropriate hook for your yarn and expect the toy to be larger or smaller accordingly.

Do I need prior crochet experience for this pattern?

This pattern is rated intermediate, so basic knowledge of single crochet, increases, decreases and front-loop work is recommended for best results.

How long does this project typically take to complete?

Most crocheters complete one version (standing or sitting) in about 5-7 hours; making both and doing detailed finishing may take longer depending on experience and finishing time.