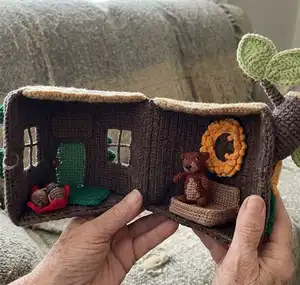
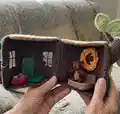
Create a charming hollow log house playset complete with roof, base, door, branch, leaves and tiny details. This pattern walks you through building sturdy crochet panels reinforced with plastic canvas so your house opens and closes like a tiny play home. You will enjoy stitching textures, adding wood rings, and assembling pieces to make a delightful, gift-ready scene.
Progress Tracker
0% Complete
— Log House Back Wall :
Round 1 :
In dark brown, ch 32. Work back down the ch that you just made, starting in the 3rd st from the hook with: hdc 30, turn. (30)
Round 2 :
Ch 2, BLO hdc 30, turn. (30)
Round 3 :
Ch 2, FLO hdc 30, turn. (30)
Round 4 :
Ch 2, BLO hdc 30, turn. (30)
Round 5 :
Ch 2, FLO hdc 30, turn. (30)
Round 6 :
Ch 2, BLO hdc 30, turn. (30)
Round 7 :
Ch 2, FLO hdc 30, turn. (30)
Round 8 :
Ch 2, BLO hdc 30, turn. (30)
Round 9 :
Ch 2, FLO hdc 30, turn. (30)
Round 10 :
Ch 2, BLO hdc 30, turn. (30)
Round 11 :
Ch 2, FLO hdc 30, turn. (30)
Round 12 :
Ch 2, BLO hdc 30, turn. (30)
Round 13 :
Ch 2, FLO hdc 30, turn. (30)
Round 14 :
Ch 2, BLO hdc 30, turn. (30)
Round 15 :
Ch 2, FLO hdc 30, turn. (30)
Round 16 :
Ch 2, BLO hdc 30, turn. (30)
Round 17 :
Ch 2, FLO hdc 30, turn. (30)
Round 18 :
Ch 2, BLO hdc 30, turn. (30)
Round 19 :
Ch 2, FLO hdc 30, turn. (30)
Round 20 :
Ch 2, BLO hdc 30, turn. (30)
Round 21 :
Ch 2, FLO hdc 30, turn. (30)
Round 22 :
Ch 2, BLO hdc 30, turn. (30)
Round 23 :
Ch 2, FLO hdc 30, turn. (30)
Round 24 :
Ch 2, BLO hdc 30, turn. (30)
Round 25 :
Ch 2, FLO hdc 30, turn. (30)
Round 26 :
Ch 2, BLO hdc 30, turn. (30)
Round 27 :
Ch 2, FLO hdc 30, turn. (30)
Round 28 :
Ch 2, BLO hdc 30, turn. (30)
Round 29 :
Ch 2, FLO hdc 30, turn. (30)
Round 30 :
Ch 2, BLO hdc 30, turn. (30)
Round 31 :
Ch 2, FLO hdc 30, turn. (30)
Round 32 :
Ch 2, BLO hdc 30, turn. (30)
Round 33 :
Ch 2, FLO hdc 30. (30)
Info :
If you are making the 1st piece, FO and weave in the ends (see photo 1 on the next page). Then, repeat the same process to make a 2nd piece. If you are making the 2nd piece, do not FO here. The instructions continue on the next page...
— Assembling the Back Wall :
Infos :
At this point, you need to cut a piece of plastic canvas so that it's slightly smaller than the piece that you have made (see photos 1 & 2). Put the 2 back wall pieces that you have made together, ensuring that the leftover front and back loops face outwards on both pieces. You will now switch to working in a joined round, working all of the way around the edge to join the two pieces together. Turn, ch 1, then, inserting the hook through both layers, continue as follows:
Round Edge :
Work across the last row with: inc, sc 28, inc. (164)
Infos :
Continue working in the same direction, working along the ends of the rows with: sc 50 (To get 50 stitches across this edge: into every 2 hdc rows you will need to make 3 stitches). At this stage, insert the piece of plastic canvas between the 2 crochet layers and then continue as follows: Work along the short edge with: inc, sc 28, inc. Work along the remaining side with: sc 50 (see photo 3), then sl st into the 1st sc to join the round. FO and weave in the end. Then, set the back wall aside for later assembly (see photos 4 & 5).
— Log House Front Wall :
Round 1 :
In dark brown, ch 32. Work back down the ch that you just made, starting in the 3rd st from the hook with: hdc 30, turn. (30)
Round 2 :
Ch 2, BLO hdc 30, turn. (30)
Round 3 :
Ch 2, FLO hdc 30, turn. (30)
Round 4 :
Ch 2, BLO hdc 30, turn. Place a marker into the 10th st after making it. (30)
Round 5 :
Ch 2, FLO hdc 8, turn. Leave the rest of the stitches un-worked. (8)
Round 6 :
Ch 2, BLO hdc 8, turn. (8)
Round 7 :
Ch 2, FLO hdc 8, turn. (8)
Round 8 :
Ch 2, BLO hdc 8, turn. (8)
Round 9 :
Ch 2, FLO hdc 8, turn. (8)
Round 10 :
Ch 2, BLO hdc 8, turn. Place markers into both the 1st and 8th stitches after making them (see photo 1). (8)
Info :
FO and weave in the end. Re-join your dark brown yarn in the marked stitch on row 4 (see photo 2). Then, starting in the same st that you just joined into, continue as follows:
Round 5B :
Ch 2, FLO hdc 10, turn. (10)
Round 6B :
Ch 2, BLO hdc 10, turn. (10)
Round 7B :
Ch 2, FLO hdc 10, turn. (10)
Round 8B :
Ch 2, BLO hdc 10, turn. (10)
Round 9B :
Ch 2, FLO hdc 10, turn. (10)
Round 10B :
Ch 2, BLO hdc 10, ch 12, sl st into the end of row 10 on the first side (you will be joining into the 1st marked stitch). (10 + ch section)
Info :
FO and weave in the end (see photo 3). The instructions continue on the next page...
Infos :
Re-join your dark brown yarn into the remaining marked stitch on the end of row 10 (see photo 1). Then, starting in the same st that you just joined into, continue as follows:
Round 11 :
Ch 2, FLO hdc 8, work across the ch section with hdc 12, FLO hdc 10, turn. (30)
Round 12 :
Ch 2, BLO hdc 30, turn. (30)
Round 13 :
Ch 2, FLO hdc 30, turn. (30)
Round 14 :
Ch 2, BLO hdc 30, turn. (30)
Round 15 :
Ch 2, FLO hdc 13, turn. Leave the rest of the stitches un-worked. (13)
Round 16 :
Ch 2, BLO hdc 13, turn. (13)
Round 17 :
Ch 2, FLO hdc 13, turn. (13)
Round 18 :
Ch 2, BLO hdc 13, turn. (13)
Round 19 :
Ch 2, FLO hdc 13, ch 19, turn. (13 + ch section)
Round 20 :
Don't ch here. Starting in the 3rd ch from the hook; Hdc 17 along the ch section, then BLO hdc 13, turn. (30)
Round 21 :
Ch 2, FLO hdc 30, turn. (30)
Round 22 :
Ch 2, BLO hdc 30, turn. (30)
Round 23 :
Ch 2, FLO hdc 30, turn. Place a marker into the 8th st after making it. (30)
Round 24 :
Ch 2, BLO hdc 10, turn. Leave the rest of the stitches un-worked. (10)
Round 25 :
Ch 2, FLO hdc 10, turn. (10)
Round 26 :
Ch 2, BLO hdc 10, turn. (10)
Round 27 :
Ch 2, FLO hdc 10, turn. (10)
Round 28 :
Ch 2, BLO hdc 10, turn. (10)
Round 29 :
Ch 2, FLO hdc 10. Place markers into both the 1st and 10th stitches after making them. FO and weave in the end (see photo 2). (10)
Infos :
Re-join your dark brown yarn in the marked stitch on row 23 (see photo 1). Then, starting in the same st that you just joined into, continue as follows:
Round 24B :
Ch 2, BLO hdc 8, turn. (8)
Round 25B :
Ch 2, FLO hdc 8, turn. (8)
Round 26B :
Ch 2, BLO hdc 8, turn. (8)
Round 27B :
Ch 2, FLO hdc 8, turn. (8)
Round 28B :
Ch 2, BLO hdc 8, turn. (8)
Round 29B :
Ch 2, FLO hdc 8, ch 12, sl st into the end of row 29 on the first side (you will be joining into the 1st marked stitch). FO and weave in the end. (8 + ch section)
Infos :
Re-join your dark brown yarn into the remaining marked stitch on the end of row 29 (see photo 2). Then, starting in the same st that you just joined into, continue as follows:
Round 30 :
Ch 2, BLO hdc 10, work across the ch section with hdc 12, BLO hdc 8, turn. (30)
Round 31 :
Ch 2, FLO hdc 30, turn. (30)
Round 32 :
Ch 2, BLO hdc 30, turn. (30)
Round 33 :
Ch 2, FLO hdc 30. If you are making the 1st piece, FO and weave in the ends (see photo 3). Then, repeat the same process to make a 2nd piece. If you are making the 2nd piece, do not FO here. The instructions continue on the next page...
— Assembling the Front Wall :
Infos :
At this point, you need to cut a piece of plastic canvas so that it's slightly smaller than the piece that you have made (see photos 1 & 2). Put the 2 front wall pieces that you have made together ensuring that the leftover front and back loops face outwards on both pieces. You will now switch to working in a joined round, working all of the way around the edge to join the two pieces together. Ch 1, then, inserting the hook through both layers, continue as follows:
Round Edge :
Work across the last row with: inc, sc 28, inc. Continue working in the same direction, working along the ends of the rows with: sc 50 (To get 50 stitches across this edge: into every 2 hdc rows you will need to make 3 stitches). At this stage, insert the piece of plastic canvas between the 2 crochet layers and then continue as follows: Work along the short edge with: inc, sc 28, inc. Work along the remaining side with: sc 21 (see photo 3). This should take you up to the bottom corner of the doorway. FO leaving a long tail of yarn (this will be used shortly, to sew the edges together around the doorway and windows (see photo 4). Then re-join your yarn on the other side of the doorway (see photo 5), and working through both layers sc 21. FO leaving a long tail of yarn for later assembly (see photo 6).
— Log House - Roof Panels :
Round 1 :
In beige, ch 3. Working into the 3rd ch from the hook, make 4 hdc all into this stitch, turn. (4)
Round 2 :
Ch 2, hdcinc x4, turn. (8)
Round 3 :
Ch 2, (hdcinc, hdc) x4, turn. (12)
Round 4 :
Ch 2, (hdcinc, hdc 2) x4, turn. (16)
Round 5 :
Ch 2, (hdcinc, hdc 3) x4, turn. (20)
Round 6 :
Ch 2, (hdcinc, hdc 4) x4, turn. (24)
Round 7 :
Ch 2, (hdcinc, hdc 5) x4, turn. (28)
Round 8 :
Ch 2, (hdcinc, hdc 6) x4, turn. (32)
Round 9 :
Ch 2, (hdcinc, hdc 7) x4, turn. (36)
Round 10 :
Ch 2, (hdcinc, hdc 8) x4, turn. (40)
Round 11 :
Ch 2, (hdcinc, hdc 9) x4, turn. (44)
Round 12 :
Ch 2, (hdcinc, hdc 10) x4. (48)
Info :
If you are making the 1st piece, FO and weave in the ends (see photo 1). Then, repeat the same process to make a 2nd piece. At this point, you need to cut a piece of plastic canvas so that it's slightly smaller than the piece that you have made (see photo 2). If you are making the 2nd piece, do not FO here. Put the two pieces together - You will now switch to working in a joined round, working all of the way around the edge to join the two pieces together. Inserting the hook through both layers, continue as follows:
Round Edge :
Ch 1. Work along the curved edge with: inc, sc 46, inc. At this stage, insert the piece of plastic canvas between the 2 crochet layers and then continue as follows: Work across the straight edge with sc 30 (it doesn't matter if your stitch count is slightly different to mine along this edge, just ensure the stitches are spread out evenly). Sl st into the 1st sc to join the round. FO and weave in the end. Repeat the whole process to make a 2nd roof panel (see photo 3).
— Log House - Base Panels :
Round 1 :
In dark brown, ch 3. Working into the 3rd ch from the hook, make 4 hdc all into this stitch, turn. (4)
Round 2 :
Ch 2, hdcinc x4, turn. (8)
Round 3 :
Ch 2, (hdcinc, hdc) x4, turn. (12)
Round 4 :
Ch 2, (hdcinc, hdc 2) x4, turn. (16)
Round 5 :
Ch 2, (hdcinc, hdc 3) x4, turn. (20)
Round 6 :
Ch 2, (hdcinc, hdc 4) x4, turn. (24)
Round 7 :
Ch 2, (hdcinc, hdc 5) x4, turn. (28)
Round 8 :
Ch 2, (hdcinc, hdc 6) x4, turn. (32)
Round 9 :
Ch 2, (hdcinc, hdc 7) x4, turn. (36)
Round 10 :
Ch 2, (hdcinc, hdc 8) x4, turn. (40)
Round 11 :
Ch 2, (hdcinc, hdc 9) x4, turn. (44)
Round 12 :
Ch 2, (hdcinc, hdc 10) x4. (48)
Info :
If you are making the 1st piece, FO and weave in the ends (see photo 1). Then, repeat the same process to make a 2nd piece. At this point, you need to cut a piece of plastic canvas so that it's slightly smaller than the piece that you have made (see photo 2). If you are making the 2nd piece, do not FO here. Put the two pieces together - You will now switch to working in a joined round, working all of the way around the edge to join the two pieces together. Inserting the hook through both layers, continue as follows:
Round Edge :
Ch 1. Work along the curved edge with: inc, sc 46, inc. At this stage, insert the piece of plastic canvas between the 2 crochet layers and then continue as follows: Work across the straight edge with sc 30. Sl st into the 1st sc to join the round. FO leaving a long tail of yarn for later assembly. Repeat the whole process to make a 2nd base panel (see photo 3).
— Log House - Door :
Round 1 :
In beige, ch 21. Work back down the ch that you just made, starting in the 2nd st from the hook with: sc 20, turn. (20)
Round 2 - 13 :
(12 rows) Ch 1, sc 20, turn. (20)
Info :
At this point, you need to cut a piece of plastic canvas so that it's slightly smaller than the piece that you have made (see photo 1). Then, continue as follows:
Round 14 :
Ch 1, FLO sc 20, turn. (20)
Rounds 15-26 :
(12 rows) Ch 1, sc 20, turn. (20)
Infos :
Fold the piece in half ensuring that the leftover back loops from row 14 face outwards and inserting the plastic between the 2 layers as you do so (see photo 2). Then, continue as follows:
Edge / Hinge :
Ch 1, inserting your hook through both layers (see photo 3), sc 20. (This edge will be the hinge, which will be attached to the house later on). FO leaving a long tail of yarn. Use the tail of yarn to sew the open seams at the top and bottom of the door and then (holding the door with the hinge on the right) weave the remaining tail of yarn to the position shown to make the button loop (see photo 4). Insert your hook around a stitch and draw up a loop (see photo 5). Ch 14 and sl st back into the door. FO and weave in the end (see photo 6).
— Heart Decoration for the Door :
Round 1 :
In red, make a magic ring. Into the open ring work all of the following: Ch 3, cc 2, hdc, sc, ch 2, work back down the ch that you just made, working into the 2nd ch from the hook with a sl st. Continue working into the open magic ring with: sc, hdc, dc 2, ch 3, sl st back into the magic ring. Close the magic ring & FO leaving a tail of yarn. Use the tail of yarn to sew the heart onto the door (ensuring to hold the door with the hinge on the left as you do so) (see photos 7 & 8).
— Log House - Large Branch :
Round 1 :
In beige, ch 3, hdc 8 into 3rd chain from hook. You can use the magic ring method if you prefer. Sl st into the 1st hdc to join the round. (8)
Round 2 :
Ch 2, (starting in the same st that you just joined into) BLO hdcinc x8, join. (16)
Round 3 :
Ch 1, (BLO sc, BLO inc) x8, join. (24)
Info :
At this point, you need to cut a piece of plastic canvas so that it's slightly smaller than the piece that you have made (see photo 1). Then, continue as follows:
Round 4 :
Change to dark brown yarn as you ch 1, BLO sc 24, join. (24)
Rounds 5-9 :
(5 rounds) Ch 1, sc 24, join. (24)
Info :
At this point you will begin working in rows. Continue working in the same direction as follows:
Row 1 :
Ch 1, sc 20, turn (leave the rest of the stitches un-worked). (20)
Row 2 :
Ch 1, dec, sc 16, dec, turn. (18)
Row 3 :
Ch 1, dec, sc 14, dec, turn. (16)
Row 4 :
Ch 1, dec, sc 12, dec, turn. (14)
Row 5 :
Ch 1, dec, sc 10, dec, turn. (12)
Row 6 :
Ch 1, dec, sc 8, dec, turn. (10)
Row 7 :
Ch 1, dec, sc 6, dec, turn. (8)
Row 8 :
Ch 1, dec, sc 4, dec, turn. (6)
Info :
FO leaving a tail of yarn for later assembly. Insert the piece of plastic into the end of the branch and then add some stuffing (see photo 2).
— Log House - Twig :
Round 1 :
In dark brown, ch 2, sc 4 into 2nd chain from hook. You can use the magic ring method if you prefer. (4)
Rounds 2-5 :
(4 rounds) Sc 4. (4)
Rounds 7-8 :
(2 rounds) Sc 5. (5)
Info :
FO leaving a tail of yarn. Add some stuffing and set aside for later assembly (see photo 3).
— Light Green Leaf :
Round 1 :
In light green, ch 11. Starting in the 2nd ch from the hook, work back down the ch that you just made with: sc, hdc, dc 2, tr 2, dc 2, hdc, sc. Continue in the same direction, working down the other side of the chain with: sc, hdc, dc 2, tr 2, dc 2, hdc, sc. Sl st into the 1st sc to join the round. (20)
Round 2 :
Ch 1, (starting in the same st that you just joined into): sc 3, inc, sc 2, inc, sc 3. Now ch 2. Starting in the 2nd ch from the hook, work back down the ch that you just made with: sl st. Continue working around the leaf with: sc 3, inc, sc 2, inc, sc 3, join. FO leaving a tail of yarn (see photo 2). Make a total of 4 leaves. Using one of the tails of yarn, sew a pair of leaves into a V-shape as shown (see photo 3) and then weave in this end. Keep the remaining tail of yarn (that's left on the 2nd leaf) for later assembly. Repeat this process on the remaining 2 leaves.
— Log House - Small Branch for the Swing :
Round 1 :
In dark brown, ch 2, sc 6 into 2nd chain from hook. You can use the magic ring method if you prefer. (6)
Rounds 2-8 :
(7 rounds) Sc 6. (6)
Info :
At this point, you need to cut a length of plastic canvas that can be folded in half and inserted into the crochet tube that you have made. I cut a length of plastic canvas that is 6 squares wide and fold it in half lengthways (see photos 1 & 2). Don't worry about the length of the plastic canvas at this stage as this can be trimmed down later on. Insert the plastic into your branch and then (leaving it in position and working around it), continue as follows:
Rounds 9-16 :
(8 rounds) Sc 6. (6)
Round 17 :
FLO inc x6. (12)
Round 18 :
(Inc, sc) x6. (18)
Round 19 :
(Sc, inc, sc) x6. (24)
Round 20 :
(Inc, sc 3) x6. (30)
Info :
FO leaving a tail of yarn for later assembly. Trim the plastic so that it's slightly longer than the crochet section (see photo 4). Cut the end of the plastic into 3 strips and then fold them back against the crochet section as shown (see photo 5). These 3 strips will point downwards when you attach this branch to the log house (see photo 6) to help to support the weight of the swing. Add a small amount of stuffing inside the branch if required and then set it aside for later assembly.
— Log House - Swing :
Round 1 :
In beige, ch 11. Starting in the 2nd ch from the hook, work back down the ch that you just made with: sc 10, turn. (10)
Rounds 2-6 :
(5 rows) Ch 1, sc 10, turn. (10)
Info :
At this point, you need to cut a piece of plastic canvas so that it's slightly smaller than the piece that you have made (see photo 1). Then, continue as follows:
Round 7 :
Ch 1, BLO sc 10, turn. (10)
Rounds 8-12 :
(5 rows) Ch 1, sc 10, turn. FO leaving a tail of yarn. Fold the piece in half ensuring that the leftover front loops from row 7 face outwards and inserting the plastic between the 2 layers as you do so (see photo 2). Sew around the 3 open edges and then weave in the end (see photo 3). To add the chains with which to hang your swing seat, re-join your beige yarn by inserting your hook around a stitch in the position indicated (see photo 4). Ch 51 and then join back into the seat near the opposite corner (see photo 5). FO and weave in the ends. Repeat this process on the other side (see photo 6).
— Log House - Adding the Details Before Assembly :
Infos :
Using one of the tails of dark brown yarn that you left on the front wall panel, sew around the edge of the door frame and both windows as shown. Then, weave in this end. To mark the rings on the roof of your log house, first take a roof panel and find the ring shapes on it (caused by the hdc stitches). These are marked in red in the photo on the right. Take a long piece of dark brown yarn and using a tapestry needle, weave the yarn through these stitches as shown below. Repeat this process on each of the rings and on both roof panels and then weave in the ends. Use the same process to add small rings to the end of the branch section too.
— Log House Assembly :
Info :
Take the back wall panel and one base panel and lay them out as shown… the edges that are marked in red in the photo on the right are going to be joined together. To do this, place a stitch marker through the bottom corner of the back wall panel and then through the corner of the base panel. Repeat this on the opposite corner as shown below. You can now add more markers to hold the pieces together. Then, using the tail of dark brown yarn that you left on the base panel, sew the two pieces together and then weave in the end. Repeat the same process to attach the roof panel on the other end (ensuring the rings that you added to the roof panel face upwards as you do so). I use a length of dark brown yarn for this and then weave in the end.
Info :
Repeat the same process to attach the front wall panel and the remaining base panel and lay them out as shown… the edges that are marked in red in the photo on the right are going to be joined together. To do this, place a stitch marker through the bottom corner of the front wall panel and then through the corner of the base panel. Repeat this on the opposite corner as shown below. You can now add more markers to hold the pieces together. Then, using the tail of dark brown yarn that you left on the base panel, sew the two pieces together and weave in the end.
Info :
Take the two house sections and lay them out as shown… you will now be joining the two sections together. Again I use stitch markers to hold the two pieces together. Using a length of dark brown yarn, join the two sections together and then weave in the end. Your house should now be able to open and close as shown. Find the leftover loops just to the left of the doorway (these stitches are marked in red in the photo below). Lay the door with the hinge against this leftover loops, also ensuring the bottom of the door is in line with the bottom of the house as shown. Sew the edge of the door to the leftover loops and then weave in the end. The chain loop that you made on the door will allow it to be fastened closed with a button sewn inside the house as shown.
This hollow log house pattern brings a tiny woodland world to life with texture, hidden canvases and playful details. Make a cozy home for a crocheted squirrel or small toys, complete with working door and swing. A perfect gift or heirloom-style toy to stitch with love. 🧶🏡✨