About This Spike Stitch Tote Bag Pattern
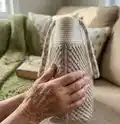
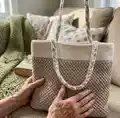
This pattern creates a textured spike stitch tote bag with a durable top band and two strap options. Youll build the base in worsted weight yarn, work textured rounds for the body, then finish in a contrasting top color. Clear round-by-round instructions make it easy to follow and customize.

Includes a spike stitch tutorial, measurements, and detailed strap instructions for pre-made or crocheted handles. The finished bag measures approximately 15 x 12 inches and uses worsted weight yarn.
Why You'll Love This Spike Stitch Tote Bag Pattern
I absolutely love this pattern because the spike stitch creates incredible texture with a surprisingly simple repeat. I enjoy how the bag holds its shape when worked around a second strand of yarn for stability. I also love offering two strap options so makers can choose a quick finish with pre-made straps or a fully handmade look with crocheted handles. The result is a polished, everyday tote that looks and feels like a boutique piece.
Switch Things Up
I love customizing this tote by changing colors—try a gradient body and a contrasting top band for a striking look.
I often make a mini version by using fingering weight yarn with a smaller hook to create a small pouch or market bag.
I sometimes substitute a bulkier yarn and larger hook to make a chunky, more structured tote that works well as a beach bag.
I like to line mine with cotton fabric and add an interior pocket to keep small items secure and tidy.
I occasionally add brass hardware or rivets for a more polished, bag-like finish when using pre-made leather straps.
I recommend experimenting with handle length—shorter hand straps or longer crossbody chains change the bag's function entirely.
I often embroider simple initials on the top band for a personalized gift.
I also try mixing stitch textures: replace a few rounds of spike stitch with plain SC or HDC for variety and structure.
I sometimes add a snap or magnetic closure to keep items secure; sew it to the top band before finishing the handles.
I enjoy making matching accessories like a small pouch or key fob using leftover yarn to create a coordinated set.
I suggest testing a small swatch of spike stitch using two strands if you want extra firmness; it changes drape and feel but improves stability.
I like to add tassels or pom-poms to the handle attachment points for a playful finish when making gifts or market bags.
Common Mistakes & How to Fix Them
✗ Skipping the suggestion to crochet around a second strand can lead to a floppy bag; crochet around a second strand of yarn from round 2 for extra structure and check for bunching after each round.
✗ Not placing stitch markers for strap placement causes misaligned handles; place markers in the specified stitches (21, 49, 94, 121) and adjust before continuing.
✗ Pulling chains too tightly when making handles will twist them and distort placement; make sure each CH 100 is not twisted before joining and placing SC into chains.
✗ Forgetting to count stitches at the end of rounds results in incorrect stitch totals; always confirm the number in brackets matches after each round and correct any mistakes immediately.