🧢 Beautiful ✨ Detailed πŸ’ Adorable

SpaceBall Amigurumi Pattern

SpaceBall Amigurumi Pattern
4.8β˜… Rating
5-7 Hours Time Needed
3.6K Made This
βœ‚οΈ

Intermediate Level

Ideal for those with basic crochet experience, featuring slightly more advanced stitches and techniques to expand your skills.

⏱️

Weekend Treat

Takes 5-7 hours, making it an enjoyable project to finish over a couple of days.

🧸

Cute Companion

An adorable friend to cherish, handcrafted with love to bring comfort and joy for years to come.

About This SpaceBall Amigurumi Pattern

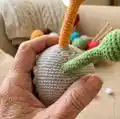
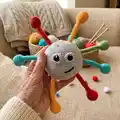
This pattern creates a round, happy SpaceBall toy with eight long, pullable arms sewn through the body to make a tactile, interactive plaything. It uses YarnArt Jeans yarn and simple amigurumi shaping to form a neat sphere and hollow arms that can be pulled and pushed. The instructions include step-by-step rounds for arms, body, eyes, embroidery and finishing touches.

SpaceBall Amigurumi Pattern crochet pattern - detailed view of completed project

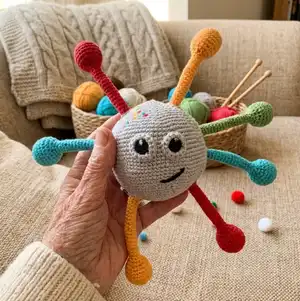
The toy is safe for toddlers when securely sewn and stuffed, and the arms measure about 30 cm. You will learn careful insertion and assembly techniques to keep the stuffing contained.

Why You'll Love This SpaceBall Amigurumi Pattern

I absolutely love this pattern because it turns basic amigurumi stitches into a playful, tactile toy that children adore. I enjoy the challenge of making the hollow pullable arms β€” they are clever, fun, and surprisingly simple to crochet. The bright color combinations make each finished SpaceBall cheerful and unique, and I love how easy it is to personalize with embroidery. Sharing this pattern lets me combine design, teaching, and play in one little handmade friend.

SpaceBall Amigurumi Pattern step 1 - construction progress SpaceBall Amigurumi Pattern step 2 - assembly progress SpaceBall Amigurumi Pattern step 3 - details and accessories SpaceBall Amigurumi Pattern step 4 - final assembly and finishing

Switch Things Up

I love how easy it is to customize the SpaceBall by simply changing arm colors or swapping yarn brands; try pastel tones for a nursery-friendly version or neon shades for a playful look.

If you want a chunkier toy, I often use a thicker cotton blend and a larger hook to create a plush version β€” just note the arms and body will grow proportionally larger.

I sometimes embroider different facial expressions to vary personality: a wide smile, a surprised O, or sleepy eyes all change the character dramatically.

For extra durability for young toddlers, I substitute embroidered eyes for crocheted pieces and skip any loose accessory bits that could be pulled off.

If you prefer a set, make several SpaceBalls in matching palettes and stitch a loop to turn them into hanging mobile toys β€” I like to add a small felt tag with a name.

I also experiment with stuffing placement: less stuffing in the hollow arm tubes and more in the rounded ends gives the best pull-and-push action.

Another fun idea is to make the arms detachable with a small button or snap inside for an interactive version; test thoroughly to ensure safety before giving to a child.

I recommend trying different stitch textures around the openings β€” a single crochet edge is neat, but a crab stitch or slip stitch border gives a different finish.

To create a teething-friendly version, I use 100% cotton and make the arms shorter and thicker for safer chewing; always use baby-safe yarn and finishes.

Finally, I sometimes add tiny crocheted accessories like a scarf or hat to personalize gifts β€” these little touches make each SpaceBall special and truly handmade.

Common Mistakes & How to Fix Them

βœ— Forgetting to leave the arm pipe hollow will trap stuffing inside the arm; leave the central 9 SC tube unstuffed and only stuff the ball ends tightly. βœ— Not securing arms when crocheting the body can shift placement later; follow the placement rounds exactly and temporarily pin or hold each arm in place before crocheting over it. βœ— Overstuffing the body before all arms are inserted makes it hard to push filler back; stuff gradually and use a chopstick to push stuffing back during assembly. βœ— Skipping counting after increases and decreases results in mismatched shaping; count each round and verify stitch totals against the pattern notation. βœ— Using a much larger hook than recommended makes the openings too loose and filler may escape; stick to a 2 mm hook and adjust tension instead of size.

SpaceBall Amigurumi Pattern

Make a playful SpaceBall amigurumi with eight pullable arms that develop fine motor skills and entertain little hands. This colorful toy combines a soft spherical body with long, hollow arms in bright shades β€” perfect for gifting or nursery play. Clear round-by-round instructions guide you through crocheting each arm, attaching them to the body, adding embroidered eyes and a friendly smile. Recommended for ages 1+ and crafted with durable YarnArt Jeans yarn for a sturdy, washable finish.

Intermediate 5-7 Hours

Materials Needed for SpaceBall Amigurumi Pattern

β€” Main Fabric

  • 01
    YarnArt Jeans 50 g (approx. 160 m) - 55% cotton, 45% acrylic; shades: 80 (grey) - main body (quantity: several 50 g balls as needed)
  • 02
    YarnArt Jeans 50 g - 53 (black) - small amount for eyes and mouth details
  • 03
    YarnArt Jeans 50 g - 03 (white) - small amount for eye highlights and securing eyes
  • 04
    YarnArt Jeans 50 g - 26 (red) - 50 g ball for one arm
  • 05
    YarnArt Jeans 50 g - 69 (green) - 50 g ball for one arm
  • 06
    YarnArt Jeans 50 g - 35 (yellow) - 50 g ball for one arm
  • 07
    YarnArt Jeans 50 g - 33 (blue) - 50 g ball for one arm
  • 08
    Polyester fiber filler - quantity sufficient to firmly stuff the body and arm ends

β€” Tools Required

  • 01
    Crochet hook size 2.0 mm
  • 02
    Scissors
  • 03
    Large eye sewing needle
  • 04
    Wooden stick (chopstick) for pushing stuffing back
  • 05
    Stitch markers (optional)
  • 06
    Yarn needle for sewing and weaving ends
  • 07
    Pins for positioning pieces (optional)

Progress Tracker

0% Complete

β€” Arms (make 4) :

Info :

Begin crocheting in any color you like. You should make pieces in 4 different colors. I used red, green, yellow, and blue. I began with red.

Round 1 :

6 MR (6)

Round 2 :

INC *6 (12)

Round 3 :

(1 SC, INC)*6 (18)

Round 4 :

(2 SC, INC)*6 (24)

Rounds 5-8 :

4 rnds straight: 24 SC

Round 9 :

(DEC, 2 SC)*6 (18)

Info :

Stuff tightly.

Round 10 :

(DEC, 1 SC)*6 (12)

Round 11 :

(DEC, 2 SC)*3 (9)

Info :

Further on leave the pipe part of 9 SC hollow. Go on crocheting 60 rows.

Rounds 12-71 :

60 rnds straight: 9 SC

Round 72 :

(INC, 2 SC)*3 (12)

Round 73 :

(1 SC, INC)*6 (18)

Round 74 :

(2 SC, INC)*6 (24)

Rounds 75-78 :

4 rnds straight: 24 SC

Round 79 :

(DEC, 2 SC)*6 (18)

Info :

Stuff tightly.

Round 80 :

(DEC, 1 SC)*6 (12)

Round 81 :

DEC*6 fasten off.

β€” Body :

Info :

Begin crocheting with grey yarn. Be very attentive, as you are going to attach arms pieces as you crochet the body.

Round 1 :

6 MR (6)

Round 2 :

INC *6 (12)

Round 3 :

(1 SC, INC)*6 (18)

Round 4 :

(2 SC, INC)*6 (24)

Round 5 :

(3 SC, INC)*6 (30)

Round 6 :

(4 SC, INC)*6 (36)

Round 7 :

(5 SC, INC)*6 (42)

Info :

Take red and yellow arm pieces at this stage.

Round 8 :

Chain 3, skip 3 SC, put the yellow arm and continue crocheting the round. 3 SC, INC, (6 SC, INS)*2, 3 CH, put the red arm, 3 SC, INC, (6 SC, INC)*2. The arms should be placed opposite each other symmetrically. (48)

Round 9 :

(7 SC, INC)*6 (54) (work 1 SC into each CH)

Round 10 :

(8 SC, INC)*6 (60)

Round 11 :

(9 SC, INC)*6 (66)

Round 12 :

(10 SC, INC)*6 (72)

Round 13 :

(11 SC, INC)*6 (78)

Round 14 :

(12 SC, INC)*6 (84)

Rounds 15-18 :

4 rnds straight : 84 SC

Round 19 :

In this round you want to attach green and blue arms. 6 SC, 3 CH, skip 3 SC, put the green arm, 39 SC, 3 CH, skip 3 SC, put the blue arm, 33 SC.

Rounds 20-24 :

5 rnds straight: 84 SC.

Round 25 :

In this round place the remaining loose ends of blue and green arms. 3 SC, 3 CH, skip 3 SC, put the blue arm, 39 SC, 3 CH, skip 3 SC, green arm, 36 SC (84). Yellow and red pieces should go between the green and blue pieces inside the toy.

Rounds 26-29 :

4 rnds straight: 84 SC.

Info :

Further on work decreases.

Round 30 :

(DEC, 12 SC)*6 (78)

Round 31 :

(DEC, 11 SC)*6 (72). Stuff the piece.

Round 32 :

(DEC, 10 SC)*6 (66)

Round 33 :

(DEC, 9 SC)*6 (60)

Round 34 :

(DEC, 8 SC)*6 (54)

Round 35 :

(DEC, 7 SC)*6 (48)

Round 36 :

In this round attach the loose ends of red and yellow arm pieces. DEC, 1 SC, 3 CH, skip 3 SC, put the red arm, 2 SC, DEC, (6 SC, DEC)*2, 1 SC, 3 CH, skip 3 SC, put the yellow arm, 2 SC, (DEC, 6 SC)*2 (42)

Round 37 :

(DEC, 5 SC)*6 (36). Work 1 SC into each CH.

Round 38 :

(DEC, 4 SC)*6 (30).

Info :

Stuff tightly. Shape a nice sphere.

Round 39 :

(DEC, 3 SC)*6 (24)

Round 40 :

(DEC, 2 SC)*6 (18)

Round 41 :

(DEC, 1 SC)*6 (12)

Round 42 :

DEC*6 fasten off.

β€” Eyes (make 2) :

Info :

Begin crocheting in black yarn.

Round 1 :

6 MR (6)

Round 2 :

INC *6 (12)

Round 3 :

(1 SC, INC)*6 (18), SL ST, fasten off.

Info :

Place the eyes between rounds 25 to 29, 4 SC apart. I don’t sew them with black thread, but only secure them on place with white thread. Embroider 3 white stitches on top of the eyes and stitch semicircles at the bottom of each eye.

Info :

Now you need to single crochet round the eyes. Insert your hook into the body and work 15 SC around the eyes. Do 2 rounds.

Info :

Embroider a mouth in black under the left eye between rounds 30 and 32, make 2 stitches.

β€” Embroidery :

Info :

Embroider small spots over the top of the head above the right eye and over the back using red, yellow, green, and blue yarn with cross-stitch. You can add these spots wherever and however you like, the key thing is to make the toy bright and attractive.

β€” Please note :

Info :

Quite tricky is the issue of the filler, which might come out when the arms are pulled. I always test the arms, and push the filler back in with a chopstick, and I simply cut the excess stuffing with scissors.

Info :

For the best effect, you could single crochet round each opening, from where the arms come out (that is, 8 openings). Insert your hook into the corner of the hole on the body and work 3 SC, 2 SC to the corner, 3 SC, 2 SC - round 1 is done. Round 2 - 10 SC, SL ST.

Assembly Instructions

  • Insert and place arm pipe pieces through the body as specified: attach red and yellow arms when directed at round 8 and 36, and attach green and blue arms at rounds 19 and 25, making sure each arm is positioned symmetrically.
  • When inserting an arm, hold the arm tube in place and crochet the body round so the arm becomes secured in the CH opening; work 1 SC into each CH when instructed to lock the arm in place.
  • Stuff the spherical body gradually and use a chopstick to push filler back while closing the body to prevent stuffing coming out of the arm openings.
  • Sew or secure the eyes with white thread through rounds 25-29 as described, then single crochet two rounds of 15 SC around each eye from the body to create eye rims.
  • After final stuffing, shape the sphere and close with the decrease rounds, then weave in all ends inside the toy to ensure they cannot be pulled out by little hands.
  • Embroider the mouth and decorative spots after assembly, placing the mouth between rounds 30-32 and adding cross-stitch spots above the right eye and on the back.

Important Notes

  • πŸ’‘Use a 2 mm hook and firm tension to keep openings tight so stuffing will not escape through the arm holes.
  • πŸ’‘Leave the central pipe portion of each arm (9 SC length) hollow to allow the arm to be pulled without displacing stuffing.
  • πŸ’‘Insert arms and secure them during the body rounds as shown; pin or hold each arm before crocheting around it for even placement.
  • πŸ’‘Stuff the arm ends and body firmly but gradually; overstuffing early can make it difficult to close the body neatly later.

This cheerful SpaceBall is perfect for little hands and big imaginations β€” eight colorful arms for endless tactile play. Handmade with soft YarnArt Jeans yarn, it makes a delightful gift for toddlers and a bright accent in any nursery. Enjoy the satisfying process of shaping, attaching, and embroidering to create a truly one-of-a-kind companion. 🧢🧸

You ask,

we answer.

FAQs

What size will the finished piece be?

The finished toy measures approximately 12-14 cm across the body with arms about 30 cm long when using YarnArt Jeans and a 2.0 mm hook; final size varies with yarn and tension.

Can I use different yarn weights for this pattern?

Yes, but changing yarn weight will change the finished size and may require adjusting the hook; use a smaller hook for denser fabric if using a lighter yarn and test your gauge.

Do I need prior crochet experience for this pattern?

This pattern is rated intermediate, so basic amigurumi experience including magic ring, increases, decreases, and sewing pieces together is recommended.

How long does this project typically take to complete?

Most crocheters finish this project in about 5-7 hours, depending on experience and how quickly you complete assembly and embroidery.

How do I prevent stuffing from coming out of the arm holes?

Work the suggested edging around each opening, push filler back with a chopstick during assembly, and make sure to crochet tight rounds and finish by closing the opening securely.