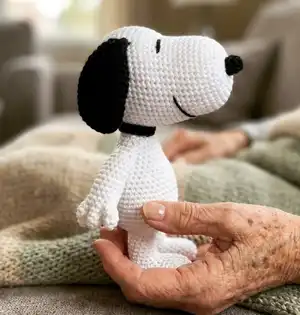
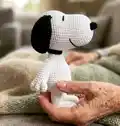
Create a charming handmade Snoopy amigurumi with step-by-step instructions that walk you through every piece. This pattern gives clear rounds, sewing notes, and helpful photos so you can build a lovable plush with confidence. Perfect for gifting or displaying, you will enjoy simple shaping and sweet details as you crochet your own classic Peanuts friend.
Progress Tracker
0% Complete
— Head :
Round 1 :
6 sc in magic ring (6 sts)
Round 2 :
(1 inc)x6 (12 sts)
Round 3 :
(1 sc, 1 inc)x6 (18 sts)
Round 4 :
(2 sc, 1 inc)x6 (24 sts)
Round 5 :
(3 sc, 1 inc)x6 (30 sts)
Round 6 :
(4 sc, 1 inc)x6 (36 sts)
Round 7 :
(5 sc, 1 inc)x6 (42 sts)
Round 8-17 :
sc even (42 sts)
Round 18 :
15 sc, (1 inc, 1 sc)x6, 15 sc (48 sts)
Round 19 :
15 sc, (1 inc, 2 sc)x6, 15 sc (54 sts)
Round 20-27 :
sc even (54 sts). Start stuffing.
Round 28 :
(7 sc, 1 dec)x6 (48 sts)
Round 29 :
(6 sc, 1 dec)x6 (42 sts)
Round 30 :
(5 sc, 1 dec)x6 (36 sts)
Round 31 :
(4 sc, 1 dec)x6 (30 sts)
Round 32 :
(3 sc, 1 dec)x6 (24 sts)
Round 33 :
(2 sc, 1 dec)x6 (18 sts)
Round 34 :
(1 sc, 1 dec)x6 (12 sts). Tightly finish stuffing
Round 35 :
(1 dec)x6 (6 sts).
Info :
Fasten off, close hole and weave in ends.
— Ear (make 2 with black yarn) :
Round 1 :
6 sc in magic ring (6 sts)
Round 2 :
(1 inc)x6 (12 sts)
Round 3 :
(1 sc, 1 inc)x6 (18 sts)
Round 4 :
(2 sc, 1 inc)x6 (24 sts)
Round 5-12 :
sc even (24 sts)
Round 13 :
(6 sc, 1 dec)x3 (21 sts)
Round 14 :
(5 sc, 1 dec)x3 (18 sts)
Round 15 :
(4 sc, 1 dec)x3 (15 sts)
Round 16 :
sc even (15 sts)
Round 17 :
(3 sc, 1 dec)x3 (12 sts)
Round 18 :
(2 sc, 1 dec)x3 (9 sts)
Round 19 :
sc even (9 sts)
Info :
Fasten off, leaving a long tail to sew to head. Don't stuff.
— Nose (with black yarn) :
Round 1 :
Chain 5 stitches. We are going to work around the foundation chain in spiral, to make an oval
Round 2 :
Starting from 2nd chain from hook, crochet 4 sc. Turn and crochet 4 sc on the back loops of the chain (8 sts)
Round 3-4 :
sc even (8 sts). Stuff the nose lightly.
Info :
Fasten off leaving a very long tail, as we are using it to sew the nose and to embroider the eyes and the mouth.
— Body :
Round 1 :
6 sc in magic ring (6 sts)
Round 2 :
(1 inc)x6 (12 sts)
Round 3 :
(1 sc, 1 inc)x6 (18 sts)
Round 4 :
(2 sc, 1 inc)x6 (24 sts)
Round 5 :
(3 sc, 1 inc)x6 (30 sts)
Round 6 :
(4 sc, 1 inc)x6 (36 sts)
Round 7 :
(5 sc, 1 inc)x6 (42 sts)
Round 8-14 :
sc even (42 sts)
Round 15 :
(5 sc, 1 dec)x6 (36 sts)
Round 16-17 :
sc even (36 sts)
Round 18 :
(4 sc, 1 dec)x6 (30 sts)
Round 19 :
sc even (30 sts)
Round 20 :
(3 sc, 1 dec)x6 (24 sts). Start stuffing
Round 21-23 :
sc even (24 sts)
Round 24 :
(6 sc, 1 dec)x3 (21 sts)
Round 25 :
(5 sc, 1 dec)x3 (18 sts)
Round 26 :
(4 sc, 1 dec)x3 (15 sts)
Round 27 :
sc even (15 sts).
Info :
Finish stuffing and F.O., leaving a long tail for sewing.
— Arm (make 2 with white yarn) :
Info :
To make the arm, we begin by crocheting the 3 fingers, then joining them and continue crocheting the hand and arm. First, crochet two fingers like this:
Round 1 :
4 sc in magic ring (4 sts)
Round 2 :
(1 sc, 1 inc)x2 (6 sts)
Round 3 :
sc even (6 sts). Cut the yarn.
Info :
Crochet now a third finger following the same steps, but this time do not cut the yarn. You are now going to join the 3 fingers (this will count as row 4):
Round 5 :
(1 sc, 1 dec)x6 (12 sts)
Round 6-15 :
sc even (12 sts)
Round 16 :
(2 sc, 1 dec)x3 (9 sts). Stuff lightly
Round 17 :
sc even (9 sts). Fasten off, leaving a long tail for sewing.
— Leg (make 2 with white yarn) :
Round 1 :
Leaving a long tail at the beginning, chain 12 stitches and make a circle by joining the last chain with the first chain (be careful to not twist the chain!). We continue working in spiral:
Round 2-6 :
sc even (12 sts)
Round 7 :
5 sc, 1 sl st. Cut the yarn, leaving a long tail to sew.
— Foot (make 2 with white yarn) :
Round 1 :
6 sc in magic ring (6 sts)
Round 2 :
(1 inc)x6 (12 sts)
Round 3 :
(3 sc, 1 inc)x3 (15 sts)
Round 4-15 :
sc even (15 sts)
Round 16 :
(3 sc, 1 dec)x3 (12 sts). Stuff
Round 17 :
(1 dec)x6 (6 sts). Cut the yarn, close the hole and weave in ends.
— Collar (with black yarn) :
Round 1 :
Chain 18 stitches. We are working in flat:
Round 2 :
From second chain from hook, crochet 1 sc in every chain (17 sts). Fasten off, leaving a long tail to sew.
— Tail (start with white yarn) :
Round 1 :
4 sc in magic ring (4 sts)
Round 3 :
(1 sc, 1 inc)x2 (6 sts)
Round 4 :
(2 sc, 1 inc)x2 (8 sts)
Round 5-7 :
sc even (8 sts).
Round 8 :
(2 sc, 1 dec)x2 (6 sts). Change to black yarn
Round 9 :
sc even (6 sts). Fasten off, leaving a long tail for sewing. Stuff lightly.
— Patch (with black yarn) :
Round 1 :
Chain 5 stitches.
Round 2 :
Starting from 2nd chain from hook, crochet 4 sc. Turn and crochet 4 sc on the back loops of the chain (8 sts)
Round 3 :
(1 sc, 1 inc)x4 (12 sts).
Round 4 :
4 sc, 4 inc, 4 sc (16 sts).
Info :
Fasten off, leaving a long tail to sew to body.
— Assembly :
Info :
On R18 of the head, place 1 ball-point pin on the first increase of the row, another one on the last increase and a third one on the stitch between the third and the fourth increase of the row. They will be our reference to place and embroider the parts of the face. Place the nose over the initial magic ring of the head, making sure it's horizontally straight in relation to the pins, and sew. Don't F.O.
Info :
Using the spare thread from the nose, now we are going to embroider the eyes between the rows 16 and 17. Taking as reference the already placed pins, put two new pins in correspondence with the pins placed on the first and last increase, one row lower. Count 3 stitches from each on those pins towards the center and place other two pins. Embroider the eyes on that space. I used a double thread for the eyes. Don't cut the yarn yet.
Info :
On the lower part of the head, count 11 rows from the edge of the nose and determine the central point in relation to the eyes and the nose. From that central point, count 8 stitches to the left and 8 stitches to the right, and mark the spots. Place a pin a couple of rows further of each one of the pins, towards the back of the head, and use those references to embroider the mouth. I've used a single thread to do it. You'll hide the excess thread later.
Info :
Mark now the center of the eyes and go up a few rows, roughly 6. Sew the ears to the temples. Now you can finish the mouth by knotting the excess thread under one of the ears and cutting.
Info :
Place the body roughly between rows 24-28 of the head. The neck is Snoopy's weakest point, so sew it very carefully using a sturdy stitch like the mattress stitch. Also, stuff it very tightly.
Info :
Sew the tail on Snoopy's back between rows 9-10 of the body and sew the patch right over it. Sew the arms on both sides of the body roughly between rows 23-24 of the body. Fasten the collar on the neck.
— Woodstock Head :
Round 1 :
6 sc in magic ring (6 sts)
Round 2 :
(1 inc)x6 (12 sts)
Round 3 :
(5 sc, 1 inc)x2 (14 sts)
Round 4 :
sc even (14 sts)
Round 5 :
(6 sc, 1 inc)x2 (16 sts)
Round 6 :
sc even (16 sts)
Round 7 :
(7 sc, 1 inc)x2 (18 sts)
Round 8-9 :
sc even (18 sts)
Round 10 :
(2 sc, 1 inc)x6 (24 sts)
Round 11 :
sc even (24 sts)
Round 12 :
(3 sc, 1 inc)x6 (30 sts)
Round 13-14 :
sc even (30 sts)
Round 15 :
(3 sc, 1 dec)x6 (24 sts)
Round 16 :
sc even (24 sts). Start stuffing
Round 17 :
(2 sc, 1 dec)x6 (18 sts)
Round 18 :
(1 sc, 1 dec)x6 (12 sts)
Round 19 :
(1 dec)x6 (6 sts)
Info :
Finish stuffing and close hole. Weave in ends.
— Woodstock Body :
Round 1 :
6 sc in magic ring (6 sts)
Round 2 :
(1 inc)x6 (12 sts)
Round 3 :
(1 sc, 1 inc)x6 (18 sts)
Round 4-7 :
sc even (18 sts)
Round 8 :
(4 sc, 1 dec)x3 (15 sts)
Round 9 :
sc even (15 sts)
Round 10 :
(3 sc, 1 dec)x3 (12 sts)
Round 11 :
(2 sc, 1 dec)x3 (9 sts)
Round 12 :
sc even (9 sts)
Info :
Cut yarn, leaving a long tail to sew to head. Stuff firmly.
— Head Feathers :
BIG (make 1) - Round 1 :
4 sc in magic ring (4 sts)
BIG - Round 2 :
sc even (4 sts)
BIG - Round 3 :
1 inc, 3 sc (5 sts)
BIG - Round 4 :
1 inc, 4 sc (6 sts)
BIG - Round 5 :
1 inc, 5 sc (7 sts)
BIG - Round 6 :
1 inc, 6 sc (8 sts). Cut yarn, leaving a tail.
SMALL (make 2) - Round 1 :
4 sc in magic ring (4 sts)
SMALL - Round 2 :
sc even (4 sts)
SMALL - Round 3 :
(1 inc, 1 sc)x2 (6 sts)
SMALL - Round 4 :
sc even (6 sts). Cut yarn, leaving a tail.
MEDIUM (make 3) - Round 1 :
4 sc in magic ring (4 sts)
MEDIUM - Round 2 :
sc even (4 sts)
MEDIUM - Round 3 :
(1 inc, 1 sc)x2 (6 sts)
MEDIUM - Round 4 :
sc even (6 sts)
MEDIUM - Round 5 :
(1 inc, 2 sc)x2 (8 sts). Cut yarn, leaving a tail.
LITTLE (make 1) - Round 1 :
4 sc in magic ring (4 sts)
LITTLE - Round 2 :
sc even (4 sts)
LITTLE - Round 3 :
(1 inc, 1 sc)x2 (6 sts). Cut yarn, leaving a tail.
— Woodstock Foot (make 2) :
Round 1 :
4 sc in magic ring (4 sts)
Round 2-4 :
sc even (4 sts). Cut yarn
Round 5 :
1 sc in every sc of each finger (8 sts)
Round 6 :
(2 sc, 1 dec)x2 (6 sts)
Round 7 :
(1 sc, 1 dec)x2 (4 sts)
Round 8 :
sc even (4 sts). Stuff very lightly and close hole.
— Woodstock Legs (make 2) :
Round 1 :
Chain 5, leaving a long tail at the beginning. Join to first chain to make a ring (5 sts)
Round 2-4 :
sc even (5 sts). Cut yarn, leaving a long tail to sew to body.
— Wings (make 2) :
FIRST PIECE - Round 1 :
6 sc in magic ring (6 sts)
FIRST PIECE - Round 2-3 :
sc even (6 sts). Cut yarn
SECOND PIECE - Round 1 :
4 sc in magic ring (4 sts)
SECOND PIECE - Round 2 :
sc even (4 sts)
Join the two pieces - Round 4 :
1 sc in very sc of each piece (10 sts)
Round 5 :
sc even (10 sts)
Round 6 :
(3 sc, 1 dec)x2 (8 sts)
Round 7 :
(2 sc, 1 dec)x2 (6 sts). Cut yarn, leaving a long tail to sew to body. Don't stuff.
— Woodstock Tail :
Round 2 :
Starting from 2nd chain from hook, crochet 6 sc. Turn and crochet 6 sc on the back loops of the chain (12 sts)
Round 3-5 :
sc even (12 sts)
Round 6 :
(1 dec, 4 sc)x2 (10 sts)
Round 7 :
sc even (10 sts)
Round 8 :
(1 dec, 3 sc)x2 (8 sts)
Round 9-10 :
sc even (8 sts)
Round 11 :
(1 dec, 2 sc)x2 (6 sts). Cut yarn, leaving a long tail to sew to body. Don't stuff.
This adorable Snoopy amigurumi brings a beloved character to life with approachable shaping and sweet details. Make one for yourself, a friend, or as a special handmade gift that will be treasured. The companion Woodstock pattern is included so you can create a matching duo to cuddle and display. 🧶🐶✨