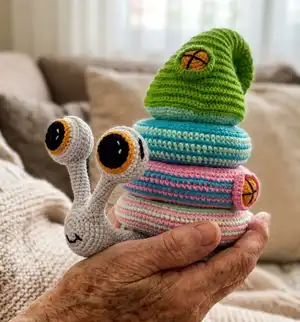
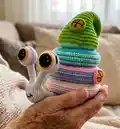
Make a charming snail stacking toy with this complete crochet pattern. You will build colorful stackable rings, a whimsical roof, a friendly snail head and coiled shell using simple amigurumi techniques. The pattern includes full round-by-round instructions, materials, and assembly notes so you can recreate this playful toy step by step.
Progress Tracker
0% Complete
— Terms Used :
Info :
MR - magic ring. Ch - chain. sl st - slip stitch. sc - single crochet. inc - increase (2 sc in 1 st). dec - decrease. hdc - half double crochet. dc inc - 2 double crochet in 1 sc. BLO - back loop only. FLO - front loop only.
— Materials :
Info :
Yarn: Gray - Alize Cotton Gold 21. Green - Alize Cotton Gold 10. Light green - Alize Cotton Gold 522. Pink - Alize Cotton Gold 149. Blue - Alize Cotton Gold 279. White - Alize Cotton Gold 55. Black - Alize Cotton Gold 60. Yellow - Alize Cotton Gold 83. Hook: 3 mm (or in accordance with the yarn you use). Fiberfill for stuffing, scissors, tapestry needle for sewing.
— Base (make 2 parts) :
Round 3 :
(1 sc; inc)*6 (18)
Round 4 :
(2 sc; inc)*6 (24)
Round 5 :
(3 sc; inc)*6 (30)
Round 6 :
FLO (4 sc; inc)*6 (36)
Round 7 :
(5 sc; inc)*6 (42)
Round 8 :
3 sc; inc; (6 sc; inc)*5; 3 sc (48)
Round 9 :
(7 sc; inc)*6 (54)
Round 10 :
4 sc; inc; (8 sc; inc)*5; 4 sc (60)
Round 11 :
FLO (9 sc; inc)*6 (66)
Round 12 :
5 sc; inc; (10 sc; inc)*5; 5 sc (72)
Round 13 :
(11 sc; inc)*6 (78)
Round 14 :
6 sc; inc; (12 sc; inc)*5; 6 sc (84)
Round 15 :
(13 sc; inc)*6 (90)
Round 16-17 :
90 sc (90) cut the yarn, hide a tail.
Info :
Sew two parts of the base together in back loops of rounds 6 and 11. Fill with stuffing as you go. After that start to crochet tail, connecting both parts.
— Tail :
Round 1 :
10 sc(one part) + 10 sc (second part)(20) continue to work in rounds
Round 3 :
(dec; 8 sc)*2 (18)
Round 5 :
(dec; 7 sc)*2 (16)
Round 7 :
(dec; 6 sc)*2 (14)
Round 9 :
(dec; 5 sc)*2 (12)
Round 11 :
(2 sc; dec)*3 (9)
Round 13 :
(1 sc; dec)*3 (6)-fasten off.
Infos :
Connect 2 parts with 35 sc, turn and make (dc inc)*25 (70). Make it the same way starting from both sides of the tail and filling with stuffing as you go.
Info :
In the end there will be a hole with 20 sc, here we'll start to make a neck and then head of a snail.
— Neck & Head :
Round 1 :
10 sc(one part) + 10 sc (second part)(20) continue to work in rounds
Round 6 :
3 sc; 4 inc; 4 sc; 4 dec; 1 sc (20)
Round 7 :
15 sc; 4 hdc; 1 sc (20)
Round 8 :
4 sc; 4 inc; 4 sc; 4 dec (20)
Round 9 :
16 sc; 4 hdc (20)
Round 10 :
6 sc; 4 inc; 4 sc; 4 dec (22*)
Round 11 :
16 sc; 4 hdc (20)
Round 12 :
6 sc; 4 inc; 4 sc; 4 dec (22*)
Round 13 :
(1 sc; inc)*10 (30)
Round 14 :
(4 sc; inc)*6 (36)
Round 22 :
(4 sc; dec)*6 (30)
Round 23 :
(3 sc; dec)*6 (24)
Round 24 :
(2 sc; dec)*6 (18)
Round 25 :
(1 sc; dec)*6(12)
Round 26 :
6 dec (6) cut the yarn, sew the hole, hide a tail.
Info :
(*)- + decreases from the beginning of the other round
— Pole :
Round 4 :
(1 sc; inc)*6 (18)
Round 7 :
(2 sc; inc)*6 (24)
Round 11 :
(3 sc; inc)*6 (30)
Round 16 :
(4 sc; inc)*6 (36)
Round 22 :
(5 sc; inc)*6 (42)
Round 29 :
(6 sc; inc)*6 (48)
Round 37 :
(7 sc; inc)*6 (54)
Round 46 :
(8 sc; inc)*6 (60) cut the yarn, leave a long tail for sewing.
Info :
Sew the pole with the part of the base (in round 11) like in the pictures.
— Eyes Part 1 (make 2) :
Info :
Start with black yarn
Round 3 :
(1 sc; inc)*6 (18)
Round 4 :
18 sl st (18) - change to yellow color
Round 5 :
BLO (2 sc; inc)*6 (24)
Round 6 :
24 sl st (24) change to white color
Round 7 :
(3 sc; inc)*6 (30)
Round 8-10 :
30 sc (30) fasten off.
— Eyes Part 2 (make 2) :
Round 3 :
(1 sc; inc)*6 (18)
Round 4 :
(2 sc; inc)*6 (24)
Round 5 :
(3 sc; inc)*6 (30)
Round 7 :
connect with R10 30sc (30)
Round 8-9 :
30 sc (30) fasten off.
— Eyes Part 3 (make 2) :
Round 1 :
13 ch, 1slst to form a circle
Round 3 :
(1 sc; dec)*6 (8)
Round 13 :
(1 sc; inc)*6 (12)
Round 14 :
12 sc (12) cut the yarn leave long tail for sewing. Sew as in the pictures.
— Large Ring :
Info :
Start with light green yarn
Round 1 :
60 ch; slst in 1st ch (60)
Round 2 :
(9 sc; inc)*6 (66)
Round 3 :
5 sc; inc; (10 sc; inc)*5; 5 sc (72)
Round 4 :
(11 sc; inc)*6 (78)
Round 5 :
6 sc; inc; (12 sc; inc)*5; 6 sc (84)
Round 6 :
(13 sc; inc)*6 (90)
Round 7 :
7 sc; inc; (14 sc; inc)*5; 7 sc (96)
Round 8 :
(15 sc; inc)*6 (102)
Round 9 :
102 sc (102) change to pink color
Round 10 :
102 sc (102) change to light green color
Round 11 :
102 sc (102) change to pink color
Round 12 :
102 sc (102) change to light green color
Round 13 :
102 sc (102) change to pink color
Round 14 :
102 sc (102) change to light green color
Round 16 :
(15 sc; dec)*6 (96)
Round 17 :
7 sc; dec; (14 sc; dec)*5; 7 sc (90)
Round 18 :
(13 sc; dec)*6 (84)
Round 19 :
6 sc; dec; (12 sc; dec)*5; 6 sc (78)
Round 20 :
(11 sc; dec)*6 (72)
Round 21 :
5 sc; dec; (10 sc; dec)*5; 5 sc (66)
Round 22 :
(9 sc; dec)*6 (60) cut the yarn, leave a long tail for sewing.
Info :
Sew round 22 with round 1, fill with stuffing as you go.
— Middle Ring :
Info :
Start with pink yarn
Round 1 :
48 ch; slst in 1st ch (48)
Round 2 :
(7 sc; inc)*6 (54)
Round 3 :
4 sc; inc; (8 sc; inc)*5; 4 sc (60)
Round 4 :
(9 sc; inc)*6 (66)
Round 5 :
5 sc; inc; (10 sc; inc)*5; 5 sc (72)
Round 6 :
(11 sc; inc)*6 (78)
Round 7 :
6 sc; inc; (12 sc; inc)*5; 6 sc (84) change to blue
Round 8 :
(13 sc; inc)*6 (90) change to pink
Round 9 :
90 sc (90) change to blue
Round 10 :
90 sc (90) change to pink
Round 11 :
90 sc (90) change to blue
Round 12 :
90 sc (90) change to pink
Round 13 :
90 sc (90) change to blue
Round 14 :
90 sc (90) change to pink
Round 16 :
(13 sc; dec)*6 (84)
Round 17 :
6 sc; dec; (12 sc; dec)*5; 6 sc (78)
Round 18 :
(11 sc; dec)*6 (72)
Round 19 :
5 sc; dec; (10 sc; dec)*5; 5 sc (66)
Round 20 :
(9 sc; dec)*6 (60)
— Small Ring :
Info :
Start with blue yarn
Round 1 :
36 ch; slst in 1st ch (36)
Round 2 :
(5 sc; inc)*6 (42)
Round 3 :
3 sc; inc; (6 sc; inc)*5; 3 sc (48)
Round 4 :
(7 sc; inc)*6 (54)
Round 5 :
4 sc; inc; (8 sc; inc)*5; 4 sc (60)
Round 6 :
(9 sc; inc)*6 (66)
Round 7 :
5 sc; inc; (10 sc; inc)*5; 5 sc (72)
Round 8 :
(11 sc; inc)*6 (78)
Round 9 :
78 sc (78) change to light green
Round 10 :
78 sc (78) change to blue
Round 11 :
78 sc (78) change to light green
Round 12 :
78 sc (78) change to blue
Round 13 :
78 sc (78) change to light green
Round 14 :
78 sc (78) change to blue
Round 16 :
(11 sc; dec)*6 (72)
Round 17 :
5 sc; dec; (10 sc; dec)*5; 5 sc (66)
Round 18 :
(9 sc; dec)*6 (60)
Round 19 :
4 sc; dec; (8 sc; dec)*5; 4 sc (54)
Round 20 :
(7 sc; dec)*6 (48)
Round 21 :
3 sc; dec; (6 sc; dec)*5; 3 sc (42)
Round 22 :
(5 sc; dec)*6 (36)
Info :
Sew round 22 with round 1, fill with stuffing as you go.
— Windows (make 3) :
Info :
Start with yellow color
Round 3 :
(1 sc; inc)*6 (18)
Round 4 :
(2 sc; inc)*6 (24)
Round 5 :
24 sc (24) change to blue/pink/green color
Round 7 :
(3 sc; inc)*6 (30) cut the yarn, leave a long tail for sewing
Info :
Sew the windows to the middle ring, small ring and a roof.
— Door :
Info :
Start with black color
Round 2 :
5 sc; 3 sc in 1; 5 sc; turn (13)
Round 3 :
1 ch; 5 sc; 3 inc; 5 sc; turn (16)
Round 4 :
1 ch; 5 sc; (1 sc; inc)*3; 5 sc; turn (13) change to light green color
Round 5 :
1 ch; BLO 16 sc; turn (16)
Round 6 :
1 ch; BLO 16 sc (16) cut the yarn, leave a long tail for sewing
Info :
Sew the doors to the large ring.
— Roof :
Info :
Start with green yarn
Row 3 :
BLO 1 ch; 2 sc; inc; 2 sc; turn (6)
Row 4 :
BLO 1 ch; 6 sc; turn (6)
Row 5 :
BLO 1 ch; 3 sc; inc; 2 sc; turn (7)
Row 6 :
BLO 1 ch; 7 sc; turn (7)
Row 7 :
BLO 1 ch; 3 sc; inc; 3 sc; turn (8)
Row 8 :
BLO 1 ch; 8 sc; turn (8)
Row 9 :
BLO 1 ch; 4 sc; inc; 3 sc; turn (9)
Row 10 :
BLO 1 ch; 9 sc; turn (9)
Row 11 :
BLO 1 ch; 4 sc; inc; 4 sc; turn (10)
Row 12 :
BLO 1 ch; 10 sc; turn (10)
Row 13 :
BLO 1 ch; 5 sc; inc; 4 sc; turn (11)
Row 14 :
BLO 1 ch; 11 sc; turn (11)
Row 15 :
BLO 1 ch; 5 sc; inc; 5 sc; turn (12)
Row 16 :
BLO 1 ch; 12 sc; turn (12)
Row 17 :
BLO 1 ch; 6 sc; inc; 5 sc; turn (13)
Row 18 :
BLO 1 ch; 13 sc; turn (13)
Row 19 :
BLO 1 ch; 6 sc; inc; 6 sc; turn (14)
Row 20 :
BLO 1 ch; 14 sc; turn (14)
Row 21 :
BLO 1 ch; 7 sc; inc; 6 sc; turn (15)
Row 22 :
BLO 1 ch; 15 sc; turn (15)
Row 23 :
BLO 1 ch; 7 sc; inc; 7 sc; turn (16)
Row 24 :
BLO 1 ch; 16 sc; turn (16)
Row 25 :
BLO 1 ch; 8 sc; inc; 7 sc; turn (17)
Row 26 :
BLO 1 ch; 17 sc; turn (17)
Row 27 :
BLO 1 ch; 8 sc; inc; 8 sc; turn (18)
Row 28 :
BLO 1 ch; 18 sc; turn (18)
Row 29 :
BLO 1 ch; 9 sc; inc; 8 sc; turn (19)
Row 30 :
BLO 1 ch; 19 sc; turn (19)
Row 31 :
BLO 1 ch; 9 sc; inc; 9 sc; turn (20)
Row 32 :
BLO 1 ch; 20 sc; turn (20)
Row 33 :
BLO 1 ch; 10 sc; inc; 9 sc; turn (21)
Row 34 :
BLO 1 ch; 21 sc; turn (21)
Row 35 :
BLO 1 ch; 10 sc; inc; 10 sc; turn (22)
Row 36 :
BLO 1 ch; 22 sc; turn (22)
Row 37 :
BLO 1 ch; 11 sc; inc; 10 sc; turn (23)
Row 38 :
BLO 1 ch; 23 sc; turn (23)
Row 39 :
BLO 1 ch; 11 sc; inc; 11 sc; turn (24)
Row 40 :
BLO 1 ch; 24 sc; turn (24)
Row 41 :
BLO 1 ch; (3 sc; inc)*6; turn (30)
Row 42 :
BLO 1 ch; 30 sc; turn (30)
Row 43 :
BLO 1 ch; (4 sc; inc)*6; turn (36)
Row 44 :
BLO 1 ch; 36 sc; turn (36)
Row 45 :
BLO 1 ch; (5 sc; inc)*6; turn (42)
Row 46 :
BLO 1 ch; 42 sc; turn (42)
Row 47 :
BLO 1 ch; (6 sc; inc)*6; turn (48)
Row 48 :
BLO 1 ch; 48 sc; turn (48)
Row 49 :
BLO 1 ch; (7 sc; inc)*6; turn (54)
Row 50 :
BLO 1 ch; 54 sc; turn (54)
Row 51 :
BLO 1 ch; (8 sc; inc)*6; turn (60)
Row 52 :
BLO 1 ch; 60 sc; turn (60)
Row 53 :
BLO 1 ch; (9 sc; inc)*6; turn (66)
Row 54 :
BLO 1 ch; 66 sc; turn (66)
Row 55 :
BLO 1 ch; (10 sc; inc)*6; turn (72)
Row 56 :
BLO 1 ch; 72 sc; turn (72)
Row 57 :
BLO 1 ch; (11 sc; inc)*6; turn (78)
Row 58 :
BLO 1 ch; 78 sc; turn (78)
Row 59 :
BLO 1 ch; (12 sc; inc)*6; turn (84)
Row 60 :
BLO 1 ch; 84 sc; turn (84)
Row 61 :
BLO 1 ch; (13 sc; inc)*6; turn (90)
Row 62 :
BLO 1 ch; 90 sc; turn (90) change to light green color and from now on continue to work in rounds
Round 63 :
BLO 1 ch; (13 sc; dec)*6 (84)
Round 64 :
6 sc; dec; (12 sc; dec)*5; 6 sc (78)
Round 65 :
(11 sc; dec)*6 (72)
Round 66 :
5 sc; dec; (10 sc; dec)*5; 5 sc (66)
Round 67 :
(9 sc; dec)*6 (60)
Round 68 :
4 sc; dec; (8 sc; dec)*5; 4 sc (54)
Round 69 :
(7 sc; dec)*6 (48)
Round 70 :
3 sc; dec; (6 sc; dec)*5; 3 sc (42)
Round 71 :
(5 sc; dec)*6 (36)
Round 76 :
(4 sc; dec)*6 (30)
Round 79 :
(3 sc; dec)*6 (24)
Round 82 :
(2 sc; dec)*6 (18)
Round 84 :
(1 sc; dec)*6 (12)
Round 85 :
6 dec (6) cut the yarn, finish, hide a tail.
This snail stacking toy pattern brings playful color and tactile fun to your crochet projects. The stackable rings and adorable snail details make a wonderful handmade gift or nursery toy. Enjoy customizing colors and creating a unique set that will be treasured for playtime and decor. 🧶🧵