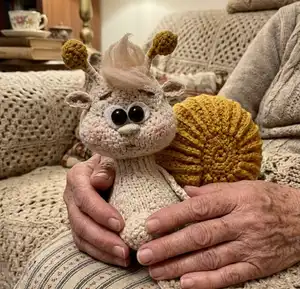
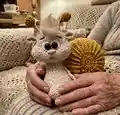
Bring a charming handmade snail to life with this detailed crochet pattern. You will create a cuddly, wire-framed toy with a textured shell and delicate facial features. Clear step-by-step rounds and illustrated assembly help you complete the project using one hook. Perfect as a gift or a delightful desk companion.
Progress Tracker
0% Complete
— Shell :
Info :
With mustard No. 84 and a 2 mm crochet hook. Make 2.
Rnd 1 :
6 into MR, 1 sl st in the first stitch, chain 3 (6)
Rnd 2 :
3 DC in the first stitch, (3 DC in each stitch)*5, 2 DC in the first stitch, where we crocheted 3 chains at the beginning of the round, sl st. (20)
Info :
Break yarn and secure it. Hide the yarn tail. Crochet the second part similarly but do not break yarn.
Info :
Continue crocheting: Chain 13 and attach the chain foundation to any stitch of the first circle with a slip stitch. To do this, insert the hook from the right side of the circle, bring the working yarn to the wrong side of the circle. Grab the working yarn and pull it through the loops on the hook, making a slip stitch. Chain 1. Turn.
Info :
Start crocheting in the 2nd chain from the hook.
Round 1 :
1 sl st, sc, HDC, 7 DC, HDC, sc, 1 sl st. Attach the first line of the shell in the next stitch of the circle with sl st as usual, chain 1, turn (13)
Round 2 :
BLO: 1 sl st, 11 sc, 1 sl st, attach in the next stitch of the circle with 1 sl st, as indicated above (insert the hook from the right side of the circle, hold the working yarn on the wrong side and pull it through the loops on the hook, making a slip stitch). Chain 1, turn. (13)
Round 3 :
BLO: 1 sl st, 2 sc in 1 stitch, HDC, 3 DC, 3 DC in 1 stitch, 3 DC, HDC, 2 sc in 1 stitch, 1 sl st. Attach the piece in the next stitch of the circle with sl st as usual. Chain 1, and turn the work. (17)
Round 4 :
BLO: 1 sl st, 15 sc, 1 sl st, attach the piece in the next stitch of the circle with sl st as indicated above, chain 1, and turn (17)
Round 5 :
BLO: 1 sl st, 2 sc in 1 stitch, 1 sc, HDC, 9 DC, HDC, 1 sc, 2 sc in 1 stitch, 1 sl st. Attach the piece in the next stitch of the circle with sl st as usual. Chain 1, and turn the work (19)
Round 6 :
BLO: 1 sl st, 17 sc, 1 sl st, attach the piece in the next stitch of the circle with sl st as indicated above, chain 1, and turn (19)
Round 7 :
BLO: 1 sl st, 2 sc in 1 stitch, 2 sc in 1 stitch, 1 sc, HDC, 9 DC, HDC, 1 sc, 2 sc in 1 stitch, 2 sc in 1 stitch, 1 sl st. Attach the piece in the next stitch of the circle with sl st as usual. Chain 1, and turn the work (23)
Round 8 :
BLO: 1 sl st, 21 sc, 1 sl st, attach the piece in the next stitch of the circle with sl st as indicated above, chain 1, and turn (23)
Round 9 :
BLO: 1 sl st, 5 sc, HDC, 9 DC, HDC, 5 sc, 1 sl st. Attach the piece in the next stitch of the circle with sl st as usual. Chain 1, and turn the work (23)
Round 10 :
BLO: 1 sl st, 21 sc, 1 sl st, attach the piece in the next stitch of the circle with sl st as indicated above, chain 1, and turn (23)
Info :
Repeat 9-10 rounds 10 times. Rounds 11-30: repeat rounds 9-10. Note: the right side of the circles is facing outward and the wrong side of the circles is facing inward.
Info :
We have crocheted 16 double rounds if you count from the first round. From the next round, start increasing the number of stitches.
Round 31 :
BLO: 1 sl st, 2 sc in 1 stitch, 4 sc, HDC, 9 DC, HDC, 4 sc,2 sc in 1 stitch, 1 sl st. Attach the piece in the next stitch of the circle with sl st, chain 1, turn (25)
Round 32 :
BLO: 1 sl st, 23 sc, 1 sl st, attach the piece in the next stitch of the circle with sl st, chain 1, turn (25)
Round 33 :
BLO: 1 sl st, 6 sc, HDC, 9 DC, HDC, 6 sc, 1 sl st. Attach the piece in the next stitch of the circle with sl st, chain 1, turn (25)
Round 34 :
BLO: 1 sl st, 23 sc, 1 sl st, attach the piece in the next stitch of the circle with sl st, chain 1, turn (25)
Round 35 :
BLO: 1 sl st, 6 sc, HDC, 4 DC, 3 DC in 1 stitch, 4 DC, HDC, 6 sc, 1 sl st. Attach the piece in the next stitch of the circle with sl st, chain 1, turn (27)
Round 36 :
BLO: 1 sl st, 25 sc, 1 sl st, attach the piece in the next stitch of the circle with sl st, chain 1, turn (27)
Round 37 :
BLO: 1 sl st, 6 sc, HDC, 11 DC, HDC, 6 sc, 1 sl st. Attach the piece in the next stitch of the circle with sl st, chain 1, turn (27)
Round 38 :
BLO: 1 sl st, 25 sc, 1 sl st, attach the piece in the next stitch of the circle with sl st, chain 1, turn (27)
Round 39 :
BLO: 1 sl st, 6 sc, HDC, 11 DC, HDC, 6 sc, 1 sl st. Attach the piece in the next stitch of the circle with sl st, chain 1, turn (27)
Round 40 :
BLO: 1 sl st, 25 sc, 1 sl st, attach the piece in the next stitch of the circle with sl st, chain 1, turn (27)
Round 41 :
BLO: 1 sl st, 6 sc, HDC, 11 DC, HDC, 6 sc, 1 sl st. Attach the piece in the next stitch of the circle with sl st, chain 1, turn (27)
Round 42 :
BLO: 1 sl st, 25 sc, 1 sl st, attach the piece in the next stitch of the circle with sl st, chain 1, turn (27)
Info :
Attach the piece of the last 4 rounds in the first stitch of the circle and crochet as rounds 39-40. Break yarn and secure it, leaving a long yarn tail for sewing. Stuff the shell with fiberfill.
— Eyes :
Info :
Eyes (white) make 2. With white yarn and a 2 mm crochet hook.
Info :
Tighten the ring gently. Insert the safety eye into the ring and do not tighten strongly, as shown in the photo. Break yarn, leaving a short tail for sewing to the head. Crochet the second eye similarly. Put the ready eyes aside. Start crocheting the body.
— Body :
Info :
With light beige No. 03 and a 2 mm crochet hook.
— Tail (the first part) :
Start the tail (first part) as follows.
Round 4 :
2 sc, 1 inc, 2 sc, 1 inc (8)
Round 5 :
3 sc, 1 inc, 3 sc, 1 inc (10)
Round 6 :
4 sc, 1 inc, 4 sc, 1 inc (12)
Round 7 :
5 sc, 1 inc, 5 sc, 1 inc (14)
Round 8 :
6 sc, 1 inc, 6 sc, 1 inc (16)
Round 9 :
7 sc, 1 inc, 7 sc, 1 inc (18)
Round 10 :
8 sc, 1 inc, 8 sc, 1 inc (20)
Round 11 :
9 sc, 1 inc, 9 sc, 1 inc (22)
Round 12 :
10 sc, 1 inc, 10 sc, 1 inc (24)
Rounds 13-23 :
24 sc (24) - 11 rounds
Info :
Break yarn and secure it. Stuff the tail with fiberfill gently.
— Body (the second part) :
With light beige No. 03 and a 2 mm crochet hook.
Round 3 :
(1 sc, 1 inc)*6 (18)
Round 4 :
(2 sc, 1 inc)*6 (24)
Round 5 :
(3 sc, 1 inc)*6 (30)
Round 6 :
(4 sc, 1 inc)*6 (36)
Round 7 :
(5 sc, 1 inc)*6 (42)
Info :
In the next round, start joining the tail and circle (body) together. Fold both parts with the right side facing each other and start crocheting 12 through both loops of the tail and body together at once, continue crocheting 30 sc to the body.
Round 8 :
12 sc through both stitches of the tail and body together, 30 sc to the body (42)
Info :
In the next round, continue crocheting 12 sc to the outer side of the tail and 30 sc to the circle (body).
Round 9 :
12 sc to the outer side of the tail, 30 sc (42)
Rounds 10-13 :
42 sc (42) 4 rounds
Round 14 :
19 sc, 1 dec, 19 sc, 1 dec (40)
Round 15 :
(8 sc, 1 dec)*4 (36)
Round 16 :
(7 sc, 1 dec)*4 (32)
Round 17 :
(6 sc, 1 dec)*4 (28)
Round 18 :
(5 sc, 1 dec)*4 (24)
Round 19 :
(4 sc, 1 dec)*4 (20)
Round 20 :
8 sc, 1 dec, 8 sc, 1 dec (18)
— Neck :
Continue to neck instructions below.
Rounds 21-23 :
18 sc (18) 3 rounds
Info :
Do not forget to stuff the body. Crochet shift stitches. The beginning of the new round must be in the middle of the front part of the neck. I crocheted 10 sc and put the marker.
— Head :
Info :
Make the wireframe for the neck and antennas before you start crocheting the head. Cut a 20 cm / 7.8 inches piece of wire. Fold the wire in half and put it aside.
Round 24 :
(2 sc, 1 inc)*6 (24) through front loops only
Round 25 :
(3 sc, 1 inc)*6 (30)
Round 26 :
(4 sc, 1 inc)*6 (36)
Info :
Note: crochet increases for the cheeks in the next round. The marker is in the middle on the front side of the head! Crochet shift stitches if needed.
Round 27 :
2 sc, 6 inc, 20 sc, 6 inc, 2 sc (48)
Rounds 28-33 :
48 sc (48) 6 rounds
Round 34 :
2 sc, 6 dec, 20 sc, 6 dec, 2 sc (36)
Info :
In round 36 insert the eyes and secure them from inside. I install the eyes and sew the whites to the ready stuffed head later.
Round 39 :
(4 sc, 1 dec)*6 (30)
Round 41 :
(3 sc, 1 dec)*6 (24)
Info :
Insert the wireframe into the head and neck. Stuff the head and neck with fiberfill firmly. Draw out the ends of the wireframe to the sides in round 42. The distance between the antennas is 10-12 sc.
Round 43 :
(2 sc, 1 dec)*6 (18)
Round 44 :
(sc, 1 dec)*6 (12)
Info :
Break yarn and tighten the hole with a tapestry needle. Hide the yarn tail inside the head.
— Antennas :
Info :
Attach light beige yarn to the head and secure it from inside. Cut the ends of the wireframe if they are long. Bend the ends and secure them with adhesive tape. Wrap the beige yarn around the wireframe moving upward. Break yarn and tie it into a knot. Repeat with the other antenna.
— Cups for the antennas (make 2) :
With mustard yarn and a 2 mm crochet hook.
Round 6 :
(1 sc, 1 dec)*6 (6)
Info :
Break yarn and tighten using a tapestry needle. Hide the yarn tail inside. Crochet the second cup similarly. Put the cups onto the ends of the wireframe and sew them. Hide the beige yarn tails from the antennas inside the cups. The antennas are ready.
— Ears (make 2) :
Info :
With light beige yarn and a 2 mm crochet hook.
Info :
Break yarn, leaving a tail for sewing to the head. Crochet the second ear similarly. Pin the ears on the sides of the head under the antennas between rounds 37-38 of the head and sew on.
— Paws (make 2) :
Info :
With light beige yarn and a 2 mm crochet hook.
Round 3 :
(1 sc, 1 inc)*6 (18)
Info :
Break yarn, leaving a long tail for sewing to the body. Crochet the second paw similarly. Pin the paws to the bottom of the body and sew them.
— Foot :
Info :
With light beige yarn and a 2 mm crochet hook.
Round 1 :
Chain 9, start crocheting in the second chain from hook 7 sc (one sc in each stitch), 5 sc in the last chain foundation, turn and continue crocheting on the other side of the chain 7 sc, 5 sc in the last chain foundation (24)
Round 2 :
7 sc, inc, 1 sc, inc, 1 sc, inc, 7 sc, inc, 1 sc, inc, 1 sc, inc (30)
Round 3 :
7 sc, inc, 2 sc, 2 inc, 2 sc, inc, 7 sc, inc, 2 sc, 2 inc, 2 sc, inc (38)
Round 4 :
7 sc, inc, 3 sc, inc, 2 sc, inc, 3 sc, inc, 7 sc, inc, 3 sc, inc, 2 sc, inc, 3 sc, inc (46)
Round 5 :
7 sc, inc, 4 sc, inc, 4 sc, inc, 4 sc, inc, 7 sc, inc, 4 sc, inc, 4 sc, inc, 4 sc, inc (54)
Frill :
Continue crocheting as following. Rnd 6: chain 3, *2 TR in one stitch, chain 2* - repeat from * to * to the end of the round. Fasten off and break yarn. Hide the yarn tail.
— Assembly :
Info :
Sew the foot to the body as shown in the photo: Pin the shell to the body and foot and sew them together, sewing the sides of the shell.
Info :
Sew the paws if you did not do it before.
Info :
Insert the eyes between rounds 36-37 of the head and sew the whites. Embroider the eyebrows with brown thread. Do not cut thread and move it to the mouth point in the center of the 29th round of the head. Make 1 stitch (length 1-2 sc) and draw out the needle to the top of the head. Pull the thread gently, sculpting the mouth socket. Fasten off and cut it.
Info :
Embroider the nose under the eyes with light beige yarn. First, make 2-4 horizontal stitches and 5-6 vertical stitches around previous stitches of the nose.
Info :
Hair: Use a piece of beige wool for making the hair. Take 4 cm / 1.5 inches long pieces, divide into 6-8 pieces and attach to the top of the head with a crochet hook. Trim ends and divide hair into bangs + top hair. Twist ends with fingers. Put some rouge on the cheeks and inside the ears (optionally).
Info :
Our snail is finished!
This delightful snail amigurumi is a heartwarming project that combines texture, shaping, and a playful wire-framed touch. Its cheerful mustard shell and expressive face make it a perfect gift or shelf companion. Crochet it with care, add little finishing touches like rouge and hair, and enjoy giving it a loving home. 🧶✨🧵