🧢 Beautiful ✨ Detailed πŸ’ Adorable

Small Pumpkin Pattern

Small Pumpkin Pattern
4.6β˜… Rating
1-2 Hours Time Needed
3.0K Made This
βœ‚οΈ

Beginner Friendly Level

Perfect for those just starting their crochet journey, with clear instructions and simple techniques

⏱️

Quick Make

Complete in under 2 hoursβ€”lightning fast fun for instant gratification and quick gifts.

πŸ‚

Autumn Vibes

Earthy tones with cozy textures inspired by falling leaves and the rich, warm colors of harvest season.

About This Small Pumpkin Pattern

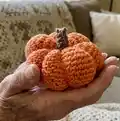
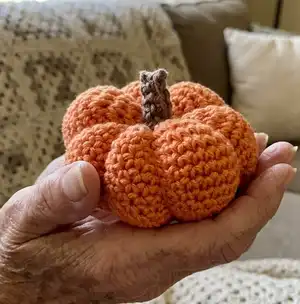
This PDF page shows a preview of a Small Pumpkin crochet project and directs you to the full free pattern on PeachUnicornDesigns.com. The finished pumpkin is small, decorative, and perfect for autumn displays or as a gift. The pattern is ideal for using scrap yarn and practicing basic rounds and shaping techniques.

Small Pumpkin Pattern crochet pattern - detailed view of completed project

The page itself contains a link and instructions to visit the blog for the complete pattern and photo reference. Please visit the Crochet Blog at PeachUnicornDesigns.com to view and download the full step-by-step pattern.

Why You'll Love This Small Pumpkin Pattern

I absolutely love this pattern because it turns a few simple rounds into a charming seasonal decoration that anyone can make. I enjoy how quickly a small pumpkin comes togetherβ€”perfect for gifting or decorating in a single sitting. The design is forgiving and works great with leftover yarn, so I often make a few at a time. Creating these pumpkins always adds a cozy, handmade touch to my home during autumn.

Small Pumpkin Pattern step 1 - construction progress Small Pumpkin Pattern step 2 - assembly progress Small Pumpkin Pattern step 3 - details and accessories Small Pumpkin Pattern step 4 - final assembly and finishing

Switch Things Up

I love customizing small pumpkins by changing yarn weight and hook size to alter the finished scale; try DK weight for a plumper look or fingering weight for minis.

I often swap colors to make white or pastel pumpkins for indoor seasonal decor instead of traditional orange.

I sometimes add a tiny crochet leaf or embroidered veins to the segments for extra detail and personality.

I will use a contrasting color for the stem to create a more stylized or whimsical look on some versions.

I like to vary stuffing amounts to create softer or firmer pumpkins depending on whether they will be used as pincushions or purely decorative items.

I sometimes add beads inside before stuffing to give the pumpkin a bit of weight so it sits nicely on shelves or mantels.

I recommend experimenting with textured yarns like boucle or chenille for a fuzzy, tactile pumpkin that feels cozy to the touch.

For a holiday display, I pair several pumpkins in graduated sizes and colors to create an eye-catching centerpiece.

I also enjoy making tiny versions to use as keychains or garland elements by using thinner yarn and a smaller hook.

If you like plush toys, I occasionally incorporate a wire stem so the pumpkin can be posed slightly for different display angles.

I encourage you to try embroidery, felt applique, or small buttons to customize faces or details and create themed pumpkins for Halloween or Thanksgiving.

Common Mistakes & How to Fix Them

βœ— Not visiting the blog link on the PDF means you will miss the full pattern details; follow the Click here link or visit PeachUnicornDesigns.com to view the complete instructions. βœ— Using an inappropriate hook size will change the finished size and texture of the pumpkin; match the hook to the yarn weight recommended on the blog for correct gauge. βœ— Overstuffing the pumpkin causes it to lose its segmented shape and become overly firm; stuff gradually and adjust filling until the segments form naturally. βœ— Failing to divide and shape segments properly can result in a lumpy pumpkin; use a length of yarn to sew through the center and pull to form even sections.

Small Pumpkin Pattern

Make a charming small crochet pumpkin to decorate your home or give as an autumn gift. This PDF page directs you to the full free pattern on the designer's blog, so you can easily access the complete step-by-step instructions. Perfect for quick seasonal crafting and cute handmade decor, this pumpkin is great for using up scrap yarn and practicing basic amigurumi shaping.

Beginner Friendly 1-2 Hours

Materials Needed for Small Pumpkin Pattern

β€” Main Fabric

  • 01
    Materials not listed on this PDF page; full yarn type, colors, weights, and amounts are available on the PeachUnicornDesigns.com Crochet Blog.

β€” Tools Required

  • 01
    Tool list not included on this PDF page; see the full pattern on PeachUnicornDesigns.com for exact hook size, stuffing, and accessories required.

Progress Tracker

0% Complete

β€” Note :

Infos :

Free Small Pumpkin is available on my Blog. Click here. Or visit www.PeachUnicornDesigns.com and go to Crochet Blog.

Info :

This PDF page is a cover/preview only and does not contain the full pattern rounds or materials list; please visit the blog link to access the complete pattern and step-by-step instructions.

Info :

Image of the finished small pumpkin is shown below as a photo reference for shape and color inspiration.

Assembly Instructions

  • Refer to the full pattern on the blog for exact assembly steps; the PDF preview does not include assembly details.
  • After completing the crocheted pumpkin pieces, shape the pumpkin by drawing yarn through the center from top to bottom to form even segments, pulling gently until sections are defined.
  • Attach a crocheted or sewn stem to the center top of the pumpkin, sewing through the central gathered area to ensure the stem is secure and centered.
  • Weave in all yarn ends securely and arrange the pumpkin on a flat surface to check segment symmetry; adjust the central drawstring if necessary to even out sections.

Important Notes

  • πŸ’‘This PDF page is a preview only; the complete pattern, materials, and step-by-step rounds are available on the PeachUnicornDesigns.com Crochet Blog.
  • πŸ’‘Use stitch markers and count stitches often while following the full pattern on the blog to ensure correct shaping and segment formation.
  • πŸ’‘Stuff the pumpkin gradually to maintain round shape and avoid overstuffing, which can distort the segments.

This preview directs you to the free Small Pumpkin pattern on PeachUnicornDesigns.comβ€”visit the Crochet Blog to get the full tutorial. The finished pumpkin is perfect for autumn decor, gift-giving, or using up leftover yarn. Happy crocheting and autumn crafting! πŸŽƒπŸ

You ask,

we answer.

FAQs

Where can I find the full Small Pumpkin pattern?

The full free pattern is available on the Peach Unicorn Designs blog at www.PeachUnicornDesigns.com; this PDF page is a preview directing you to the Crochet Blog.

What skill level is this pumpkin pattern suitable for?

This small pumpkin is suitable for beginner crocheters; the preview suggests basic stitches and shaping, and the blog pattern will include full step-by-step instructions.

What materials and hook size do I need?

Materials and hook size are not listed on this preview page; please visit the blog post on PeachUnicornDesigns.com to view the recommended yarn weight, hook size, and quantities.

How long will it take to make a small pumpkin?

A small pumpkin is a quick make and typically takes under 2 hours for most crocheters, depending on experience and finishing details.