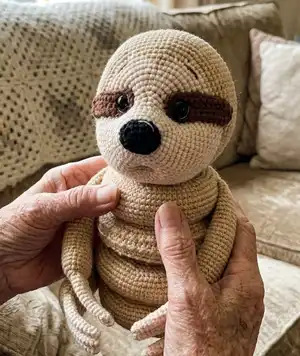
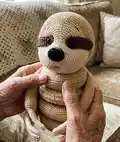
Make a charming sloth stacking toy with this detailed crochet pattern. You will create rings, legs, arms, a tail and a sweet sloth head with clear round-by-round instructions. Suitable for hobbyists who enjoy amigurumi assembly and finishing details. Follow the pattern to stitch, stuff and assemble your very own cuddly stacking sloth.
Progress Tracker
0% Complete
— BASE :
Round 4 :
(1 sc; inc)*6 (18)
Round 7 :
(2 sc; inc)*6 (24)
Round 11 :
(3 sc; inc)*6 (30)
Round 16 :
(4 sc; inc)*6 (36)
Round 22 :
(5 sc; inc)*6 (42)
Round 29 :
(6 sc; inc)*6 (48)
Round 37 :
(7 sc; inc)*6 (54)
Round 46 :
(8 sc; inc)*6 (60)
Round 47 :
FLO (9 sc; inc)*6 (66)
Round 48 :
5 sc; inc; (10 sc; inc)*5; 5 sc (72)
Round 49 :
(11 sc; inc)*6 (78)
Round 50 :
6 sc; inc; (12 sc; inc)*5; 6 sc (84)
Round 51 :
(13 sc; inc)*6 (90)
Round 52 :
7 sc; inc; (14 sc; inc)*5; 7 sc (96)
Round 53 :
(15 sc; inc)*6 (102)
Round 54 :
8 sc; inc; (16 sc; inc)*5; 8 sc (108)
Round 55 :
(17 sc; inc)*6 (114)
Round 56-62 :
114 sc (114)
Round 63 :
(17 sc; dec)*6 (108)
Round 64 :
8 sc; dec; (16 sc; dec)*5; 8 sc (102)
Round 65 :
(15 sc; dec)*6 (96)
Round 66 :
7 sc; dec; (14 sc; dec)*5; 7 sc (90)
Round 67 :
(13 sc; dec)*6 (84)
Round 68 :
6 sc; dec; (12 sc; dec)*5; 6 sc (78)
Round 69 :
(11 sc; dec)*6 (72)
Round 70 :
5 sc; dec; (10 sc; dec)*5; 5 sc (66)
Round 71 :
(9 sc; dec)*6 (60)
Round 72 :
connect round 71 with round 47 (BLO) with 60 sc (60) fill with stuffing as you go, then continue to work in rounds.
Round 73 :
(8 sc; dec)*6 (54)
Round 74 :
(7 sc; dec)*6 (48)
Round 75 :
(6 sc; dec)*6 (42)
Round 76 :
(5 sc; dec)*6 (36)
Round 77 :
(4 sc; dec)*6 (30)
Round 78 :
(3 sc; dec)*6 (24)
Round 79 :
(2 sc; dec)*6 (18)
Round 80 :
(1 sc; dec)*6 (12)
Round 81 :
6 dec (6) cut the yarn, pull off hole, hide a tail.
— LEGS :
Info :
With ivory yarn and 1.5 mm hook make 3 claws, middle claw will be a bit longer, then other two:
Long claw (make 1) :
Round 1. 6 sc in MR (6)
Long claw (make 1) :
Round 2-6. 6 sc (6)
Long claw (make 1) :
Round 7. inc; 5 sc (7)
Long claw (make 1) :
Round 8-12. 7 sc (7)
Long claw (make 1) :
Round 13. 1 sc; inc; 5 sc (8)
Long claw (make 1) :
Round 14-17. 8 sc (8)
Long claw (make 1) :
Round 18. 2 sc; inc; 5 sc (9)
Long claw (make 1) :
Round 19-22. 9 sc (9) fasten off.
Short claws (make 2) :
Round 1. 6 sc in MR (6)
Short claws (make 2) :
Round 2-5. 6 sc (6)
Short claws (make 2) :
Round 6. inc; 5 sc (7)
Short claws (make 2) :
Round 7-10. 7 sc (7)
Short claws (make 2) :
Round 11. 1 sc; inc; 5 sc (8)
Short claws (make 2) :
Round 12-15. 8 sc (8)
Short claws (make 2) :
Round 16. 2 sc; inc; 5 sc (9)
Short claws (make 2) :
Round 17-20. 9 sc (9) fasten off one claw and in second short claw change yarn to beige and from now on use 3 mm hook.
Connect claws :
Round 1. 9 sc in a short claw; 5 sc in a long claw; 9 sc in a second short claw; 4 sc in a long claw (27)
Connect claws :
Round 2. 9 sc; inc; 3 sc; inc; 10 sc; inc; 2 sc (30)
Connect claws :
Round 3-7. 30 sc (30)
Connect claws :
Round 8. 9 sc; dec;(3 sc; dec)*2; 4 sc; inc; (1 sc; inc)*2 (30)
Connect claws :
Round 9-13. 23 sc; BLO 7 slst (30)
Connect claws :
Round 14. 30 sc (30)
Connect claws :
Round 15. (3 sc; dec)*6 (24)
Connect claws :
Round 16-30. 24 sc (24)
Connect claws :
Round 31. (2 sc; dec)*6 (18)
Connect claws :
Round 32. 5 sc, turn fold in half and crochet 9 sc closing the hole (fill with stuffing, not too tight - 3/4 of the leg)
Info :
Stuff claws using tweezers as needed
Round 8 (continued) :
5 sc; dec;(3 sc; dec)*2; 4 sc; 3 inc (24)
Round 9-13 (alternative) :
18 sc; BLO 6 slst (24)
Round 15 :
(2 sc; dec)*6 (18)
Round 35 :
6 sc, turn fold in half and crochet 9 sc closing the hole (fill with stuffing, not too tight - 3/4 of the arm)
Info :
Make the arms the same way you did the legs before, use the previous photos to remember the whole process.
— TAIL :
Round 4 :
(1 sc; inc)*6 (18)
Round 6 :
(2 sc; inc)*6 (24)
Round 8 :
(3 sc; inc)*6 (30)
Round 14 :
BLO(3 sc; dec)*6 (24)
Round 15 :
(2 sc; dec)*6 (18) fill with stuffing
Round 16 :
(1 sc; dec)*6 (12)
Round 17 :
6 dec (6) fasten off, leave a tail for sewing.
Info :
Sew the tail to the base as you can see in the photos.
— LARGE RING :
Round 1 :
60 ch; slst in 1st ch (60)
Round 2 :
(9 sc; inc)*6 (66)
Round 3 :
5 sc; inc; (10 sc; inc)*5; 5 sc (72)
Round 4 :
(11 sc; inc)*6 (78)
Round 5 :
6 sc; inc; (12 sc; inc)*5; 6 sc (84)
Round 6 :
(13 sc; inc)*6 (90)
Round 7 :
7 sc; inc; (14 sc; inc)*5; 7 sc (96)
Round 8 :
(15 sc; inc)*6 (102)
Round 12 :
BLO 102 sc (102)
Round 13-15 :
102 sc (102)
Round 16 :
(15 sc; dec)*6 (96)
Round 17 :
7 sc; dec; (14 sc; dec)*5; 7 sc (90)
Round 18 :
(13 sc; dec)*6 (84)
Round 19 :
6 sc; dec; (12 sc; dec)*5; 6 sc (78)
Round 20 :
(11 sc; dec)*6 (72)
Round 21 :
5 sc; dec; (10 sc; dec)*5; 5 sc (66)
Round 22 :
(9 sc; dec)*6 (60)
Info :
Sew round 22 with round 1, fill with stuffing as you go.
— MIDDLE RING :
Round 1 :
48 ch; slst in 1st ch (48)
Round 2 :
(7 sc; inc)*6 (54)
Round 3 :
4 sc; inc; (8 sc; inc)*5; 4 sc (60)
Round 4 :
(9 sc; inc)*6 (66)
Round 5 :
5 sc; inc; (10 sc; inc)*5; 5 sc (72)
Round 6 :
(11 sc; inc)*6 (78)
Round 7 :
6 sc; inc; (12 sc; inc)*5; 6 sc (84)
Round 8 :
(13 sc; inc)*6 (90)
Round 16 :
(13 sc; dec)*6 (84)
Round 17 :
6 sc; dec; (12 sc; dec)*5; 6 sc (78)
Round 18 :
(11 sc; dec)*6 (72)
Round 19 :
5 sc; dec; (10 sc; dec)*5; 5 sc (66)
Round 20 :
(9 sc; dec)*6 (60)
Round 21 :
4 sc; dec; (8 sc; dec)*5; 4 sc (54)
Round 22 :
(7 sc; dec)*6 (48)
Info :
Sew round 22 with round 1, fill with stuffing as you go.
Note :
There are two ways to make pretty edges on the rings - in rounds 10, 12, 14 in the front loops make slip stitch round or reverse crochet (crab stitch) round.
— ARMS :
Info :
With ivory yarn and 1.5 mm hook make 3 claws, middle claw will be a bit longer, then other two:
Long claw (make 1) :
Round 1. 6 sc in MR (6)
Long claw (make 1) :
Round 2-7. 6 sc (6)
Long claw (make 1) :
Round 8. inc; 5 sc (7)
Long claw (make 1) :
Round 9-15. 7 sc (7)
Long claw (make 1) :
Round 16. 1 sc; inc; 5 sc (8)
Long claw (make 1) :
Round 17-18. 8 sc (8) fasten off.
Short claws (make 2) :
Round 1. 6 sc in MR (6)
Short claws (make 2) :
Round 2-6. 6 sc (6)
Short claws (make 2) :
Round 7. inc; 5 sc (7)
Short claws (make 2) :
Round 8-13. 7 sc (7)
Short claws (make 2) :
Round 14. 1 sc; inc; 5 sc (8)
Short claws (make 2) :
Round 15-16. 8 sc (8) fasten off one claw and in second short claw, change yarn to beige and from now on use 3 mm hook.
Connect short, long and short claw :
Round 1. 8 sc in a short claw; 4 sc in a long claw; 8 sc in a second short claw; 4 sc in a long claw (24)
Connect claws :
Round 2-7. 24 sc (24)
Round 8 :
5 sc; dec;(3 sc; dec)*2; 4 sc; 3 inc (24)
Round 9-13 :
18 sc; BLO 6 slst (24)
Round 15 :
(2 sc; dec)*6 (18)
Round 35 :
6 sc, turn fold in half and crochet 9 sc closing the hole (fill with stuffing, not too tight - 3/4 of the arm)
Info :
Make the arms the same way you did the legs before, use the previous photos to remember the whole process.
— SMALL RING :
Round 1 :
36 ch; slst in 1st ch (36)
Round 2 :
(5 sc; inc)*6 (42)
Round 3 :
3 sc; inc; (6 sc; inc)*5; 3 sc (48)
Round 4 :
(7 sc; inc)*6 (54)
Round 5 :
4 sc; inc; (8 sc; inc)*5; 4 sc (60)
Round 6 :
(9 sc; inc)*6 (66)
Round 7 :
5 sc; inc; (10 sc; inc)*5; 5 sc (72)
Round 8 :
(11 sc; inc)*6 (78)
Round 16 :
(11 sc; dec)*6 (72)
Round 17 :
5 sc; dec; (10 sc; dec)*5; 5 sc (66)
Round 18 :
(9 sc; dec)*6 (60)
Round 19 :
(8 sc; dec)*6 (54)
Round 20 :
(7 sc; dec)*6 (48)
Round 21 :
(6 sc; dec)*6 (42)
Round 22 :
(5 sc; dec)*6 (36)
Info :
Sew round 22 with round 1, fill with stuffing as you go.
— HEAD :
Info :
Start with black yarn for nose (hook 1.5 mm)
Row 1 :
5 ch; turn and continue to work in rounds
Round 2 :
inc; 2 sc; 2 inc in first ch; 2 sc; inc in fourth ch (12)
Round 3 :
(1 sc; inc)*6 (18)
Round 4 :
(2 sc; inc)*6 (24)
Round 7a :
BLO (2 sc; dec)*6 (18) fill with stuffing
Round 8a :
(1 sc; dec)*6 (12) fasten off, close the hole.
Info :
Start to crochet in front loops of round 6 with ivory yarn and 3 mm hook:
Round 7 :
(3 sc; inc)*6 (30)
Round 9 :
(4 sc; inc)*6 (36)
Round 10 :
(5 sc; inc)*6 (42)
Round 11 :
(6 sc; inc)*6 (48)
Round 12 :
(7 sc; inc)*6 (54)
Round 13 :
(8 sc; inc)*6 (60)
Round 14 :
6 sc; 6 inc; 48 sc (66)
Round 17 :
6 sc; (1 sc; inc)*6; 48 sc (72)
Round 19 :
14 sc; change to beige-3 sc; change to ivory-55 sc(72)
Round 20 :
6 sc; (2 sc; inc)*2; change to beige - 1 sc; inc; 2 sc; inc; change to ivory - (2 sc; inc)*2; 48 sc (78)
Round 21 :
13 sc; change to beige - 11 sc; change to ivory - 54 sc (78) change to beige color
Round 22 :
(12 sc; inc)*6 (84)
Round 23 :
(13 sc; inc)*6 (90)
Round 24 :
(14 sc; inc)*6 (96)
Round 25 :
62 sc; 18 ch (skip 18 sc); 16 sc (96)
Round 35 :
(14 sc; dec)*6 (90)
Round 36 :
(13 sc; dec)*6 (84)
Round 37 :
(12 sc; dec)*6 (78)
Round 38 :
(11 sc; dec)*6 (72)
Round 39 :
(10 sc; dec)*6 (66)
Round 40 :
(9 sc; dec)*6 (60)
Round 41 :
(8 sc; dec)*6 (54)
Round 42 :
(7 sc; dec)*6 (48)
Round 43 :
(6 sc; dec)*6 (42)
Round 44 :
(5 sc; dec)*6 (36)
Round 45 :
(4 sc; dec)*6 (30)
Round 46 :
(3 sc; dec)*6 (24)
Round 47 :
(2 sc; dec)*6 (18)
Round 48 :
(1 sc; dec)*6 (12)
Round 49 :
6 dec (6) fasten off.
— "Eye patches" (make 2) :
Row 1 :
11 ch; turn and continue to work in rounds
Round 2 :
9 sc; 3 sc in 1st ch; 8 sc; inc (22)
Round 3 :
inc; 8 sc; 3 inc; 8 sc; 2 inc (28) leave a tail for sewing.
Info :
After attaching (or sewing eyes) fill the head with stuffing and continue to crochet, starting in the spot between rounds 26-27:
Round 5 :
(4 sc; dec)*6 (30)
Round 8 :
(3 sc; dec)*6 (24)
Round 11 :
(2 sc; dec)*6 (18)
Round 13 :
(1 sc; dec)*6 (12)
Round 14 :
6 dec (6) fasten off.
— FINISHING & ASSEMBLY :
Info :
Sew "eye patches", insert safety eyes as shown in the photos and sew into position. Insert safety eyes diameter 12mm or embroider eyes as desired.
Info :
Stuff the head firmly before continuing with the final decrease rounds and closing the head. Use photos as reference for color placement and eye placement.
This sloth stacking toy combines charming amigurumi construction with playful stacking rings for endless fun and display. It uses simple color changes, small detailed claws and a soft cotton finish for a polished look. Perfect as a handmade gift or nursery accent — enjoy stitching and stacking! 🧶🧵