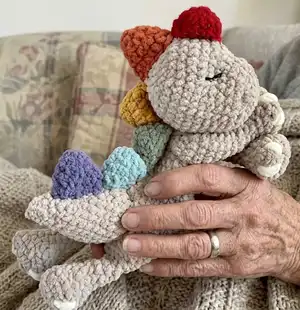
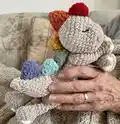
This sweet Sleepy Snuggle-saurus rag doll pattern guides you through making a cuddly dinosaur-style rag doll using Super Bulky 6 yarn. You will create four feet/arms, a body, head, tail, spikes and embroidered sleepy eyes with clear step-by-step instructions. The pattern uses simple single crochet shaping, front/back loop techniques, and gentle assembly tips to make a soft, squishy toy you will love to handcraft and gift.
Progress Tracker
0% Complete
— Front Legs a.k.a the Arms (make 2) :
Info :
*Begin with the pale gray (or your choice of super bulky 6 yarn), and a 6.00mm crochet hook. All 4 legs are worked in a continuous spiral*
Rnd 1 :
6 sc in a mc (6sc)
Rnd 2 :
inc in each stitch around x 6 (12sc)
Rnd 3 :
[1sc, inc] repeat around x 6 (18sc)
Rnd 4 :
BLO sc around (18sc)
Rnd 5 :
[1sc, dec] repeat around x 6 (12sc)
Rnd 7 :
[2sc, dec] repeat x 3 (9sc)
Rnd 8-16 :
sc around (9sc in each round)
Info :
*Stuff only the foot area of the leg, leaving the rest of the leg free of stuffing*
Rnd 17 :
press the top of the leg flat, crochet both sides together to close the leg (4sc)
Info :
*Fasten off and weave in the ends, set aside for later, these will be crocheted to the body.*
— Hind Legs (make 2) :
Info :
*Begin with the pale gray (or your choice of super bulky 6 yarn), and a 6.00mm crochet hook. All 4 legs are worked in a continuous spiral*
Rnd 1 :
6 sc in a mc (6sc)
Rnd 2 :
inc in each stitch around x 6 (12sc)
Rnd 3 :
[1sc, inc] repeat around x 6 (18sc)
Rnd 4 :
BLO sc around (18sc)
Rnd 5 :
[1sc, dec] repeat around x 6 (12sc)
Rnd 7 :
[2sc, dec] repeat x 3 (9sc)
Rnd 8-11 :
sc around (9sc in each round)
Info :
*Stuff only the foot area of the leg, leaving the rest of the leg free of stuffing*
For First Hind Leg :
sl st into next stitch, fasten off and weave in ends, (leaving the top of the leg open) set aside for 'body'.
For Second Hind Leg :
Rnd 12: press the top of the leg flat, crochet both sides together to close the opening of the leg (4sc)
Info :
Please Advise: fasten off and cut yarn after making the first hind leg, but do NOT cut your working yarn after completing the second hind leg, we will continue with the body.
Info :
*Do not cut working yarn after finishing the second hind leg*
— Body :
Info :
* Begin using the pale grey yarn from the second hind leg. The first 2 parts of the body are worked in rows, then worked in rounds from Rnd 3*
Row 1 :
following instructions from Rnd 12 of the second hind leg, you have just completed 4 sc across, to close the leg. These 4 stitches WILL count in the final stitch count of row 1 of the body. Now, chain 5, then sc across the first hind leg you made to close the top of that leg (now both legs should be crocheted closed with 4 sc each and a ch 5 between them. (4sc, 5 ch, 4sc)
Row 2 :
ch 1 and turn your work over, inc in the first stitch, 3 sc, 5sc in ch 5 from previous row, 3sc, inc in last stitch. (15sc)
Info :
*from this point on, the body will be worked in rounds. So, you will flip your work, and begin working in the first stitch, but to make a round, your stitches must be worked in the FLO (front loop will depend on orientation of flipped work) of both sides of Row 2* (see below for instructions and images)
Rnd 3 :
now you will begin working in the round: ch 1, and turn your work, inc in first FLO, 14 FLO sc across, once you reach the end of the body, turn your work and continue to work on the back loops of Row 2 (keep in mind, this loop will LOOK like the front loop from your current perspective, since you have already turned your work), inc in next FLO, 14 FLO sc across the other side of Row 2 (32 sc)
Info :
*From now on, use your stitch marker to mark the beginning and end of each round, as you will work in spirals for the rest of the body*
— Body (continued) :
Rnd 4 :
inc, 15sc, inc, 15sc, (34sc)
Rnd 5 :
inc, 16sc, inc, 16sc (36sc)
Rnd 6-10 :
sc in each stitch (36sc in each round)
Rnd 11 :
dec, 16sc, dec, 16sc (34sc)
Rnd 13 :
dec, 15sc, dec, 15sc (32sc)
Rnd 14 :
dec, 14sc, dec, 14sc (30sc)
Rnd 15 :
[3sc, dec] repeat around x 6 (24sc)
Rnd 16 :
[2sc, dec] repeat around x 6 (18sc)
Rnd 17 :
[1sc, dec] repeat around x 6 (12sc)
Rnd 18 :
sc in each stitch around (12sc)
Rnd 19 :
In this round, you will crochet the front legs (a.k.a. the arms) to the body. 4sc through front leg and body, 2sc through body only, 4 sc through front leg and body, 2sc through body only (12sc)
Rnd 20 :
sc in each stitch around (12sc)
Info :
*sl st into the next stitch, fasten off and leave a long tail for sewing head to the body. Do not stuff the body*
— Head :
Info :
*Begin with super bulky pale grey and a 6.00mm crochet hook, you will work the entire nose/face/head in continuous rounds*
Rnd 3 :
[sc, inc] repeat x 6 (18sc)
Rnd 4 :
[2sc, inc] repeat x 6 (24sc)
Rnd 5-6 :
sc around (24sc in each round)
Rnd 7 :
[2sc, inc] repeat around (32sc)
Rnd 8 :
14sc, inc, inc, (insert a stitch marker) inc, inc, 14sc (36sc)
Info :
*This stitch marker is meant to mark the center of the face. This landmark will be used when making the eye details.*
Rnd 9-12 :
sc in each st around (36sc in each round)
Rnd 13 :
[4sc, dec] repeat x 6 (30sc)
Rnd 14 :
[3sc, dec] repeat x 6 (24sc)
Info :
*Begin to stuff the head and stuff as you continue to decrease and close. Be sure to not over stuff the head. Ragdolls are cuddlier if they are more on the squishy side and not too structured*
Rnd 15 :
[2sc, dec] repeat x 6 (18sc)
Rnd 16 :
[1sc, dec] repeat x 6 (12sc)
Rnd 17 :
dec x 6 (6sc) sl st in next stitch, cut yarn and leave a long tail. Use the yarn tail to weave through the last remaining stitches to close the back of the head, secure the yarn tail and move on to instructions for shaping the head and adding nostrils.
— Eye Detail & Nostrils :
Infos :
* Use the remaining tail from closing the head, OR cut a new piece of super bulky pale grey yarn* -First, I like to use my fingers to gauge where the eyes would look best. Each creation is slightly different, so I prefer to decide where the eyes go on a case by case basis. Press into the head where you think the eyes look best on each side of the stitch marker you added in round 8 of the head (image 1), to create two slight dents in the head (image 2). For this example, I made the eye dents around row 8, with 5 stitches between them. These dents will guide where you insert your needle. -Next, insert your needle through the back of one of the stitches in your dents. Then go back through a stitch that is one row greater and one stitch over from where you inserted your needle first (images 3-5). Bring your needle to the other side of the head to the other dent you made. Repeat the process of reinserting your needed in a stitch that is one row higher and one stitch over. Repeat this entire process of going back and forth 2-3 more times, pulling, and squeezing the head as you go. Make the eye dents as obvious as you desire. Once you have your desired look, continue using that yarn tail, OR a new piece of yarn to create the nostrils.
Infos :
-Nostrils: as with the eyes, I think it is better to decide where your nostrils go, based on what looks best with your creation. For this example, I put the nostrils beginning between rows 2&3, spanning from between rows 4&5 on the center of the face (image 5). I went through the stitches 3 times to create the thickness of the nostrils. You can repeat the process for your nostrils if you desire a bigger nostril look. Be sure to not pull the nostrils too tight, or they will change the shape of the face. After completing the nostrils, secure the yarn tail(s) inside of the head.
— Embroidered Sleepy Eyes :
Info :
* Use the some black yarn and a yarn needle* Follow the shape of the eye dents you already made to create a sleepy eyelid (image 1). Work back into a lower stitch to pull the eye lid into a downward arch shape to create the sleepy look. (image 2-3). Then repeat the process for the other eye, and weave in ends.
— Spikes (make 6) :
Info :
* Use the super bulky 6 yarn in your desired color(s), and a 6.00mm crochet hook* * I have included some images of snuggle-sauruses made with one spike color, two spike colors, and 6 spike colors. Refer to the images below for specific colors of Bernat Blanket yarn that I used for the spikes or create your own look! (the possibilities are endless!)
Info :
The first spike, on the top of the head is slightly smaller. Once you decide what color you will use for the first spike, follow these instructions:
Rnd 2 :
[sc, inc] repeat around x 3 (9sc)
Rnd 3 :
[2sc, inc] repeat around x 3 (12sc)
Info :
flatten the opening of the spike and crochet closed (6sc) *sl st in the next stitch, fasten off and leave a long tail for sewing*
Info :
Once you have a plan for the rest of your spike pattern, follow the instructions below for 5 spikes in your desired color(s):
Rnd 2 :
[sc, inc] repeat around x 3 (9sc)
Rnd 3 :
[2sc, inc] repeat around x 3 (12sc)
Rnd 4 :
[3sc, inc] repeat around x 3 (15sc)
Info :
flatten the opening of the spike and crochet closed (6sc) *sl st in the next stitch, fasten off and leave a long tail for sewing*
— Tail :
Info :
* Use the super bulky 6 yarn in pale grey, and a 6.00mm crochet hook*
Rnd 2 :
[1sc, inc] repeat x 2 (6sc)
Rnd 3 :
[2sc, inc] repeat x 2 (8sc)
Rnd 4 :
[3sc, inc] repeat x 2 (10sc)
Rnd 5 :
[4sc, inc] repeat x 2 (12sc)
Rnd 6 :
[5sc, inc] repeat x 2 (14sc)
Rnd 7 :
[6sc, inc] repeat x 2 (16sc)
Rnd 8 :
[7sc, inc] repeat x 2 (18sc)
Rnd 9 :
[8sc, inc] repeat x 2 (20sc)
Rnd 10-11 :
1 sc in each stitch around (20sc in each round)
Rnd 12 :
inc, inc, (insert stitch marker), inc, inc, 16sc (24sc)
Info :
This stitch marker marks the center of the top of the tail. Use it as a guide when sewing the tail to the body during assembly.
Rnd 13 :
sc in each stitch around (24sc)
Info :
sl st into the next stitch and leave a long tail for sewing to the body. Set aside for assembly.
— Assembly :
Assembly Step 1 (P1) :
Sew the head to the body, using the yarn tail from finishing the body
Assembly Step 2 (P1) :
Stuff the tail lightly and sew tail to the body using the long tail from finishing the tail. Be sure to use the stitch marker from round 12 of the body as your guide to the center of the tail. Line the stitch marker up with the center of the body. Remove stitch marker after sewing
Assembly Step 3 (P1) :
Sew the spikes to the head in the order you desire. Begin with the small spike beginning on row 9 of the head and then put each consecutive spike right next to the last one all the way down the center of the head, back and tail.
Assembly Step 4 (P1) :
Attach the front legs to the body where you desire to get a natural pose. Sew securely and weave in ends.
Assembly Step 5 (P1) :
Sew the hind legs to the bottom of the body, spacing evenly and ensuring they are secure for the toy to sit or lay as desired. Weave in ends.
— Assembly continued (toenails) :
Info :
* Use the super bulky 6 yarn in vintage white, and a yarn needle* -First, cut 4 long strands of vintage white. Using 1 strand and your needle, insert your needle into the center of the foot, and out of a stitch between row 4 and 5 of the foot (image 1), go back over that area 2-3 more time until you make the toenail as thick as you desire. Put your needle back into a stitch two stitches over between row 4 and 5 to make the second toe (image 2), repeat the process for the second and third toe. -As you finish the third toe, make your working yarn exit the foot at the very center where you began (image 3). Tie a double knot and hide the knot inside the foot (image 4).
Info :
Repeat all the above steps for all 4 feet with the rest of your long yarn strands.
This adorable Sleepy Snuggle-saurus rag doll is designed to be soft, squishy, and perfect for hugs and naps. Customize the spike colors and toenail accents to make a unique companion that reflects your style. Whether made for a child, a friend, or yourself, this handmade friend will bring warmth and smiles. 🧶🧸✨