🧢 Beautiful ✨ Detailed πŸ’ Adorable

Sheep No Sew Amigurumi Pattern

Sheep No Sew Amigurumi Pattern
4.6β˜… Rating
2-4 Hours Time Needed
1.7K Made This
βœ‚οΈ

Intermediate Level

Ideal for those with basic crochet experience, featuring slightly more advanced stitches and techniques to expand your skills.

⏱️

Bite-Sized Project

Finishes in 2-4 hoursβ€”perfect for an afternoon of creative relaxation.

🧸

Cute Companion

An adorable friend to cherish, handcrafted with love to bring comfort and joy for years to come.

About This Sheep No Sew Amigurumi Pattern

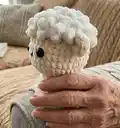
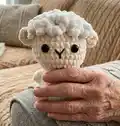
This no-sew sheep amigurumi pattern creates a soft, tactile toy using super bulky yarn and bobble-style wool loops. You will crochet the body continuously into the head, switch colors for skin details, and add textured wool in the FLO for a fluffy finish. The pattern includes ear and wool instructions, eye placement, and simple embroidery for the nose.

Sheep No Sew Amigurumi Pattern crochet pattern - detailed view of completed project

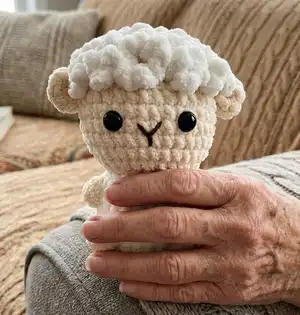
Clear row-by-row directions and photo references make shaping easy, while minimal sewing keeps this pattern beginner-friendly. Use safety eyes and a short length of brown yarn to add the final facial details.

Why You'll Love This Sheep No Sew Amigurumi Pattern

I absolutely love this pattern because it turns simple stitches into a charming, textured toy with very little finishing work. I enjoy the seamless body-to-head construction β€” it makes the piece feel sturdy and neat without a lot of sewing. The fluffy wool created in the FLO is one of my favorite techniques; it gives so much personality and a tactile squish that kids and adults adore. I also appreciate how quick the pattern is to make, so you can gift a handmade friend the same day you start.

Sheep No Sew Amigurumi Pattern step 1 - construction progress Sheep No Sew Amigurumi Pattern step 2 - assembly progress Sheep No Sew Amigurumi Pattern step 3 - details and accessories Sheep No Sew Amigurumi Pattern step 4 - final assembly and finishing

Switch Things Up

I love offering ideas to make this sheep uniquely yours: try changing the wool color from white to cream, gray, or pastel shades for a different mood.

You can make the sheep larger or smaller by swapping yarn weight and adjusting hook size; bulky yarn with a larger hook makes a chunky cuddle friend, while thinner yarn and a smaller hook creates a tiny keychain version.

I often add a crocheted scarf, tiny bell, or embroidered heart to personalize each sheep β€” these small accessories add character and make great gifts.

For a whimsical look, experiment with mismatched eye sizes or embroider eyelashes and cheeks for personality.

To create a family of animals, use the same body pattern but swap color panels and wool placement to make a cow, pig, or other critters.

I sometimes add a little wire armature inside the limbs for posability, especially if I want a display piece that can sit posed on a shelf.

If you want a plush, squishier result, stuff the body more generously; for a firm, display-ready toy, use less stuffing and tighter tension.

Try embroidering a tiny name or initial on the back or under the chin for a personalized gift that feels special.

I recommend testing eye placement with pins before securing them permanently β€” small shifts make a big difference in expression.

Don't be afraid to combine techniques: add tiny felt patches, safety nose alterations, or surface crochet accents to make each sheep one-of-a-kind.

Common Mistakes & How to Fix Them

βœ— Skipping stitch markers during rounds with increases and decreases causes lost stitch counts; place a marker at the start of each round and recount frequently. βœ— Forgetting to switch yarn color exactly where noted will misplace facial or body details; change yarn at the specified round and secure ends neatly. βœ— Not stuffing as you go leads to under- or over-stuffed shapes and uneven curvature; stuff gradually between shaping rounds for smooth contours. βœ— Trying to crochet the wool loops too tightly will make them look small and sparse; work the FLO loops with relaxed tension to create fluffy wool. βœ— Inserting safety eyes after too many rounds can position them incorrectly; attach eyes at the recommended rounds and spacing for a balanced face.

Sheep No Sew Amigurumi Pattern

Make a cuddly no-sew sheep amigurumi using super bulky yarn and easy shaping. This pattern guides you step-by-step from the body up to the head, including wool texture, ears, and facial details. Perfect for gift-making or a cozy collectible, with clear photos and helpful tips to keep you on track. Enjoy a compact, satisfying crochet project that brings a sweet handmade friend to life.

Intermediate 2-4 Hours

Materials Needed for Sheep No Sew Amigurumi Pattern

β€” Main Fabric

  • 01
    Yarn: Super Bulky / Category 6
  • 02
    Color: white
  • 03
    Color: skin color (for head and limbs details)
  • 04
    A short piece of brown yarn for embroidery
  • 05
    Plastic safety eyes (10mm) for face
  • 06
    Fiberfill stuffing for body

β€” Tools Required

  • 01
    Crochet hook size 3.5mm (E)
  • 02
    Stitch marker
  • 03
    Sewing needle
  • 04
    Scissors
  • 05
    Plastic safety eyes (10mm)
  • 06
    Hot gun glue
  • 07
    Fiberfill stuffing
  • 08
    Pins for assembly (optional)

Progress Tracker

0% Complete

β€” Body to Head (No Sew) :

Round 1 :

6 SC in an MR (6)

Round 2 :

6 INC (12)

Round 3 :

(SC, INC) 6 times (18)

Round 4 :

(2 SC, INC) 6 times (24)

Round 5 :

8 SC, BO, 6 SC, BO, 8 SC (24)

Round 6 :

8 SC, SC into the stitch's BO, 6 SC, SC into the stitch's BO, 8 SC (24)

Round 7 :

24 SC (24)

Round 8 :

6 SC, BO, 10 SC, BO, 6 SC (24)

Round 9 :

6 SC, SC into the stitch's BO, 10 SC, SC into the stitch's BO, 6 SC (24)

Round 10 :

(SC, DEC) 8 times (16)

Info :

Change to skin color yarn

Round 11 :

FLO, (SC, INC) 8 times (24)

Round 12 :

(SC, INC) 12 times (36)

Round 13-18 :

36 SC (36)

Round 19 :

BLO, (2 SC, DEC) 9 times (27)

Info :

*Stuffing*

Round 20 :

BLO, (SC, DEC) 9 times (18)

Round 21 :

BLO, (SC, DEC) 6 times (12)

Round 22 :

BLO, 6 DEC (6)

Info :

Weave in the yarn end and cut

β€” Sheep's Wool :

Info :

Crochet in the FLO from row 21, and continue seamlessly from row 21 down to row 18. (3 ch, Slst) 93 times.

β€” EARS (MAKE 2) :

Info :

Use Skin color yarn. Crochet the ears onto the stitches at row 18.

Item Name (P1) :

2 Ch, 3 DC, 2 Ch, Slst in one st.

Info :

Attach eyes on rows 15 and 16, spaced 6 stitches apart. Use a short of brown yarn to embroider the nose.

Assembly Instructions

  • Attach eyes on rows 15 and 16, spacing them 6 stitches apart for proper facial alignment.
  • Sew the ears onto the stitches at row 18 using skin color yarn, attaching each ear point with a couple of slip stitches to secure.
  • Embroider the nose with a short piece of brown yarn centered between the eyes, following the photo reference for shape.
  • Stitch the wool loops worked in the FLO securely so they sit evenly around the head; tuck and weave any loose ends before trimming.
  • Weave in all yarn ends and cut, then glue or secure safety eyes as needed to ensure they are firmly attached.

Important Notes

  • πŸ’‘Use stitch markers to mark the start of each round, especially when working increases and decreases.
  • πŸ’‘Stuff gradually between shaping rounds to maintain a smooth shape and avoid lumps in the head and body.
  • πŸ’‘Switch yarn colors exactly at the indicated rounds to preserve facial placement and body details.
  • πŸ’‘Work bobble/BO stitches with relaxed tension to create a fluffy wool texture instead of tight lumps.

This adorable Sheep pattern brings a fluffy friend to life with minimal sewing and big texture. Perfect for gifting or keeping, it combines simple amigurumi shaping with playful wool loops for extra charm. Try making a whole barnyard of pals and spread the handmade love! πŸ§ΆπŸ‘

You ask,

we answer.

FAQs

What size will the finished piece be?

The finished amigurumi measures approximately 10-12 cm tall when using super bulky yarn and a 3.5mm hook; exact size varies with tension.

Can I use different yarn weights for this pattern?

Yes, you can use different yarn weights, but this will affect the final size and texture; choose an appropriate hook size for the yarn you select.

Do I need prior crochet experience for this pattern?

This pattern is rated intermediate because it uses FLO/BLO techniques and bobble stitches; basic knowledge of single crochet, increases, and decreases is recommended.

How long does this project typically take to complete?

Most crocheters complete this sheep in 2-4 hours, though time may vary based on experience level and how detailed you make the wool texture.