🧢 Beautiful ✨ Detailed πŸ’ Adorable

Seven Dwarfs Amigurumi Pattern

Seven Dwarfs Amigurumi Pattern
3.9β˜… Rating
5-7 Hours Time Needed
2.3K Made This
βœ‚οΈ

Intermediate Level

Ideal for those with basic crochet experience, featuring slightly more advanced stitches and techniques to expand your skills.

⏱️

Weekend Treat

Takes 5-7 hours, making it an enjoyable project to finish over a couple of days.

🧸

Cute Companion

An adorable friend to cherish, handcrafted with love to bring comfort and joy for years to come.

About This Seven Dwarfs Amigurumi Pattern

This pattern guides you through making a set of seven dwarf amigurumi characters, each with its own personality. You will crochet heads, bodies, hats, noses, ears, arms and two beard styles with detailed rounds. Techniques include magic ring, increases/decreases and bobble stitches for textured beards.

Seven Dwarfs Amigurumi Pattern crochet pattern - detailed view of completed project

The pattern provides all yarn colors, materials and US stitch abbreviations for clarity. Follow the assembly and embroidery instructions to complete each dwarf's unique face.

Why You'll Love This Seven Dwarfs Amigurumi Pattern

I absolutely love this pattern because it balances charming character design with clear, structured instructions that make shaping easy to follow. I enjoy the bobble beard technique β€” it adds delightful texture and personality to each dwarf. I also love how customizable the set is: changing hat colors or facial embroidery instantly creates a new personality. Making an entire seven-dwarf set is satisfying and fun, and I always enjoy gifting these handmade characters to friends and family.

Seven Dwarfs Amigurumi Pattern step 1 - construction progress Seven Dwarfs Amigurumi Pattern step 2 - assembly progress Seven Dwarfs Amigurumi Pattern step 3 - details and accessories Seven Dwarfs Amigurumi Pattern step 4 - final assembly and finishing

Switch Things Up

I love changing the hat colors to give each dwarf a distinct personality; try pastels for gentle looks or bright primaries for playful vibes.

I often swap the yarn weight to make different sizes β€” using DK yarn and a 3.5mm hook makes a slightly larger, cuddlier dwarf.

I like to embellish the hats with small crocheted flowers or tiny pom-poms for a fun twist.

You can change the beard style by mixing short and long beard pieces in different combinations for varied silhouettes.

I sometimes embroider different eyebrow shapes to give sleepy or grumpy expressions without changing structural pieces.

I recommend adding wire to the arms for posability if you want them to hold tiny props or pose on a shelf.

Try substituting felt for the nose or making a flat appliquΓ© nose for a simpler finish when sewing skills are limited.

I often mix yarn brands or textures for the beard (slightly fuzzy yarn gives a more realistic beard effect).

To create a keychain version, reduce size by using thinner yarn and a smaller hook, then attach a keyring through the hat top.

I enjoy making themed sets β€” consider holiday colors or matching family colors to create themed dwarf collections.

When in doubt, experiment with facial placement on a scrap head to preview looks before committing to sewing; small shifts drastically change expression.

Common Mistakes & How to Fix Them

βœ— Skipping the stitch marker at the beginning of rounds can cause you to lose track of your rounds; place a marker at the first stitch and move it each round to stay accurate. βœ— Stuffing too late or unevenly leads to lumpy shapes and distorted features; stuff gradually while crocheting and shape as you go for even results. βœ— Breaking the yarn too early when making paired pieces like legs makes joining awkward; leave a long tail on the second leg or join as instructed to connect legs properly. βœ— Changing colors without weaving in tails neatly can create messy joins; carry or weave ends through hidden rows and trim excess after securing to keep a tidy finish. βœ— Not inserting safety eyes at the correct rounds will misplace facial features; follow the instruction to place eyes between the specified rounds for correct spacing.

Seven Dwarfs Amigurumi Pattern

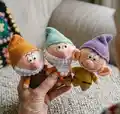
Make a charming set of seven little dwarfs with this friendly crochet pattern. You will create heads, bodies, hats, beards and tiny accessories with clear step-by-step rounds. The pattern uses simple amigurumi techniques plus bobble details for textured beards β€” perfect for gift-making or a playful display.

Intermediate 5-7 Hours

Materials Needed for Seven Dwarfs Amigurumi Pattern

β€” Main Fabric

  • 01
    Color A: skin color YarnArt Jeans 73 (50g, 160m)
  • 02
    Color B: light brown YarnArt Jeans 48 (50g, 160m)
  • 03
    Color C: dark brown YarnArt Jeans 70 (50g, 160m)
  • 04
    Color D: black YarnArt Jeans 53 (50g, 160m)
  • 05
    Color E: yellow YarnArt Jeans 35 (50g, 160m)
  • 06
    Color F: beige YarnArt Jeans 07 (50g, 160m)
  • 07
    Color G: light pink YarnArt Jeans 36 (50g, 160m)
  • 08
    Color H: white YarnArt Jeans 03 (50g, 160m)
  • 09
    Color I: orange YarnArt Jeans 85 (50g, 160m)

β€” Tools Required

  • 01
    Crochet hook size 2-2.5mm
  • 02
    Black safety eyes 6mm
  • 03
    White felt for eye ovals
  • 04
    Tapestry needles
  • 05
    Pins for assembly
  • 06
    Stitch markers
  • 07
    Scissors
  • 08
    Polyester stuffing

Progress Tracker

0% Complete

β€” Legs :

Round 1 :

sc 6 into a magic loop (6)

Round 2 :

[sc 1, inc] 3x (9)

Round 3 :

[sc 2, inc] 3x (12)

Round 4 :

[sc 3, inc] 3x (15)

Info :

Break the yarn, make the second leg in the same way, but don’t break the yarn this time. connect with 1st leg with 1 slst. Continue to crochet: sc 15 (leg 1) + sc 15 (leg 2) = 30. Move to the Body part, change to yarn C

β€” Body :

Round 1 :

[sc 4, inc] 6x (36)

Round 2-3 :

sc 36 (2 rows), change to yarn D (36)

Round 4 :

sc 16, change to yarn E, sc 3, change to yarn D, sc 17, change to yarn F (36)

Round 5-7 :

sc 36 (3 rows) (36)

Round 8 :

[sc 4, dec] 6x (30)

Round 9 :

sc 30 (30)

Round 10 :

[sc 3, dec] 6x (24)

Round 11 :

sc 24 (24)

Round 12 :

[sc 2, dec] 6x (18)

Round 13 :

sc 18 (18)

Info :

Break the yarn with a long rest. Stuff.

β€” Nose :

Round 1 :

sc 6 into a magic loop (6)

Round 2 :

inc 6 (12)

Round 3 :

[sc 1, inc] 6x (18)

Round 4-5 :

sc 18 (2 rows) (18)

Round 6 :

dec 9 (9)

Info :

Break the yarn with a long rest to sew later. Stuff slightly.

β€” Arms :

Round 1 :

sc 6 into a magic loop (6)

Round 2 :

[sc 1, inc] 3x (9)

Round 3 :

sc 9, change to yarn F (9)

Round 4-9 :

sc 9 (6 rows) (9)

Info :

Break the yarn with a long rest. Stuff slightly. Sew 2 edges together.

β€” Head :

Round 1 :

sc 6 into a magic loop (6)

Round 2 :

inc 6 (12)

Round 3 :

[sc 1, inc] 6x (18)

Round 4 :

sc 1, inc, [sc 2, inc] 5x, sc 1 (24)

Round 5 :

[sc 3, inc] 6x (30)

Round 6 :

sc 2, inc, [sc 4, inc] 5x, sc 2 (36)

Round 7 :

[sc 5, inc] 6x (42)

Round 8 :

sc 3, inc, [sc 6, inc] 5x, sc 3 (48)

Round 9 :

[sc 7, inc] 6x (54)

Round 10 :

sc 54 (54)

Round 11 :

sc 4, inc, [sc 8, inc] 5x, sc 4 (60)

Round 12-19 :

sc 60 (8 rows), insert 6mm safety eyes onto 2 oval white felts and place between the 12th & 13th rnd (60)

Round 20 :

[sc 8, dec] 6x (54)

Round 21 :

sc 54 (54)

Round 22 :

[sc 7, dec] 6x (48)

Round 23 :

[sc 6, dec] 6x (42)

Round 24 :

[sc 5, dec] 6x (36)

Round 25 :

[sc 4, dec] 6x (30)

Round 26 :

[sc 3, dec] 6x (24)

Round 27 :

[sc 2, dec] 6x (18)

Info :

Break the yarn with a long rest to sew later. Stuff.

β€” Hat :

Round 1 :

sc 6 into a magic loop (6)

Round 2 :

[sc 1, inc] 3x (9)

Round 3 :

[sc 2, inc] 3x (12)

Round 4 :

[sc 3, inc] 3x (15)

Round 5 :

[sc 4, inc] 3x (18)

Round 6 :

[sc 5, inc] 3x (21)

Round 7 :

[sc 6, inc] 3x (24)

Round 8 :

[sc 7, inc] 3x (27)

Round 9 :

[sc 8, inc] 3x (30)

Round 10 :

slst 15, sc 15 (30)

Round 11 :

[sc 9, inc] 3x (33)

Round 12 :

slst 17, sc 16 (33)

Round 13 :

[sc 10, inc] 3x (36)

Round 14 :

slst 19, sc 17 (36)

Round 15 :

[sc 11, inc] 3x (39)

Round 16 :

[sc 12, inc] 3x (42)

Round 17 :

[sc 13, inc] 3x (45)

Round 18 :

[sc 14, inc] 3x (48)

Round 19 :

[sc 15, inc] 3x (51)

Round 20 :

[sc 16, inc] 3x (54)

Round 21 :

[sc 17, inc] 3x (57)

Round 22 :

[sc 18, inc] 3x (60)

Round 23 :

[sc 19, inc] 3x (63)

Round 24-27 :

sc 63 (63)

Info :

Break the yarn with a long rest to sew later.

β€” Short Beard :

Round 1 :

ch 34, start on the 3rd stitch from the hook. [Bobble 1, hdc 1] 16x, turn (32)

Round 2 :

ch 1, [sc 6, dec 1] 4x, turn (28)

Round 3 :

ch 2, [Bobble 1, hdc 1] 14x, turn (28)

Info :

Break the yarn with a long rest to sew later.

β€” Long Beard :

Round 1-3 :

Crochet as 1-3 rnd of Short Beard (28)

Round 4 :

ch 1, [sc 5, dec 1] 4x, turn (24)

Round 5 :

slst 6, ch 2, [Bobble 1, hdc 1] 6x, turn (12)

Round 6 :

ch 1, dec 1, sc 8, dec 1, turn (10)

Round 7 :

ch 2, [Bobble 1, hdc 1] 5x, turn (10)

Round 8 :

ch 1, dec 1, sc 6, dec 1, turn (8)

Round 9 :

ch 2, [Bobble 1, hdc 1] 4x, turn (8)

Round 10 :

ch 1, dec 4, turn (4)

Round 11 :

ch 2, [Bobble 1, hdc 1] 2x (4)

Info :

Break the yarn with a long rest to sew later.

β€” Ears :

Round 1 :

sc 6 into a magic loop (6)

Round 2 :

[sc 1, inc] 3x (9)

Round 3 :

[sc 2, inc] 3x (12)

Round 4 :

[sc 3, inc] 3x (15)

Round 5 :

[sc 4, inc] 3x (18)

Round 6 :

[sc 2, inc] 6x (24)

Round 7-8 :

sc 24 (2 rows) (24)

Round 9 :

[sc 2, dec] 6x (18)

Round 10 :

[sc 1, dec] 6x (12)

Info :

Break the yarn, fold the ears in half and sew 2 edges together

β€” Assembly :

Item :

Attach the Body to the Head by aligning the opening of the head to the top of the body and sew securely using a yarn needle.

Item :

Attach the Arms to the Body: position each arm on the sides between the designated body rounds, then sew through the edge to secure.

Item :

Attach the Hat to the Head, sew to the Head by needle. Use the long tail to stitch around the hat base to fix it in place.

Item :

Attach the Nose under the eyes: position centrally and sew through the base of the nose to the face ensuring it is firmly secured.

Item :

Use the tapestry needle to sew the Beard under the Nose. Arrange bobbles to sit evenly and stitch along the top edge to the face.

Item :

Embroider eyebrows and add some pink color on 2 cheeks as desired for expression; follow sample photos for each dwarf's look.

Item :

For finishing touches, attach white felt ovals behind safety eyes, embroider unique facial expressions for each dwarf (Sleepy, Doc, Dopey, Happy, Bashful, Grumpy, etc.).

Assembly Instructions

  • Attach the Body to the Head by aligning the head opening with the top of the body, then sew securely with a yarn needle around the opening.
  • Attach the Arms to the Body by positioning them on either side at the appropriate rounds and sewing the arm edges together for a clean seam.
  • Attach the Hat to the Head and sew to the Head by needle, using the long tail to stitch the hat base evenly around the head.
  • Attach the Nose under the eyes, centering it and sewing firmly through the base so it is secure and well positioned.
  • Use the tapestry needle to sew the Beard under the Nose, arranging bobbles neatly and stitching the top edge to the face.
  • Embroider eyebrows and add some pink color on both cheeks to create expressions unique to each dwarf.
  • Attach safety eyes onto oval white felt pieces and position them between the 12th and 13th head rounds before securing.

Important Notes

  • πŸ’‘Use stitch markers to mark the start of each round and to keep track of changes in color or shaping.
  • πŸ’‘Break the yarn leaving a long tail for sewing later when instructed, this makes assembly easier and neater.
  • πŸ’‘Stuff the pieces gradually and evenly; overstuffing can distort the shapes while under-stuffing will leave gaps.
  • πŸ’‘Pin parts in place before sewing to check symmetry and correct positioning of arms, nose, hat and beard.
  • πŸ’‘Weave in ends as you go, and secure bobble stitches well when attaching beards for durability.

Create a whole troupe of tiny handcrafted companions with this playful Seven Dwarfs set. Each dwarf has its own hat color, beard style, and facial expression to customize and treasure. These cheerful characters make lovely gifts or a whimsical display for any home. 🧢✨😊

You ask,

we answer.

FAQs

What size will the finished piece be?

The finished amigurumi measures approximately 10-14 cm tall depending on yarn tension and hat shaping when using the recommended yarn and 2-2.5mm hook.

Can I use different yarn weights for this pattern?

Yes, you can use different yarn weights but the final size will change; choose an appropriate hook for your yarn and adjust safety eye size accordingly.

Do I need prior crochet experience for this pattern?

This pattern is rated intermediate and uses bobble stitches and shaping, so basic amigurumi skills and familiarity with increases/decreases are recommended.

How long does this project typically take to complete?

Most crocheters complete a single dwarf in about 1-2 hours; making the full set of seven will take roughly 5-7 hours depending on experience.

How do I attach the beard so the bobbles sit neatly?

Lay the beard under the nose and use a tapestry needle to stitch along the top edge; secure at several points so bobbles maintain their curve.