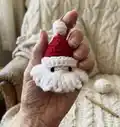
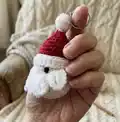
About This Santa Keychain Amigurumi Pattern
This pattern creates a small Santa keychain amigurumi using DK weight yarn and a 3mm hook. You will work a small head, hair/beard loops, hat, bobble and hat band then attach a keyring. The design uses front-post stitches, looped beard/hair techniques and small finishing stitches for charming detail.

Clear UK-term row-by-row instructions and photo diagram references are included for tricky steps. Perfect for gifting, charity sales or adding handmade charm to your keys and bags.
Why You'll Love This Santa Keychain Amigurumi Pattern
I absolutely love this pattern because it turns a few simple stitches into a delightful, pocket-sized Santa full of character. I enjoy the looped beard/hair technique — it adds instant personality and texture with very little extra time. The hat and bobble make each keychain feel finished and festive, and I find the small scale makes them addictive to make in batches. Creating something handmade that people can carry with them always brings me joy and this pattern delivers that in a compact, satisfying project.
Switch Things Up
I love to customise these little Santas by changing yarn colours — try soft pastels, metallic sparkle yarn, or neutral tones for a modern look.
I sometimes swap the DK yarn for a sport or worsted weight and adjust the hook to create mini or jumbo versions; this changes the final size but keeps the same charm.
I add felt or embroidered cheeks for extra personality; a small blush of fabric paint or yarn embroidery makes the face pop.
I experiment with different beard lengths and loop sizes by changing the chain lengths in Row 2 to make fuller or neater beards.
I use safety eyes for toddlers or stitched eyes for a safer, handmade look — always choose safety options that fit your project purpose.
I often attach a tiny ribbon or jingle bell to the keyring for a festive finish when gifting during the holidays.
I will embroider a name or initial on the hat band before attaching it to personalise each keychain as a unique gift.
I sometimes add wire inside the hat or brim for a slightly posed look, or stitch the hat down more firmly for a flatter profile.
I recommend making a colour sample first to check how the chosen yarn reads at small scale; different brands behave differently.
I enjoy making a set in coordinated colours and displaying them as a garland or tree decoration — the pattern lends itself to multiples and small variations.
Common Mistakes & How to Fix Them
✗ Skipping a stitch marker when working continuous rounds causes lost stitch counts; place a marker at the last stitch of each round to stay on track and move it each round.
✗ Overstuffing the head or bobble will distort shape and show through the stitches; stuff gradually, shaping as you go and stop when the piece can be lightly squeezed.
✗ Not counting stitches after increases and decreases leads to uneven shaping; count your stitches at the end of each row especially after dec/inc rounds to ensure correct totals.
✗ Placing eyes or facial features without checking symmetry can look off-center; position and pin features before securing, using the pattern stitch references as guides.
✗ Cutting ends too short for the bobble or hat band attachments makes assembly difficult; leave the specified 20–25cm ends for threading, securing and weaving through the head.