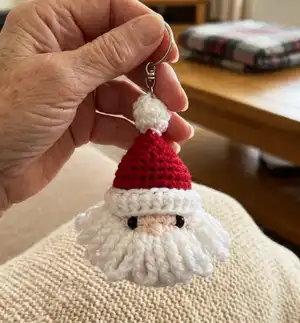
Create a tiny, festive Santa keychain with this clear UK-terms crochet pattern. You will make a little head, fluffy beard, cosy hat and bobble — perfect for gifts or holiday decor. The pattern includes step-by-step rows, diagrams references, and finishing notes so you can stitch with confidence.
Progress Tracker
0% Complete
— Note :
Info :
Unless stated work in continuous rounds marking last stitch of each row with a stitch marker before proceeding with the next. When stuffing parts make sure that you don’t overstuff them as you don’t want the stuffing to show through when complete. Each part should be filled just enough that it can be easily squeezed when pinched firmly.
— Head :
Row 1 :
Using Peaches ch2, dc 6 into 2nd st from hook (alternatively dc 6sts into magic ring) (6)
Row 3 :
(dc into next st, inc) x6 (18)
Row 4 :
(dc into the next 2sts, inc) x6 (24)
Rows 5 - 7 :
dc (24) (3 rows)
Row 8 :
dc into the next 5sts, FPtr into the dc 2 rows below, dc into next 5sts, cl, dc into the next 5sts, FPtr into the dc 2 rows below, dc into next 6sts (24) (Diagrams 1 - 7)
Row 9 :
dc into the next 5sts, FPtr into the previous tr, dc into next 11sts, FPtr into the previous tr, dc into next 6sts (24) (Diagrams 8 - 9)
Row 10 :
dc (24) sl st to join
Info :
F/O leaving a short end
— Head (alternate wording) :
Row 1 :
Using Peaches ch2, sc 6 into 2nd st from hook (alternatively sc 6sts into magic ring) (6)
Row 3 :
(sc into next st, inc) x6 (18)
Row 4 :
(sc into the next 2sts, inc) x6 (24)
Rows 5 - 7 :
sc (24) (3 rows)
Row 8 :
sc into the next 5sts, FPdc into the sc 2 rows below, sc into next 5sts, cl, sc into the next 5sts, FPdc into the sc 2 rows below, sc into next 6sts (24) (Diagrams 1 - 7)
Row 9 :
sc into the next 5sts, FPdc into the previous dc, sc into next 11sts, FPdc into the previous dc, sc into next 6sts (24) (Diagrams 8 - 9)
Row 10 :
sc (24) sl st to join
Info :
F/O leaving a short end
— Hair and Beard :
Row 1 :
sl st into F/O st, sl st into next 6sts, (you should be just in front of the ear, adjust if not), slip st at an angle down the face for the next 3sts, moving 1 row and a st down the face each time, sl st straight across for the next 6sts (the 3rd and 4th st should be central to the base of the nose), slip st at an angle up the face for the next 3sts, moving 1 row and a st up the face each time, (you should be just in front of the 2nd ear), sl st into the next 6sts (24) sl st to join (Diagrams 10 - 11)
Row 2 :
(ch7, sl st through the next sl st from the previous row) x5, (ch9, sl st through the next sl st on beard shaping) x12, (ch7, sl st through the next sl st from the previous row) x7 (12 loops Beard, 12 loops Hair) (Diagrams 12 - 13)
Info :
F/O leaving a short end
— Hat :
Row 1 :
sl st into F/O st on peaches row at top of head, dc into next 24sts (24) (Diagrams 14 - 16)
Rows 2 - 3 :
dc (24) (3 rows)
Row 4 :
(dc into the next 6sts, dec) x3 (21)
Row 5 :
(dc into the next 5sts, dec) x3 (18)
Row 6 :
(dc into the next 4sts, dec) x3 (15)
Row 7 :
(dc into the next 3sts, dec) x3 (12)
Row 8 :
(dc into the next 2sts, dec) x3 (9)
Row 9 :
(dc into next st, dec) x3 (6)
Info :
F/O leaving a short end.
— Hat (alternate sc/hdc wording) :
Row 1 :
sl st into F/O st on peaches row at top of head, sc into next 24sts (24) (Diagrams 14 - 16)
Rows 2 - 3 :
sc (24) (3 rows)
Row 4 :
(sc into the next 6sts, dec) x3 (21)
Row 5 :
(sc into the next 5sts, dec) x3 (18)
Row 6 :
(sc into the next 4sts, dec) x3 (15)
Row 7 :
(sc into the next 3sts, dec) x3 (12)
Row 8 :
(sc into the next 2sts, dec) x3 (9)
Row 9 :
(sc into next st, dec) x3 (6)
Info :
F/O leaving a short end.
— Bobble :
Row 10 :
leaving a 20cm end, sl st into st to right of F/O st, (Diagram 17) (dc into next st, inc) x3 making sure that the end is to the outside sl st to join (End will be used to shape bobble) (9)
Rows 11 - 12 :
dc (9) (2 rows)
Row 13 :
(dc into next st, dec) x3 (6)
Info :
F/O leaving a 20cm end. (Diagram 18)
Info :
Thread F/O end through the front loops of the last 6sts and pull tight to gather. (Diagram 19)
Info :
Secure end with a couple of small sts. Using small back sts attach the keychain to the top of the bobble. Secure with a couple of small sts. Weave end through bobble and cut flush.
Info :
Using 20cm end from start of babble thread through the base of the 1st row of white sts and pull tight to gather. (Diagram 20)
Info :
Secure end with a couple of small sts. (Diagram 21)
Info :
Weave end through Head and cut flush.
— Hat Band :
Row 1 :
leaving a 25cm end, ch24(24) sl st to join
Row 2 :
ch1, htr into the next 23ch (24) sl st to join
Info :
F/O leaving a 25cm end (Diagram 22)
Info :
Place hat band on head so that the base is touching the top of the hair. Using each 25cm end in turn, attach both sides of the band to the head using small back sts. (Diagrams 23 - 24) Secure ends with a couple of small sts before threading through head and cutting flush.
— Eyes :
Info :
Using black oddment thread through to front of face, 1 row up from top of nose and 2sts to outside. Sew 3 small back sts 1 row in length to form 1st eye. Thread through to opposite side of face and repeat for 2nd eye. (Diagrams 25 - 26)
Info :
Weave end through head and cut flush.
This little Santa Keychain is perfect for adding a handmade touch to keys or gift tags this season. Make a set in different colours, or whip up a bunch to gift at holiday markets. Happy crocheting and may your stitches be even and your beard fluffy! 🎄🧶