🧶 Beautiful ✨ Detailed 💝 Adorable

Reversible Flower Bouquet & Bride Amigurumi Pattern

Reversible Flower Bouquet & Bride Amigurumi Pattern
4.0★ Rating
5-7 Hours Time Needed
2.2K Made This
✂️

Intermediate Level

Ideal for those with basic crochet experience, featuring slightly more advanced stitches and techniques to expand your skills.

⏱️

Weekend Treat

Takes 5-7 hours, making it an enjoyable project to finish over a couple of days.

🧸

Cute Companion

An adorable friend to cherish, handcrafted with love to bring comfort and joy for years to come.

About This Reversible Flower Bouquet & Bride Amigurumi Pattern

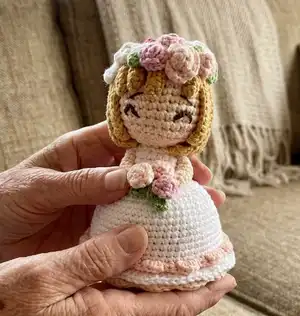
This pattern creates a reversible flower bouquet and a tiny bride amigurumi that fit together—one piece becomes two playful displays. You will crochet a bride head and body, hair, arms, skirt, a bouquet wrapper, many small flowers and leaves, plus a decorative ribbon. The pattern uses 4-ply cotton blend yarn and works in continuous rounds with photos to help with assembly.

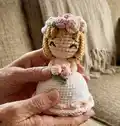
Reversible Flower Bouquet & Bride Amigurumi Pattern crochet pattern - detailed view of completed project

Techniques include magic ring, single crochet increases/decreases, front/back loop work and simple flower motifs. Detailed assembly instructions show how to join the bouquet and bride for a finished reversible gift.

Why You'll Love This Reversible Flower Bouquet & Bride Amigurumi Pattern

I absolutely love this pattern because it combines a sweet amigurumi bride with a clever reversible bouquet concept that feels like two gifts in one. I enjoy making lots of tiny flowers—they are relaxing and addictive to crochet. I also love the neat finishing techniques included here, especially the invisible finish, which gives the final piece a professional look. This design is playful, customizable, and perfect for giving as a keepsake or decoration.

Reversible Flower Bouquet & Bride Amigurumi Pattern step 1 - construction progress Reversible Flower Bouquet & Bride Amigurumi Pattern step 2 - assembly progress Reversible Flower Bouquet & Bride Amigurumi Pattern step 3 - details and accessories Reversible Flower Bouquet & Bride Amigurumi Pattern step 4 - final assembly and finishing

Switch Things Up

I love how easy it is to customize this reversible pattern by simply changing colors; try pastel shades for a softer, vintage bride or bold colors for a modern twist.

I sometimes swap the 4-ply cotton for a slightly thicker yarn and a larger hook to make a chunky, more cuddly version; this will scale up the whole design.

I often change the number and color of flowers in the bouquet—add more tiny blooms for a fuller bouquet or mix in contrasting colors for a playful look.

I like to embroider different facial expressions: move the eye placement or curve the eyebrows slightly for a sleepy, surprised, or smiling bride.

For a portable keychain version, use thinner yarn and a smaller hook to make a mini keyring-sized bride and attach a keyring to the bouquet tail.

Try adding tiny crocheted accessories like a veil, mini bouquet wrap, or a tiny garter to make the piece more personal and detailed.

I sometimes use felt accents for leaves or tiny beads for flower centers to add texture and sparkle to the bouquet.

If you want posable limbs, consider inserting a thin craft wire into the arms before stuffing, securing the ends so they don’t poke through the yarn.

Experiment with embroidery thread instead of yarn for delicate facial features to get more precise, thin lines for the eyes and mouth.

To gift-wrap this pattern creation, make a small stand or dome and place the reversible bouquet inside for a lovely presentation—your creativity will make every piece one-of-a-kind.

Common Mistakes & How to Fix Them

✗ Working too tightly will make it difficult to stuff and reduce stretch; use a slightly smaller hook but maintain a consistent, not overly tight tension. ✗ Forgetting to place stitch markers when joining color changes leads to misaligned rounds; mark the start of each round to maintain correct stitch counts. ✗ Skipping the invisible finish before sewing leaves visible knots and tails; use the invisible finish technique described and hide tails with a tapestry needle. ✗ Not stuffing gradually causes lumps or misshaped sections; stuff little by little while shaping each round to keep an even silhouette.

Reversible Flower Bouquet & Bride Amigurumi Pattern

Create a charming reversible flower bouquet that converts into a sweet bride amigurumi. This pattern guides you through crocheting a tiny bride, a bouquet wrapper filled with flowers, and the separate floral details to assemble into a reversible gift. You will enjoy clear photos and step-by-step rounds to make each element and join them neatly for a polished finish.

Intermediate 5-7 Hours

Materials Needed for Reversible Flower Bouquet & Bride Amigurumi Pattern

— Main Fabric

  • 01
    4-ply cotton blend yarn (same size used throughout)
  • 02
    White - small amount for skirt and details
  • 03
    Cream - small amount for bouquet wrapper and details
  • 04
    Skin color (or cream as skin color) - small amount for head and arms
  • 05
    Light pink - small amount for trims and flowers
  • 06
    Pink - small amount for flowers
  • 07
    Light peach / Peach - small amounts for trims and flowers
  • 08
    Green - small amount for leaves
  • 09
    Polyester fiberfill for stuffing (small bag)

— Tools Required

  • 01
    Crochet hook size 2.0 mm (or suitable size for yarn used)
  • 02
    Tapestry needle
  • 03
    Embroidery needle
  • 04
    Pin needle
  • 05
    Scissors
  • 06
    Multipurpose glue (optional)
  • 07
    Stitch markers
  • 08
    Fiberfill for stuffing

Progress Tracker

0% Complete

— Bride's Head and Body :

Info :

Start with skin color yarn

Round 1 :

6sc in MR (6)

Round 2 :

6inc (12)

Round 3 :

[sc, inc]x6 (18)

Round 4 :

[sc, inc, sc]x6 (24)

Round 5 :

[5sc, inc]x4 (28)

Round 6-12 :

28sc (28)

Round 13 :

[5sc, dec]x4 (24)

Round 14 :

[sc, dec, sc]x6 (18)

Info :

Start stuffing with fiberfill.

Round 15 :

[sc, dec]x6 (12)

Round 16 :

FLO [sc, inc]x6 (18)

Info :

Change to white yarn.

Round 17-18 :

18sc (18)

Info :

Fasten off, leave a long tail for sewing. Do an invisible finish.

Info :

Attach the arm to the body with the wrong/ugly side faces outside, between R16-17.

— Bride's Hair :

Info :

Start with light brown yarn

Round 1 :

8sc in MR (8)

Round 2 :

8inc (16)

Info :

sl st to the first st of R2. Then continue to make the hair strands.

Item Strand 1 :

14ch. Start from the second loop from the hook: sl st, 12sc. Sl st to the next st

Item Strand 2-5 :

8ch. Start from the second loop from the hook: sl st, 6sc. Sl st to the next st

Item Strand 6 :

do the same as strand 1

Item Strand 7-16 :

16ch. Start from the second loop from the hook: sl st, sc, 13hdc. Sl st to the next st

Info :

Fasten off, leave a long tail for sewing.

— Bride's Arms :

Info :

BRIDE'S ARMS (make 2). Start with skin color yarn. Make 12ch. Start from the second loop from the hook, make 11sc. Fasten off, leave a long tail for sewing.

— Face Embroidery & Finishing :

Info :

Use the dark brown yarn to embroider the eyes at R10. With dark brown yarn (use only 1 ply), embroider the eyebrows at R8. Embroider the blush on the cheeks using pink yarn, between R11-12.

Info :

Attach the hair to the head with the wrong side facing outwards. You can sew the hair or use glue. If you sew all strands together, don't sew all the way to the tip; sew about 5st above the sl st to give a nice curl and keep hair closer to the head.

— Bride's Skirt :

Info :

Start with white yarn. Leave a long starting yarn tail, approximately 10 cm (4"). This tail will be used to join both bouquet and bride at the end of this pattern.

Round 1 :

6sc in MR (6)

Round 2 :

6inc (12)

Round 3 :

[sc, inc]x6 (18)

Round 4 :

[sc, inc, sc]x6 (24)

Round 5 :

[3sc, inc]x6 (30)

Round 6 :

[2sc, inc, 2sc]x6 (36)

Round 7 :

[5sc, inc]x6 (42)

Round 8 :

42sc (42)

Round 9 :

[3sc, inc, 3sc]x6 (48)

Round 10-13 :

48sc (48)

Round 14 :

[7sc, inc]x6 (54)

Round 15-16 :

54sc (54)

Round 17 :

BLO 54sc (54)

Round 18 :

54sc (54)

Info :

Stop for a while but do not cut the yarn*, because it will be use for the step on page 9.

Info :

Hold the skirt with its bottom facing you. Attach the light peach yarn at the FL of R16 (you worked R17 BLO). Work: [sl st, sc, hdc inc, sc]x13, 2sl st. Fasten off, secure and hide the tail.

— Bouquet (flowers side) :

Info :

Hold the bouquet with its opening part facing you. Attach the cream yarn at the FL left of R3 (you worked R4 BLO). Make 1ch.

Round 1 :

[hdc, hdc inc]x9 (27)

Round 2 :

[2hdc, hdc inc]x9 (36)

Round 3-4 :

36hdc (36)

Info :

Fasten off. Do an invisible finish and secure and hide the tails.

— Bouquet Wrapper :

Info :

Start with cream yarn. Leave a long starting yarn tail, approximately 10 cm (4"). This tail will be used to join both bouquet and bride at the end of this pattern.

Round 1 :

6sc in MR (6)

Round 2 :

6inc (12)

Round 3 :

[sc, inc]x6 (18)

Round 4 :

BLO [sc, inc, sc]x6 (24)

Round 5 :

[3sc, inc]x6 (30)

Round 6 :

[2sc, inc, 2sc]x6 (36)

Round 7 :

[5sc, inc]x6 (42)

Round 8 :

42sc (42)

Round 9 :

[3sc, inc, 3sc]x6 (48)

Round 10-13 :

48sc (48)

Round 14 :

[7sc, inc]x6 (54)

Round 15-18 :

54sc (54)

Info :

Fasten off. Leave a long tail for sewing, about 50 cm long.

— Ribbon :

Info :

Work in rows. Start with peach yarn. Make 25ch. Then, start from the second loop from the hook:

Round 1 :

[2sc, 2hdc, 4dc, 2hdc, 2sc]x2 (24), 1ch

Round 2 :

turn, BLO [2sc, 2hdc, 4dc, 2hdc, 2sc]x2 (24)

Info :

Fasten off, leave a long tail. Fold the bow so that both ends meet in the middle. Make a knot using both yarn tails to fix the position of the folded ribbon.

Item Bow's tail :

Make a MR, Then work: [10ch, start from the third loop from the hook: 5dc, 2hdc, sc. Sl st to the MR]x2. Pull tight the MR and fasten off. Using the yarn tail, attach the bow’s tail to the center back of the bow. Let its wrong/ugly side faces outside.

Info :

And then, sew the ribbon to the bouquet, near to its bottom.

— Flower 1 (make 6) :

Info :

Make 1 in pink and white. Make 2 in light pink and light peach.

Item :

Make 6ch. Start from the second loop from the hook: hdc, hdc inc, hdc, 2ch, hdc inc in the same st, 2ch, hdc inc in the next st, 2ch, hdc in the same st, hdc, 2ch, hdc inc in the same st.

Info :

Fasten off, leave a long tail for sewing. Roll up the flower and sew it together so that it won’t roll open.

— Flower 2 (make 10) :

Info :

Make 6 in light peach, 3 in light pink, and 1 in pink.

Item :

Make 6ch. Start from the second loop from the hook: sc, inc, 3inc3.

Info :

Fasten off, leave a long tail for sewing. Roll up the flower and sew it together so that it won’t roll open.

— Flower 3 (make 3) :

Info :

Use the white yarn.

Item :

In a MR, make: [4ch, sl st to the MR]x5. Tighten the MR. Fasten off, leave a long tail for sewing.

— Leaves 1 (make 3) :

Item :

Start with green yarn. Make 5ch, start from the second loop from the hook, make sl st, sc, hdc, sl st. Don’t cut the yarn and make again 4ch, start from the second loop from the hook, make sl st, sc, sl st.

Info :

Fasten off. Leave a long tail for sewing.

— Leaves 2 (make 3) :

Item :

Start with green yarn. Make 4ch, start from the second loop from the hook, make sl st, sc, sl st.

Info :

Fasten off. Leave a long tail for sewing.

— Assembly & Joining :

Info :

Attach the bride’s body to the skirt between R3-4. No need to stuff the body with fiberfill, or just stuff it slightly.

Info :

Then, attach the ends of the arms, the leaves 1 and 3 pieces of flower 2 (in light pink and light peach) at the skirt.

Info :

Turn the bouquet wrapper back with the right/good side facing you, and leave the skirt intact at the wrong/ugly side. No need to stuff with fiberfill. Push the skirt inside the bouquet wrapper.

Info :

Join the last rounds of the bouquet wrapper and the bride. Sew them together with light pink tail through the BL of each piece. To finish, make a knot and hide the tail.

Info :

After joining the bouquet and the bride's skirt, continue working the bouquet side: Hold the bouquet with its flowers facing you. Attach the cream yarn to the FL of R18. And work: [sl st, sc, hdc inc, sc]x13, 2sl st. Fasten off, secure and hide the tails.

Info :

Now, turn the bouquet inside out so the bride is facing outside, because now we are going to work the bride’s side. Hold the bride with her skirt facing you. With the white yarn tail left from the last round of the bride’s skirt, work at the FL R18: ch1, sc at the same st, [sl st, sc, hdc inc, sc]x13, sl st. Fasten off, do an invisible finish, secure and hide the tail.

Info :

Congratulations! Your reversible flower bouquet and bride amigurumi is ready.

Assembly Instructions

  • Attach the arm to the body by aligning the arm opening between rounds R16-R17 and sew with the wrong/ugly side facing outside, securing firmly so the arm sits naturally.
  • Sew the hair to the head with the wrong side facing outwards; if using glue, avoid glue near areas where flowers will be sewn as glue can stiffen the yarn.
  • Attach the bride’s body to the skirt by sewing the body into the skirt opening between rounds R3-R4, leaving the skirt mostly unstuffed so it can fit inside the bouquet wrapper.
  • Position and sew the ends of the arms, three leaves (Leaves 1), and three flower 2 pieces (light pink and light peach) onto the front of the skirt as shown in photos for a balanced bouquet-holding pose.
  • Turn the bouquet wrapper inside out (wrong/ugly sides facing) and insert the skirt into the wrapper, then join the last rounds of the wrapper and the bride by sewing through the back loops (BL) with the light pink yarn tail to secure.
  • After joining, turn the bouquet so the bride faces outward and finish the bouquet side by attaching cream yarn at the FL of R18 and working the decorative edge [sl st, sc, hdc inc, sc]x13, then fasten off and hide tails.

Important Notes

  • 💡Try working tight stitches with a smaller hook for better detail, but do not work too tight so the plushie remains slightly stretchable.
  • 💡Use a stitch marker or a piece of yarn to mark the ending or beginning of the round since each round is worked in a continuous spiral.
  • 💡It is highly recommended to read through the pattern completely before beginning to crochet to understand assembly and color changes.
  • 💡Use the invisible finish described to close and secure rounds neatly: draw the tail through loops from front to back and pull tight, hiding the tail inside the work.

This reversible flower bouquet & bride amigurumi is a delightful handmade keepsake you will love to make and gift. The convertible design means you have two charming displays in one sweet project. Enjoy stitching the tiny flowers and assembling them into a beautiful, memorable piece. 🧶🌸
You ask,

we answer.

FAQs

What size will the finished piece be?

The finished amigurumi measures approximately 10.5 cm (4.1") tall for the bride side and about 7 cm (2.76") tall for the flower bouquet side using the recommended 4-ply cotton blend yarn and 2.0 mm hook.

Can I use different yarn weights for this pattern?

Yes, you can use different yarn weights but this will affect the final size and the number of stitches per round; adjust your hook size accordingly and expect a different finished height.

Do I need prior crochet experience for this pattern?

This pattern is rated intermediate and assumes knowledge of basic stitches, increases, decreases, working in continuous rounds, and simple embroidery.

How long does this project typically take to complete?

Most crocheters complete this project in 5-7 hours depending on experience and how many flowers you choose to make.