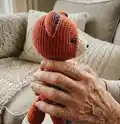
Make a charming hand-crocheted red fox with detailed, step-by-step instructions and helpful photo tutorials. This pattern guides you through shaping the head, body, limbs and ears with clear rounds and assembly tips so you can create a cuddly toy you will love. Perfect for gifting or keeping, the design uses simple shaping and color changes to bring personality to every stitch.
Progress Tracker
0% Complete
— Head :
Info :
Attach safety eyes between rounds 9 and 10, leaving 13 stitches (count 12 holes) between them, and the nose between the first two rounds.
Round 3 :
(sc3, inc) x 3 (15)
Round 4 :
sc in each st (15)
Round 5 :
(inc, sc 2) x 5 (20)
Round 6 :
sc in each st (20)
Round 7 :
(sc 3, inc) x 5 (25)
Round 8 :
sc in each st (25)
Round 9 :
(inc, sc) x 3, hdc, hdc-inc x 8, hdc, (sc, inc) x 4, sc (40)
Round 10 :
sc 11, hdc, (hdc-inc, hdc) x 7, sc 14 (47)
Round 11 :
sc 8, inc, (sc 6, inc) x 4, sc 10 (52)
Round 12 :
sc 22, inc, sc 5, inc, sc 23 (54)
Round 13 :
sc, inc, sc 49, inc, sc 2 (56)
Info :
Attach safety eyes after finishing round 13 (see photos). Start stuffing the head. Keep adding a bit of fiberfill after every few rounds, stuffing the head firmly.
Round 14-21 :
sc in each st (56)
Round 22 :
sc 5, dec, (sc 12, dec) x 3, sc 7 (52)
Round 23 :
(sc 11, dec) x 4 (48)
Round 24 :
sc 4, dec, (sc 10, dec) x 3, sc 6 (44)
Round 25 :
(sc 9, dec) x 4 (40)
Round 26 :
sc 3, dec, (sc 8, dec) x 3, sc 5 (36)
Round 27 :
(sc 7, dec) x 4 (32)
Round 28 :
sc 2, dec, (sc 6, dec) x 3, sc 4 (28)
Round 29 :
(sc 5, dec) x 4 (24)
Round 30 :
(dec, sc 2) x 6 (18)
Round 31 :
(sc, dec) x 6 (12)
Info :
Finish stuffing. Cut the yarn, leaving a long yarn tail, fasten off and close the opening (see photos). Use yarn and needle to shape the head around the eyes as shown in the photo tutorial.
— Ears (make 2) :
Round 2 :
(sc, inc3) x 3 (12)
Round 3 :
sc 2, inc3, (sc 3, inc3) x 2, sc (18)
Round 4 :
sc 3, inc3, (sc 5, inc3) x 2, sc 2 (24)
Info :
Sl st in next stitch and fasten off. Align a white and orange piece, wrong sides facing. Crochet over the edge with single crochet stitches, inserting the hook through both layers (see page 8-9).
Round 5 :
Locate the middle stitch of the first inc3 and attach the orange yarn with sl st. Starting in the same stitch: sc 7, switch to brown yarn, sc, inc3, sc, switch to orange yarn, sc 6, sc + sl st (edge finishing)
Info :
Cut the yarn, leaving a long yarn tail for sewing, and fasten off. Bring all other yarn tails to the wrong side and knot them together inside the ear.
— Left Arm :
Round 2 :
(inc3 x 2, sc) x 2 (14)
Round 3-5 :
sc in each st (14)
Round 6 :
sc 3, inc, sc 5, dec x 2, sc 2 (13)
Round 7 :
sc 4, inc, sc 5, dec, sc 3 (13)
Round 8 :
sc 10, dec, sc (12)
Info :
Stuff the hands firmly. Keep adding a bit of fiberfill after every few rounds, stuffing the arms firmly.
Round 9 :
sc, dec, sc 9 (11)
Round 10 :
sc, dec, sc 8 (10)
Round 11 :
sc in each st (10)
Round 12-22 :
sc in each st (10) (with orange yarn)
Round 23 :
sc 6, dec x 2 (8)
Round 24 :
dec x 3, leave rest of the sts unworked (5)
Info :
Attach the disk with a stem between rows 20 and 21, placing it so the stem is facing straight towards the body. Finish stuffing. Cut the yarn, leaving a long yarn tail, fasten off and close the opening (see page 7).
— Right Arm :
Round 2 :
(inc3 x 2, sc) x 2 (14)
Round 3-5 :
sc in each st (14)
Round 6 :
sc 2, dec x 2, sc 5, inc, sc 2 (13)
Round 7 :
sc 2, dec, sc 5, inc, sc 3 (13)
Round 8 :
sc 2, dec, sc 9 (12)
Info :
Stuff the hands firmly. Keep adding a bit of fiberfill after every few rounds, stuffing the arms firmly.
Round 9 :
sc, dec, sc 9 (11)
Round 10 :
sc, dec, sc 8 (10)
Round 11 :
sc in each st (10)
Round 12-22 :
sc in each st (10) (with orange yarn)
Round 23 :
sc 6, dec x 2 (8)
Info :
Attach the disk with a stem between rows 20 and 21, placing it so the stem is facing straight towards the body. Finish stuffing. Cut the yarn, leaving a long yarn tail, fasten off and close the opening (see page 7).
— Legs (make 2) :
Round 3 :
(sc, inc) x 6 (18)
Round 4 :
(sc 3, inc, sc 4, inc) x 2 (22)
Round 5 :
sc in each st (22)
Round 6 :
sc 7, dec, sc 2, dec, sc 9 (20)
Round 7 :
sc 5, dec, (sc, dec) x 2, sc 7 (17)
Round 8 :
sc 5, dec, sc 2, dec, sc 6 (15)
Round 9 :
sc 6, dec, sc 7 (14)
Info :
Stuff the feet firmly. Keep adding a bit of fiberfill after every few rounds, stuffing the legs firmly.
Round 10 :
sc in each st (14)
Round 11 :
sc 6, dec, sc 6 (13)
Round 12-16 :
sc in each st (13)
Round 17-26 :
sc in each st (13) (with orange yarn)
Info :
On the left leg only, sc in next 6 sts. Count the last sc as the end of the round from now on. Attach the disk with a stem between rounds 25 and 26, placing it so the stem is facing straight towards the body.
Round 27 :
dec, sc 6, dec, sc 3 (11)
Round 28 :
sc, dec x 5 (6)
Info :
Finish stuffing. Cut the yarn, leaving a long yarn tail for sewing, and fasten off. Finish stuffing the tail and legs.
— Body :
Round 3 :
(sc, inc) x 6 (18)
Round 4 :
(inc, sc 2) x 6 (24)
Round 5 :
(sc 3, inc) x 6 (30)
Round 6 :
sc, inc, (sc 4, inc) x 5, sc 3 (36)
Round 7 :
sc 3, inc, (sc 8, inc) x 3, sc 5 (40)
Round 8 :
(sc 9, inc) x 4 (44)
Round 9-16 :
sc in each st (44)
Round 17 :
(sc 9, dec) x 4 (40)
Round 18 :
sc 3, dec, (sc 8, dec) x 3, sc 5 (36)
Round 19 :
(sc 7, dec) x 4 (32)
Round 20 :
sc in each st (32)
Info :
Turn the body so the end of the round is at the center of the back. Attach the legs to the sides of the body, between rounds 9 and 10 (see page 10).
Round 21 :
(dec, sc 14) x 2 (30)
Info :
Start stuffing the body. Keep adding a bit of fiberfill after every few rounds, stuffing the body firmly.
Round 22 :
sc in each st (30)
Round 23 :
sc 12, dec, sc 4, dec, sc 10 (28)
Round 24 :
sc in each st (28)
Round 25 :
(dec, sc 5) x 4 (24)
Round 26 :
sc in each st (24)
Round 27 :
sc 9, dec, sc 4, dec, sc 7 (22)
Round 28 :
sc in each st (22)
Round 29 :
sc 5, dec, sc 9, dec, sc 4 (20)
Round 30-31 :
sc in each st (20)
Round 32 :
sc 5, leave rest of the sts unworked (20)
Info :
Sl st in next stitch. Cut the yarn, leaving a long yarn tail for sewing, and fasten off. Attach the arms to the sides of the body between rounds 27 and 28 (see page 10). Finish stuffing the body.
— Tail :
Round 2 :
(sc, inc) x 3 (9)
Round 3 :
(inc, sc 2) x 3 (12)
Round 4 :
(sc 2, inc) x 4 (16)
Round 5 :
sc, inc, (sc 3, inc) x 3, sc 2 (20)
Round 6-9 :
sc in each st (20) (with orange yarn)
Round 10 :
(dec, sc 8) x 2 (18)
Info :
Start stuffing the tail. Keep adding a bit of fiberfill after every few rounds, stuffing the tail firmly.
Round 11 :
sc in each st (18)
Round 12 :
sc 4, dec, sc 7, dec, sc 3 (16)
Round 13 :
sc in each st (16)
Round 14 :
sc 7, dec, sc 7 (15)
Round 15 :
sc in each st (15)
Round 16 :
sc 7, dec, sc 6 (14)
Round 17-18 :
sc in each st (14)
Round 19 :
sc 7, dec, sc 5 (13)
Round 20-21 :
sc in each st (13)
Round 22 :
sc 7, dec, sc 4 (12)
Info :
Finish stuffing the tail. Cut the yarn, leaving a long yarn tail for sewing, and fasten off. Sew the tail to the body as shown in the assembly instructions.
— Assembly & Finishing :
Info :
Sew the ears to the head. Place the ears just behind round 17 of the head, leaving 7–8 stitches between them. Sew the ears through both layers and hide yarn tails inside the ear. Finish the arms and legs; start making the body and attach the limbs as you go.
Info :
Turn the body so the end of the round is at the center of the back. Attach the legs between rounds 9 and 10. Attach the arms between rounds 27 and 28. Sew the head to the body so the front edge is just behind round 13 of the head. Add extra stuffing before closing seams and hide yarn tails inside.
Info :
Use plastic doll joints or button-and-thread joints if desired. For button/thread joints, cut a length of yarn, draw it through the button holes, place the button inside the limb and body and knot securely (see photos).
This Red Fox amigurumi is a delightful mix of simple shaping and clever details that give the fox its sweet personality. Perfect as a handmade gift or a cozy shelf pal, it uses accessible techniques with photo guidance for every tricky step. Enjoy making this little friend — happy crocheting! 🧶🧵