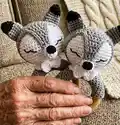
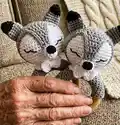
๐Ÿงถ Beautiful โœจ Detailed ๐Ÿ’ Adorable

rattle_wolf Amigurumi Pattern

rattle_wolf Amigurumi Pattern
4.0โ˜… Rating
5-7 Hours Time Needed
2.8K Made This
โœ‚๏ธ

Intermediate Level

Ideal for those with basic crochet experience, featuring slightly more advanced stitches and techniques to expand your skills.

โฑ๏ธ

Weekend Treat

Takes 5-7 hours, making it an enjoyable project to finish over a couple of days.

๐ŸŽ

Tiny Treasure

Small, sweet, and gift-worthy creations that fit perfectly in the palm of your hand with detailed charm.

About This rattle_wolf Amigurumi Pattern

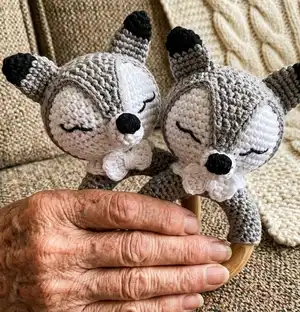
This pattern creates a sweet rattle wolf attached to a wooden ring โ€” a perfect baby toy or small gift. You will crochet the head, upper head piece, nose, ears, collar and bow, and learn how to cover a wooden ring securely. The pattern includes alternate methods for working around the ring and step-by-step photo instructions to guide you.

rattle_wolf Amigurumi Pattern crochet pattern - detailed view of completed project

Includes detailed round-by-round instructions and clear photos to make assembly straightforward. Techniques include continuous spiral work, invisible decreases, and simple embroidery for sleepy eyes.

Why You'll Love This rattle_wolf Amigurumi Pattern

I absolutely love this pattern because it turns simple cotton yarn into a charming little companion that is both practical and beautiful. I enjoy the balance between precise shaping for the head and the small-scale finishing work that makes each piece feel special. The wooden ring gives a tactile element that parents and babies appreciate, and the pattern photos make each step achievable. I also love how easy it is to customize color and size for different looks.

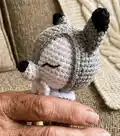
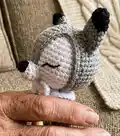
rattle_wolf Amigurumi Pattern step 1 - construction progress rattle_wolf Amigurumi Pattern step 2 - assembly progress rattle_wolf Amigurumi Pattern step 3 - details and accessories rattle_wolf Amigurumi Pattern step 4 - final assembly and finishing

Switch Things Up

I love how easy it is to customize this rattle wolf with different color combinations; try pastel shades for a softer baby look or bright colors for a playful toy.

I like to swap the cotton yarn for a slightly thicker or thinner yarn to change the finished size โ€” use a larger hook for a chunkier version or a smaller hook for a tiny keychain-size rattle.

I often add a small ribbon or tag between the head and ring for extra detail; just securely sew it in so it stays attached during use.

For a gender-neutral look, pick muted earthy tones and a natural beech ring; for themed gifts, coordinate the bow and collar colors to match nursery decor.

I sometimes replace the internal rattle with a sewn-in bell or a squeaker for a different sound profile; ensure the insert is baby-safe and well enclosed.

Try embroidering different eye expressions by changing placement and length of the stitching to make each wolf look surprised, sleepy, or happy.

I like to make matching sets โ€” create two wolves with mirrored colorways or a wolf and a fox using similar shaping but different palette choices.

If you want the head more poseable, consider inserting a small wire neck support before sewing to the ring, but always check safety for baby toys.

I recommend experimenting with the collar and bow size: make the collar narrower for minimal look or add a second little bow for extra charm.

For gift packaging, I stitch a tiny loop and hang the rattle on a card or small wooden hanger; it makes a beautiful finished presentation for baby showers.

Common Mistakes & How to Fix Them

โœ— Working too loosely around the wooden ring leads to gaps and a sloppy finish; use a smaller hook and tighten your tension when crocheting around the ring. โœ— Forgetting to insert the rattle before closing the head will require undoing many rounds; place the rattle inside before you start final decreases and stuff as you go. โœ— Not stuffing evenly creates a lumpy or misshapen head; add small amounts of stuffing gradually and use tweezers to push filling into tight areas for a smooth shape. โœ— Skipping stitch markers during continuous spiral rounds causes lost beginning-of-rounds and uneven shaping; use a marker or contrasting yarn to track the start of each round. โœ— Sewing parts with short tails or weak attachment can make ears or the head come loose; leave long tails for secure whipstitching and sew through multiple rounds for strength.

rattle_wolf Amigurumi Pattern

Make a charming rattle wolf amigurumi perfect for baby gifts and nursery play. This PDF pattern guides you step-by-step through crochet, assembly, and finishing with clear photos and helpful tips. You will learn how to cover a wooden ring, crochet the head, ears, nose, and accessories for a polished result. Ideal for makers who enjoy small, detailed projects that make thoughtful handmade gifts.

Intermediate 5-7 Hours

Materials Needed for rattle_wolf Amigurumi Pattern

โ€” Main Fabric

  • 01
    Vita Cotton Lily 100% cotton, 1.75 oz / 50 g approx 137 yds / 125 m - 2 hanks (total for project)
  • 02
    MC yarn (white) - approx 1 hank (use for head interior and face)
  • 03
    CC yarn (gray) - approx 1 hank (use for upper head, ring cover, ears, body)
  • 04
    CC1 yarn (black) - 10-15 g for nose tip and ear tips
  • 05
    Suggested substitute yarns: Scheepjes Catona, Alpina Anabel (adjust hook for gauge)

โ€” Tools Required

  • 01
    Crochet hook size 2.5 mm (main work)
  • 02
    Crochet hook size 2.0 mm (for working around wooden ring and tighter stitches)
  • 03
    Wooden ring approx 2-3 in / 60-70 mm diameter (beech recommended)
  • 04
    Rattle approx 1 in / 24-30 mm diameter
  • 05
    Polyester stuffing
  • 06
    Scissors
  • 07
    Tapestry needle for sewing and weaving ends
  • 08
    Black embroidery floss or fingering weight yarn for eyes
  • 09
    Tweezers (optional, for stuffing small cavities)
  • 10
    Stitch marker or contrasting yarn

Progress Tracker

0% Complete

โ€” Notes :

Info :

All pieces worked in a continuous spiral. Do not join to work in the rnd, just work sc in the next st. Place marker or use contrasting color yarn to mark beg of rnd. Use hook 2.5 mm or size matching your yarn and obtaining gauge. When work around the wooden ring, use smaller size hook, it will be easier to work.

โ€” Working around the ring. Option 1 :

Info :

Work around the ring in a continuous spiral. The total number of sts depends on the size of your wooden ring and yarn. For my size ch10 using hook 2.5mm, then work around the ring using hook 2mm. Join chain with sl st around the ring. Then sc in each st around. The first rnd is the most difficult.Then start to work in a continuous spiral, sc in each st. if it`s still uncomfortable to work, try to use smaller size hook. Pay attention to your tension, crochet around the ring tightly. If the fabric is moving loosely, rip it out and start over again with one st less. Cont to work until the half or a bit less than half of the ring is covered. End with sl st. The beginning and the end of work should be inside of the ring. Weave in ends. Pull the end through the last rnd to tighten the fabric around the ring, and then pull it through the fabric inside the ring.

โ€” Working around the ring. Option 2 :

Info :

If option 1 is too complicated for you, you can crochet a rectangle, working sc. For my ring size ch20 and work for 9 rows. When the rectangle is finished, fold it over the ring and sew it, the fabric should be tight around the ring. The seam should be inside the ring. Weave in ends using tapestry needle.

โ€” Head :

Round 1 :

6sc in magic ring = 6 sts

Round 2 :

(inc) * 6 times = 12 sts

Round 3 :

(inc, sc in next st) * 6 times = 18 sts

Round 4 :

(inc, sc in next 2 sts) * 6 times = 24 sts

Round 5 :

(inc, sc in next 3 sts) * 6 times = 30 sts

Round 6 :

(inc, sc in next 4 sts) * 6 times = 36 sts

Round 7 :

(inc, sc in next 5 sts) * 6 times = 42 sts

Round 8 :

(inc, sc in next 6 sts) * 6 times = 48 sts

Rounds 9-15 :

48sc (work even for 7 rnds)

Round 16 :

(dec, sc in next 6 sts) * 6 times = 42 sts

Round 17 :

(dec, sc in next 5 sts) * 6 times = 36 sts

Round 18 :

(dec, sc in next 4 sts) * 6 times = 30 sts

Round 19 :

(dec, sc in next 3 sts) * 6 times = 24 sts

Info :

Stuff the head and put rattle inside.

Round 20 :

(dec, sc in next 2 sts) * 6 times = 18 sts

Info :

Stuff the head tightly, for your convenience you can use tweezers.

Round 21 :

(dec, sc in next st) * 6 times = 12 sts

Round 22 :

(dec) * 6 times = 6 sts

Info :

Bind off rem 6 sts using a needle. Leave a long tail to sewing around a ring (approx 18-20in/45-50cm). The head is done.

โ€” Upper head piece :

Info :

With CC work the upper head piece

Round 1 :

6sc into magic ring = 6 sts

Round 2 :

(inc) * 6 times = 12 sts

Round 3 :

(inc, sc in next st) * 6 times = 18 sts

Round 4 :

(inc, sc in next 2 sts) * 6 times = 24 sts

Round 5 :

(inc, sc in next 3 sts) * 6 times = 30 sts

Round 6 :

(inc, sc in next 4 sts) * 6 times = 36 sts

Round 7 :

(inc, sc in next 5 sts) * 6 times = 42 sts

Round 8 :

(inc, sc in next 6 sts) * 6 times = 48 sts

Rounds 9-13 :

sc in every st (work even for 5 rnds) = 48 sts

Round 14 :

(dec, sc in next 6 sts) * 6 times = 42 sts

Round 15 :

sc in every st (work 1 rnd even) = 42 sts

Info :

Turn the piece and start to work flat.

Row 16 :

ch1, sc in next 6 sts, turn.

Row 17 :

ch1, sc in next 6 sts, turn.

Row 18 :

sc in next 5 sts starting from the 2nd st from the hook, turn.

Row 19 :

sc in next 4 sts starting from the 2nd st from the hook, turn.

Row 20 :

ch1, sc in next 4 sts, turn.

Row 21 :

sc in next 3 sts starting from the 2nd st from the hook, turn.

Row 22 :

sc in next 2 sts starting from the 2nd st from the hook, turn.

Rows 23-25 :

ch1, sc in next 2 sts.

Info :

Sc in every st to end of upper head piece. Sl st in next st, fasten off leaving a long tail approx 25-27 in(65-70 cm) for sewing to the head.

โ€” Nose :

Info :

Work with MC yarn

Round 1 :

5sc into magic ring = 5 sts

Round 2 :

(inc) * 5 times = 10 sts

Rounds 3-5 :

sc in next 10 (work even for 3 rnds) = 10 sts

Info :

Sl st in next st, fasten off leaving a tail for sewing.

Info :

With CC1 yarn work 6sc into magic ring for the nose tip, fasten off and sew it to the nose or embroider the tip of the nose using A yarn. Stuff the nose firmly.

โ€” Ears (Make 2) :

Info :

With CC1 yarn work as foll:

Round 1 :

6 sc into magic ring = 6 sts

Round 2 :

(inc, sc in next 2 sts) * 2 times = 8 sts

Round 3 :

(inc, sc in next 3 sts) * 2 times = 10 sts

Info :

Cont to work with CC yarn:

Round 4 :

(inc, sc in next 4 sts) * 2 times = 12 sts

Round 5 :

(inc, sc in next 5 sts) * 2 times = 14 sts

Rounds 6-7 :

sc in every st (work even for 2 rnds) = 14 sts

Info :

Sl st in next st, fasten off leaving a long tail for sewing to the head. Rep the same for the 2nd ear.

โ€” Bow :

Info :

With CC yarn, hook 2,5 mm

Instruction :

In magic ring ch4, tr4, ch4, sl st into magic ring, ch4, tr4, ch4, sl st.

Info :

Finish off leaving a long tail for sewing. Fasten off, tighten the magic ring and wrap it using a tail.

โ€” Collar :

Info :

Now make a collar.

Instruction :

With MC yarn ch27. Then work flat as foll: Row 1: dc in the 4th st from the hook, dc in next 23 sts. Leave a long tail for sewing.

โ€” Assembling :

Info :

Sew the nose to the head at level of row 6 from the last inc, attaching the upper head piece to the head, checking the right place for embroidering the nose. See photo-instructions for sewing the upper head piece and the nose.

Info :

Then outline the eyes and remove the upper head piece. With black embroidery floss or fingering weight yarn embroider sleepy eyes. You can bring the needle from the back side of the head. The upper head piece will hide all the knots, when attaching it. Embroider the eyes as it`s shown on the photo, mirror the 2nd eye. Pay attention to the symmetrical position of the eyes regarding to the nose. For your convenience attach the upper head piece. When eyes are finished, secure the thread on the back of the head and cut it.

Info :

Now sew the upper head piece. Attach it as it`s shown on the photo and sew it to the head around the edge.

Info :

Sew the ears at level of 2-3 rows from the edge of the upper head piece with 7 sts in between. The head is done.

Info :

With MC yarn tail sew the head to the wooden ring. When you sew the head to the ring, push it slightly, the neck shouldn`t be too thin. The head should be tightly attached to the ring, I recommend to sew it around twice.

Info :

Now sew the bow to the collar. Then sew it as it`s shown on the photo. Attach collar around the ring and sew in place.

Assembly Instructions

  • Sew the nose to the head at the level of row 6 from the last increase, then attach the upper head piece to the head and sew around the edge, making sure the nose placement aligns correctly.
  • Embroider sleepy eyes using black embroidery floss before fully attaching the upper head piece; bring the needle from the back when possible and mirror placement for symmetry.
  • Sew the ears to the upper head piece at the level of 2-3 rows from the edge, leaving 7 stitches between the ears for even spacing.
  • With a long tail of MC yarn, firmly sew the base of the head to the wooden ring; push slightly so the neck is not too thin and sew around twice for strength.
  • Make the collar (ch27 and dc row), sew the bow onto the collar, then attach the collar around the ring and secure with even stitches.
  • Tidy knots and weave in all tails inside the upper head piece and the ring; hide knots under the upper head piece when finishing for a neat look.

Important Notes

  • ๐Ÿ’กUse stitch markers to mark the beginning of rounds when working in continuous spiral to keep track of shaping.
  • ๐Ÿ’กWhen working around the wooden ring use a smaller hook for tighter tension; this makes stitching around the ring easier and neater.
  • ๐Ÿ’กStuff gradually and use tweezers to push stuffing into tight areas to avoid lumps and to achieve smooth shaping.
  • ๐Ÿ’กLeave long tails when fastening off parts so you have enough length to sew pieces securely to the head and ring.

This tiny rattle wolf is designed to bring handmade charm to babies and gift-giving alike. ๐Ÿงธ Follow clear step-by-step rounds and photo instructions to create a polished finished toy. ๐Ÿงถ Perfect for baby showers, keepsakes, or small shop items โ€” sweet, safe, and tactile. โœจ Happy crocheting and enjoy making something special!
You ask,

we answer.

FAQs

What size will the finished piece be?

The finished rattle, using the recommended cotton yarn and a 60-70mm wooden ring, measures approximately 10-12 cm tall including the head and ring.

Can I use different yarn weights for this pattern?

Yes, you can use different yarn weights but the finished size will change; choose appropriate hook sizes and adjust the number of chain stitches for fitting the wooden ring.

Do I need prior crochet experience for this pattern?

This pattern is rated intermediate; basic knowledge of single crochet, increases, decreases, magic ring, and sewing amigurumi parts is recommended.

How long does this project typically take to complete?

Most crocheters complete this rattle wolf in about 5-7 hours, depending on experience and how much time is spent on sewing and finishing details.