🧢 Beautiful ✨ Detailed πŸ’ Adorable

Rabbit Amigurumi Pattern

Rabbit Amigurumi Pattern
4.4β˜… Rating
5-7 Hours Time Needed
1.2K Made This
βœ‚οΈ

Intermediate Level

I deal with those who have basic crochet experience, featuring slightly more advanced stitches and techniques to expand your skills.

⏱️

Weekend Treat

Takes 5-7 hours, making it an enjoyable project to finish over a couple of days.

🧸

Cute Companion

An adorable friend to cherish, handcrafted with love to bring comfort and joy for years to come.

About This Rabbit Amigurumi Pattern

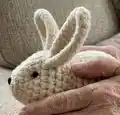
This pattern creates a soft, plush rabbit made with velvet-style yarn (Himalaya Dolphin Baby or equivalent). The finished mascot in the sample measures approximately 18 cm and features separate pieces for head with torso, ears, paws, tail and an optional sewn nose. Clear round-by-round instructions and photos will guide you through shaping and assembly.
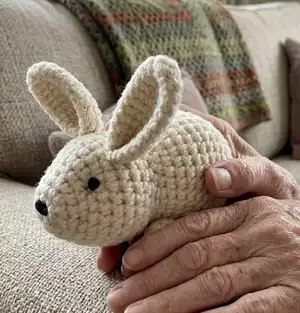
Rabbit Amigurumi Pattern crochet pattern - detailed view of completed project

Designed for makers with basic to intermediate skills who want a satisfying weekend project. The pattern uses simple increases, decreases and basic sewing to create a neat, professional finish.

Why You'll Love This Rabbit Amigurumi Pattern

I absolutely love this pattern because it transforms simple stitches into a lovable little companion with personality. I enjoyed shaping the elongated body and the cute rounded head β€” the proportions are very forgiving and fun to make. The velvet yarn gives the rabbit a plush, premium feel that is irresistible to hug. I also love how easy it is to customize colors or add small accessories to make each rabbit unique.

Rabbit Amigurumi Pattern step 1 - construction progress Rabbit Amigurumi Pattern step 2 - assembly progress Rabbit Amigurumi Pattern step 3 - details and accessories Rabbit Amigurumi Pattern step 4 - final assembly and finishing

Switch Things Up

I love how easy it is to customize this rabbit β€” I often change the color to make seasonal or themed versions.

I sometimes switch to pastel tones for a baby gift or bold colors for a playful look; try grey, pink or cream.

If you want a smaller or larger rabbit, change the yarn weight and hook: bulky yarn and larger hook make a chunky rabbit, thinner yarn makes a mini keychain version.

I like to embroider expressions or add tiny felt cheeks to change the personality of the face.

You can replace the safety nose with embroidered nose stitches or a small felt heart for a different finish.

Try making a set in different sizes and colors to create a family of bunnies β€” they look lovely grouped together.

For posable limbs, add thin craft wire in the paws (optional) and secure well so it stays safe for display only.

Add tiny crochet accessories like scarves, bows or a mini carrot to personalize each rabbit for gifting.

I sometimes work the ears a bit longer or shorter to adjust the character of the rabbit β€” try folding or shaping before sewing to see what you prefer.

Don’t be afraid to experiment with eye placement; moving the eyes slightly changes the expression from sleepy to curious.

Common Mistakes & How to Fix Them

βœ— Placing the safety eyes too high or low will unbalance the face; place the eyes between rows 6 and 7 spaced 9 single crochets apart to match the pattern. βœ— Overstuffing the head and torso makes shaping difficult and lumpy; stuff gradually and evenly as you work to maintain smooth curves and correct proportions. βœ— Skipping stitch counts after increases and decreases leads to errors in shaping; count your stitches at the end of each round and mark the start with a stitch marker. βœ— Sewing pieces without pinning causes misaligned parts; pin or use stitch markers to position ears and paws before you sew them in place to ensure symmetry.
Rabbit Amigurumi Pattern

Make a sweet, cuddly rabbit amigurumi using soft velvet yarn β€” perfect as a handmade gift or nursery decor. This pattern guides you step-by-step through the head, body, ears, paws, tail and assembly so you can crochet a charming 18 cm rabbit. Clear rounds, helpful photos and sewing tips make the process enjoyable whether you are refreshing your skills or expanding them.

Intermediate 5-7 Hours

Materials Needed for Rabbit Amigurumi Pattern

β€” Main Fabric

  • 01
    Himalaya Dolphin Baby (velvet/boucle style) - approximately half a skein (main color, ecru/off-white) - yields ~18 cm finished rabbit
  • 02
    Small amount of contrasting yarn for nose (optional) - short length
  • 03
    Alternative: any plush velvet baby yarn of equivalent weight (use similar hook for size match)

β€” Tools Required

  • 01
    Crochet hook size 4 mm
  • 02
    Row marker / stitch marker
  • 03
    Safety eyes 6 mm (2 pieces)
  • 04
    Small safety nose or short length of different color yarn to sew the nose
  • 05
    Needle with a large eye for sewing parts
  • 06
    Lighter to burn and seal yarn ends (carefully)
  • 07
    Polyester stuffing or small antiallergic silicone ball
  • 08
    Scissors
  • 09
    Pins for assembly (optional)

Progress Tracker

0% Complete

β€” Head with torso :

Round 1 :

6 mr (6)

Round 2 :

inc x 6 (12)

Round 3 :

(3 sc, inc) x 3 (15)

Round 4 :

(4 sc, inc) x 3 (18)

Round 5 :

(2 sc, inc) x 6 (24)

Round 6 :

(3 sc, inc) x 6 (30)

Round 7-10 :

30 sc (30) - 4 rows

Round 11 :

(3 sc, dec) x 6 (24)

Round 12 :

(2 sc, dec) x 6 (18)

Info :

Place the eyes between the 6) and 7) row at a distance of 9 sc.

Round 13 :

(2 sc, inc) x 6 (24), slowly we gradually fill,

Round 14 :

(3 sc, inc) x 6 (30)

Round 15 :

(4 sc, inc) x 6 (36)

Round 16-25 :

36 sc (36) – 10 rows

Round 26 :

(4 sc, dec) x 6 (30)

Round 27 :

(3 sc, dec) x 6 (24)

Round 28 :

(2 sc, dec) x 6 (18)

Round 29 :

(1 sc, dec) x 6 (12)

Round 30 :

dec x 6 (6). Cut off, leaving 30 cm in length yarns, then thread the needle and pull it successively through each front thread of the stitch from the previous row, tightening it tightly (but not too tightly so as not to break the yarn).

β€” Ears :

Round 1 :

Make 10 chain stitches, then thread into the 2 stitch.

Round 2 :

8 hdc, 3 hdc in 1 stitch, 8 hdc (19)

Round 3 :

1 dsl, 19 sc (19). Thread the yarn over the needle and sew the shorter edge together, leave 30 cm.

β€” Paws :

Round 1 :

6 mr (6)

Round 2 :

(2 sc, inc) x 2 (8)

Round 3-6 :

8 sc (8) – 4 rows, fill in, then fold the piece in half and connect the 3 sc, pull the yarn over and leave it 30 cm long.

β€” Tail :

Round 1 :

6 mr (6)

Round 2 :

(1 sc, inc) x 3 (9)

Round 3 :

9 sc (9)

Round 4 :

(1 sc, dec) x 3 (6), we pull the yarn, fill it a little and leave 30 cm in length.

β€” Nose (instead of the safe nose) :

Round 1 :

2 mr (2), we pull the yarn and leave 30 cm.

β€” Assembly :

Sewing (P1) :

Sew the ears to the head at a height of 2 sc above the eyes. Fix the thread from the upper part of the ear in the piece and hide it in your head.

Sewing (P2) :

Place the nose piece just above the middle of the knitting of the head with the body.

Sewing (P3) :

On the back of the torso, in the middle, sew the tail according to the photo.

Sewing (P4) :

Sew the paws to the body in such a way as to provide support for the entire body (2 paws at the front and 2 paws at the back).

Sewing (P5) :

To slim down the face, just below the eyes, thread the yarn (the same color as the body), then pull the yarn back, sticking into 1 single crochet and leaving where we started. Pull gently, tie the threads together, tighten them tightly, and then hide them in the knitting.

Assembly Instructions

  • Sew the ears to the head at a height of 2 sc above the eyes; fix the thread from the upper part of the ear into the piece and hide it inside the head.
  • Place the nose piece just above the middle of the knitting where the head meets the body and sew firmly in place.
  • Sew the tail to the middle of the back of the torso, using photos as a guide for placement.
  • Attach the paws to the body to provide support for the entire toy: two paws at the front and two at the back, positioning them symmetrically and sewing securely.
  • To narrow the face below the eyes, thread yarn under the stitch, pull it back into a single crochet, tie and tighten gently, then hide the threads inside the knitting.

Important Notes

  • πŸ’‘Use stitch markers to keep track of your rounds, especially when shaping the head and body.
  • πŸ’‘Stuff gradually and evenly; overstuffing will distort the shape and under-stuffing will make parts floppy.
  • πŸ’‘Leave long yarn tails (about 30 cm) on small pieces to make sewing and shaping easier when joining.

This adorable rabbit amigurumi is designed to be a cozy, handmade companion you can cherish or gift to someone special. The plush velvet yarn gives it a soft, cuddly feel that children and adults will love. With clear instructions for shaping and assembly, you will finish a charming 18 cm rabbit ready to hop into your home. 🧢🐰

You ask,

we answer.

FAQs

What size will the finished piece be?

The finished amigurumi measures approximately 18 cm long when made with the recommended Himalaya Dolphin Baby yarn and a 4 mm hook.

Can I use different yarn weights for this pattern?

Yes, you can use a different plush or velvet yarn, but the final size will change; match your hook to the yarn weight and adjust stuffing for shape.

Do I need prior crochet experience for this pattern?

This pattern is rated intermediate and assumes you know basic amigurumi techniques such as magic ring, single crochet, increases, decreases and simple sewing.

How long does this project typically take to complete?

Most crocheters complete this rabbit in about 5-7 hours depending on experience, assembly time and how many details you add.