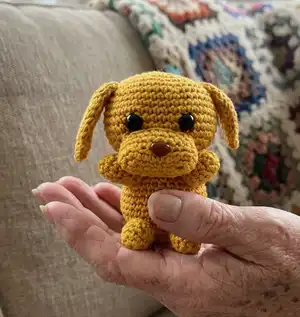
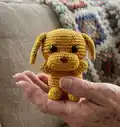
Make a lovable Puppy Dog Friend with this easy-to-follow UK-style amigurumi pattern. You will crochet the muzzle, head, ears, body, tail and paws, then assemble for a charming sitting puppy. The pattern includes complete row-by-row instructions and helpful placement notes so you can sew parts accurately. Perfect for gifting or keeping as a cute handmade companion.
Progress Tracker
0% Complete
— Muzzle :
Row 1 :
7ch, 2dc into 2nd ch from hook, dc in next 4 dc, 5 dc in last ch, working in the back loops of the chain, dc in each of the next 4 loops, 3dc in last loop (which is the back of the first chain you used, where you put the 2dc). You now have 18 dc around an oval. Slip stitch into the first dc of the row to join the ring.
Row 2 :
2dc in the same place as the joining stitch, dc in each of next 6 dc, 2dc in next dc, dc in next dc, 2dc in next dc, dc in each of next 6 dc, 2dc in next dc, dc in next dc, join as before. (22 stitches)
Row 3 :
In the back loops of each stitch only, dc into each dc, join (22)
Row 4 and 5 :
dc into each dc (22)
Info :
Pull thread through, leaving a long end to sew the muzzle onto the head. Put the nose, if you are using one, in the middle of one long side just above the edge formed by working into the back loops only. The back of the nose-piece fitted better into this muzzle with the narrower part at the front. Stuff; you may need to add stuffing once you have most of this sewn to the head.
— Head :
Row 1 :
6 dc into a magic ring.
Row 2 :
2dc into each dc (12 stitches)
Row 3 :
(1dc, 2dc in next dc) x 6 (18)
Row 4 :
(2 dc, 2dc in next dc) x 6 (24)
Row 5 :
(3 dc, 2dc in next dc) x 6 (30)
Row 6 :
(4 dc, 2dc in next dc) x 6 (36)
Row 7 :
(5 dc, 2dc in next dc) x 6 (42)
Row 8 :
(6 dc, 2dc in next dc) x 6 (48)
Rows 9-15 :
1dc in each dc to end (48) – that's 6 rows without shaping.
Row 16 :
(6 dc, dec) x 6 (42)
Row 17 :
(5 dc, dec) x 6 (36)
Row 18 :
(4 dc, dec) x 6 (30)
Row 19 :
(3 dc, dec) x 6 (24)
Row 20 :
(2 dc, dec) x 6 (18)
Info :
Place the muzzle so that it sits between row 12 and about row 18 and sew it in place. Put the safety eyes in just above and either side of it, between rows 11 and 12 about 5 stitches apart – but actually wherever looks good to you once you have placed the muzzle.
Row 21 :
(1 dc, dec) x 6 (12)
Info :
Cut yarn, leaving a long tail for sewing to the body – or you can leave the end on the body instead. No need to pull the stitches tight, but you can if you like.
— Ears :
Row 1 :
6 dc into a magic ring.
Row 2 :
2dc into each dc (12 stitches)
Row 3 :
(1dc, 2dc in next dc) x 6 (18)
Row 4 :
(2 dc, 2dc in next dc) x 6 (24)
Row 5 :
(3 dc, 2dc in next dc) x 6 (30)
Row 6 :
(4 dc, 2dc in next dc) x 3 – do not finish the row (33)
Info :
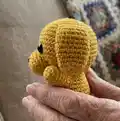
Leave a tail to sew on, make another one. Fold in half so that the side you have done the half-row more on sits against the other side, and stitch through the places you would put your hook to sew together so that the tops of the row still show and the ear is quite flat. Stitch to the head between about the 6th and 8th rows, just about halfway back, with the seam facing forwards, but place them wherever they look good to you.
— Body :
Row 1 :
6 dc into a magic ring.
Row 2 :
2dc into each dc (12)
Row 3 :
(1dc, 2dc in next dc) x 6 (18)
Row 4 :
(2 dc, 2dc in next dc) x 6 (24)
Row 5 :
(3 dc, 2dc in next dc) x 6 (30)
Row 6 :
(4 dc, 2dc in next dc) x 6 (36)
Rows 7-12 :
dc into each dc (36) – that’s 6 more rows straight.
Row 13 :
(4 dc, dec) x 6 (30)
Row 14 :
dc into each dc (30)
Row 15 :
(3 dc, dec) x 6 (24)
Row 16 :
dc into each dc (24)
Info :
Leave a long end, stuff and sew to the head around the 19th row (which also has 24 stitches, so you can sew stitch to stitch if you like). Don’t overstuff, or the base will be too round for your puppy to sit neatly without falling over all the time.
— Tail :
Row 1 :
3 dc into a magic ring.
Row 2 :
2dc in each dc (6 stitches).
Rows 3-11 :
dc into each dc (6 stitches) – that’s 9 rows without shaping.
Info :
Leave an end for sewing. Flatten the very end where you finished, and stitch just that row to the back of the dog, around row 6 of the body.
— Front Paws :
Row 1 :
6 dc into a magic ring.
Row 2 :
(1dc, 2dc in next dc) x 3 (9)
Rows 3-6 :
dc in each dc to end (9) – that’s 4 rows.
Info :
Leave an end for sewing, make a second one, stitch to body either side of where the nose droops between about rows 12 and 15, 5 stitches visible between them – or however you think is good. The model is holding his paws out for a hug.
— Back Paws :
Row 1 :
6 dc into a magic ring.
Row 2 :
(1dc, 2dc in next dc) x 3 (9)
Rows 3-5 :
dc in each dc to end (9) – that’s 3 rows.
Info :
Leave an end for sewing, make a second one, stitch them to the body between rows 4 and 7 right at the bottom of the front with only one stitch or so showing between them — but maybe pin first to be sure your dog can 'sit' neatly. You have a tail at the back to place too.
Info :
Do fiddle with this pattern to make it more the way you want it. The tail could be longer or thicker. The back paws could be stitched to the bottom so the dog stands up; you could add wire or a pipe-cleaner for posability. The front paws could be longer and less stuffed so they hang at the sides under the head if preferred.
This Puppy Dog Friend is a sweet, pocket-sized amigurumi designed to bring a smile and a warm handmade hug. Make it in your favorite colour and tweak ears, tail or paws to suit your style. Perfect as a gift or a cozy desk companion. 🐶🧶