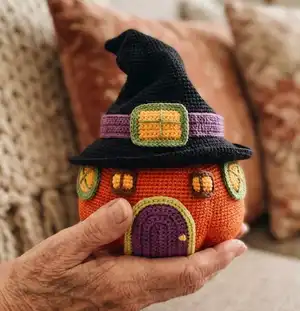
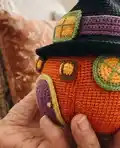
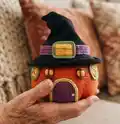
Make a charming Pumpkin House amigurumi with cosy details: a removable witch hat, tiny windows, door, lanterns and monster cookie treats. This pattern guides you step-by-step through crocheting the pumpkin body, shaping with fishing line, and assembling all the sweet Halloween accents. Perfect for gifting, seasonal decor, or as a playful weekend project to expand your amigurumi skills.
Progress Tracker
0% Complete
— Pumpkin :
Info :
First of all prepare 1 mm diameter fishing line. Neatly burn the end with a lighter so that a small ball appears on the tip.
Info :
By the way, here's a hint for you on how to fix a skein of fishing line so that it doesn't get tangled, but you can easily release a few turns.
Info :
Add the fishing line from the 3d round. Just apply it to crocheting and crochet so that it lays under the stitches. The ball at the end of the fishing line will not let it slip out.
Round 3 :
(1 sc, inc)*6=18 sc
Round 4 :
(2 sc, inc)*6=24 sc
Round 5 :
(3 sc, inc)*6=30 sc
Round 6 :
(4 sc, inc)*6=36 sc
Round 7 :
(5 sc, inc)*6=42 sc
Round 8 :
(6 sc, inc)*6=48 sc
Round 9 :
(7 sc, inc)*6=54 sc
Round 10 :
(8 sc, inc)*6=60 sc
Round 11 :
(9 sc, inc)*6=66 sc
Round 12 :
(10 sc, inc)*6=72 sc
Round 13 :
(11 sc, inc)*6=78 sc
Round 14 :
(12 sc, inc)*6=84 sc
Round 15 :
Work only this round through the back loops: (13 sc, inc)*6=90 sc
Round 16 :
(14 sc, inc)*6=96 sc
Round 17 :
(15 sc, inc)*6=102 sc
Round 18-37 :
20 rounds of 102 sc
Round 38 :
(15 sc, dec)*6=96 sc
Round 39 :
(14 sc, dec)*6=90 sc
Round 40 :
(13 sc, dec)*6=84 sc
Info :
Cut the fishing line, leaving a short end. Melt it with a lighter and quickly press to the crocheting so that the end sticks to the yarn. Crochet a few more sc to close the line. Finish with sl st, cut the yarn.
Info :
Join yarn to the 14-th round and crochet through the front loops.
Round 1 :
(13 sc, inc)*6=90 sc
Round 2 :
(14 sc, inc)*6=96 sc
Round 3 :
(15 sc, inc)*6=102 sc
Round 4 :
(16 sc, inc)*6=108 sc
Round 5 :
(17 sc, inc)*6=114 sc
Round 6 :
(18 sc, inc)*6=120 sc
Round 7 :
(19 sc, inc)*6=126 sc
Round 8-30 :
23 rounds of 126 sc
Round 31 :
(19 sc, dec)*6=120 sc
Round 32 :
(18 sc, dec)*6=114 sc
Round 33 :
(17 sc, dec)*6=108 sc. Do not cut the yarn. Neatly stuff the space between 2 layers, not tightly.
Round 34 :
(16 sc, dec)*6=102 sc
Round 35 :
(15 sc, dec)*6=96 sc
Round 36 :
(14 sc, dec)*6=90 sc
Round 37 :
(13 sc, dec)*6=84 sc
Info :
Join together the upper edges of both layers and sc 84 through both of them.
Info :
Thread the needle. Starting from the bottom (approximately along the inc lines), drag the needle straight through the stitches to the top edge.
Info :
Slightly pull this thread and fasten at the top edge of the pumpkin. Make 6 such shaping lines.
— Witch hat roof :
Info :
Crochet the hat roof with black yarn. Use a piece of yarn of contrasting color as a marker for easier rounds counting.
Round 2 :
(1 sc, inc)*3=9 sc
Round 4 :
(2 sc, inc)*3=12 sc
Round 6 :
(3 sc, inc)*3=15 sc
Round 8 :
(4 sc, inc)*3=18 sc
Round 10 :
(5 sc, inc)*3=21 sc
Round 12 :
(6 sc, inc)*3=24 sc
Round 14 :
(7 sc, inc)*3=27 sc
Round 16 :
(8 sc, inc)*3=30 sc
Round 18 :
(9 sc, inc)*3=33 sc
Round 20 :
(10 sc, inc)*3=36 sc
Round 22 :
(11 sc, inc)*3=39 sc
Round 24 :
(12 sc, inc)*3=42 sc
Round 26 :
(13 sc, inc)*3=45 sc
Round 27 :
(14 sc, inc)*3=48 sc
Round 29 :
(15 sc, inc)*3=51 sc
Round 30 :
(16 sc, inc)*3=54 sc
Round 32 :
(17 sc, inc)*3=57 sc
Round 33 :
(18 sc, inc)*3=60 sc
Round 35 :
(19 sc, inc)*3=63 sc
Round 36 :
(20 sc, inc)*3=66 sc
Round 37 :
(21 sc, inc)*3=69 sc
Round 38 :
(22 sc, inc)*3=72 sc
Round 39 :
(23 sc, inc)*3=75 sc
Round 40 :
(24 sc, inc)*3=78 sc
Round 41 :
(25 sc, inc)*3=81 sc
Round 42 :
(26 sc, inc)*3=84 sc
Round 43 :
(27 sc, inc)*3=87 sc
Round 44 :
(28 sc, inc)*3=90 sc
Round 45 :
(29 sc, inc)*3=93 sc
Round 46 :
(30 sc, inc)*3=96 sc
Info :
Add a fishing line to crocheting, after melting its tip. 47-51. 5 rounds of 96 sc with the line.
Info :
Cut the line and fasten the end as when crocheting a pumpkin.
Round 52 :
Join new fishing line, work only this round through the front loops: (11 sc, inc)*8=104 sc
Round 53 :
(12 sc, inc)*8=112 sc
Round 54 :
(13 sc, inc)*8=120 sc
Round 55 :
(14 sc, inc)*8=128 sc
Round 56 :
(15 sc, inc)*8=136 sc
Round 57 :
(16 sc, inc)*8=144 sc
Round 58 :
(17 sc, inc)*8=152 sc
Round 59 :
(18 sc, inc)*8=160 sc
Round 60 :
(19 sc, inc)*8=168 sc
Round 61 :
(20 sc, inc)*8=176 sc. Cut and fasten the line.
Info :
Pull out the yarn marker. Thread black yarn into the needle and stitch the crown of the hat along the trail of the marking thread, starting from the fishing line up to the tip.
Info :
Pull the yarn to make the crown bend and fasten the end on the tip.
— Ribbon :
Info :
Crochet a ribbon with purple yarn. Chain 96, work back and forth rows with a turning ch: 95 sc *5 rows. Steam the finished ribbon with an iron.
Info :
Glue or sew the ribbon on that part of the crown which is crocheted with fishing line. The joint should be in the center of the intended front of the hat.
— Attic window :
Item Name (P1) :
Crochet the attic window with yellow yarn. Chain 11 and sc a rectangle 10 sc*7 rows. Cut the yarn.
Round 1 :
Join green yarn and sl st around all 4 sides.
Round 2 :
Sc around through the both loops of green sc. Crochet 3 sc in 1 st on angles.
Round 3 :
Sl st around. Leave a long end.
Info :
Thread the green yarn into the needle and stitch a cross frame on the window. Cut the yarn. Glue the finished window on the joint of the ribbon.
— Door :
Item Name (P1) :
Crochet door with purple yarn. Chain 11.
Round 1 :
9 sc, 3 sc in the last loop of the chain, 9 sc along the bottom side of the chain =21 sc
Round 2 :
9 sc, inc*3, 9 sc =24 sc (work in U-shaped turning rows with a turning loop at the beginning of the row)
Round 3 :
9 sc, (1 sc, inc)*3, 9 sc =27 sc
Round 4 :
9 sc, (2 sc, inc)*3, 9 sc =30 sc
Round 5 :
9 sc, (3 sc, inc)*3, 9 sc =33 sc
Round 6 :
9 sc, (4 sc, inc)*3, 9 sc =36 sc. Cut the yarn.
Round 7 :
Join light olive yarn. Sl st around except the bottom side of the door.
Round 8 :
Turn to the wrong side and sc through the both loops of the olive sl st: 9 sc, (5 sc, inc)*3, 9 sc =39 sc
Round 9 :
Turn to the front side and sl st around. Cut the yarn.
Info :
Make several stitches with yellow yarn for a door knob.
— Round windows :
Round 1 :
6 sc in AR (yellow)
Round 3 :
(1 sc, inc)*6=18 sc
Round 4 :
(2 sc, inc)*6=24 sc. Finish with a sl st, cut the yarn.
Round 5 :
Join green yarn and sl st around.
Round 6 :
sc through the both loops of the green sl st: (3 sc, inc)*6=30 sc
Round 7 :
sl st around. Leave a long end. Thread the green yarn into the needle and stitch a cross frame on the window. Cut the yarn. Make 2 pcs. Glue (or sew if you prefer) the door and then attach the windows on the sides of the door.
— Lanterns :
Round 1 :
6 sc in AR (yellow)
Round 3-5 :
3 rounds of 12 sc
Round 6 :
Dec every st until the opening closes. Stuff while crocheting.
Info :
Crochet 2 circles with brown yarn and leave one of them with a long end of the yarn: 1. 6 sc in AR 2. inc*6=12 sc. Glue the brown circles on the top and bottom of the lantern. Thread the end of the yarn into the needle and draw a line from one circle to another. Then go back, wrapping the yarn around this line several times, fasten. Make 4 such vertical lines at equal distances from each other. Make 2 lanterns. Glue lanterns on the sides of the door.
— Monster Cookies :
Cookie Round 1 :
Crochet with beige yarn: 1. 6 sc in AR
Cookie Round 2 :
inc*6=12 sc
Cookie Round 3 :
(1 sc, inc)*6=18 sc
Cookie Round 4 :
1 sc, inc, (2 sc, inc)*5, 1 sc =24 sc
Cookie Round 5 :
(3 sc, inc)*6=30 sc
Cookie Round 6 :
2 sc, inc, (4 sc, inc)*5, 2 sc =36 sc
Cookie Round 7 :
(5 sc, inc)*6=42 sc
Cookie Round 8 :
3 sc, inc, (6 sc, inc)*5, 3 sc =48 sc
Cookie Round 9 :
(7 sc, inc)*6=54 sc
Cookie Round 11 :
(7 sc, dec)*6=48 sc
Cookie Round 12 :
3 sc, dec, (6 sc, dec)*5, 3 sc =42 sc
Cookie Round 13 :
(5 sc, dec)*6=36 sc
Cookie Round 14 :
2 sc, dec, (4 sc, dec)*5, 2 sc =30 sc
Cookie Round 15 :
(3 sc, dec)*6=24 sc
Cookie Round 16 :
1 sc, dec, (2 sc, dec)*5, 1 sc =18 sc
Cookie Round 17 :
(1 sc, dec)*6=12 sc
Cookie Round 18 :
dec*6. Do not stuff! Leave a long end. Thread the needle and stitch through the center several times.
Icing :
Crochet icing with neon yellow: 1. 6 sc in AR 2. inc*6=12 sc 3. (1 sc, inc)*6=18 sc 4. 1 sc, inc, (2 sc, inc)*5, 1 sc=24 sc 5. (3 sc, inc)*6=30 sc 6. 2 sc, inc, (4 sc, inc)*5, 2 sc=36 sc 7. (5 sc, inc)*6=42 sc 8. 3 sc, inc, (6 sc, inc)*5, 3 sc=48 sc. Finish with a sl st, cut the yarn.
Eyes :
Crochet eyes with white yarn of 2 sizes: 2 rounds circle and 3 rounds. Crochet pupils with black yarn - 1 round circle. Glue eyes on the icing and embroider a smile with black yarn. Glue the finished face onto the cookie. You can make several pieces in any other color.
This Pumpkin House amigurumi is full of tiny, joyful details — a curving witch hat, glowing windows and tiny lanterns that bring Halloween charm to any shelf. Make the whole set for seasonal décor or as a whimsical handmade gift that sparks smiles. Enjoy the shaping tricks and creative finishing steps while you stitch! 🧡🎃🧶