🧢 Beautiful ✨ Detailed πŸ’ Adorable

Pride Rainbow Gnome Amigurumi Pattern

Pride Rainbow Gnome Amigurumi Pattern
4.4β˜… Rating
5-7 Hours Time Needed
1.5K Made This
βœ‚οΈ

Intermediate Level

Ideal for those with basic crochet experience, featuring slightly more advanced stitches and techniques to expand your skills.

⏱️

Weekend Treat

Takes 5-7 hours, making it an enjoyable project to finish over a couple of days.

🧸

Cute Companion

An adorable friend to cherish, handcrafted with love to bring comfort and joy for years to come.

About This Pride Rainbow Gnome Amigurumi Pattern

This pattern creates a tall Pride Rainbow Gnome featuring a long striped hat, colorful striped limbs, a fluffy yarn beard, and cozy boots. Youll enjoy changing colors often to build the rainbow effect and shaping the body to sit upright. The finished gnome stands about 17 inches (43 cm) tall using the materials noted and the recommended hook.

Pride Rainbow Gnome Amigurumi Pattern crochet pattern - detailed view of completed project

The design uses simple amigurumi construction with color changes and front loop techniques for attaching the hat. Photos are included for tricky steps like adding the cardboard base and assembling the beard.

Why You'll Love This Pride Rainbow Gnome Amigurumi Pattern

I absolutely love this pattern because it combines playful colorwork with classic amigurumi shaping to create a joyful finished piece. I enjoy the frequent color changes β€” they keep the crocheting fun and fast-paced. The hat and limbs have a whimsical, long-lined silhouette that is so satisfying to stitch and style. Making the beard from yarn pieces always feels like giving the gnome its personality, which is my favorite part of assembly.

Pride Rainbow Gnome Amigurumi Pattern step 1 - construction progress Pride Rainbow Gnome Amigurumi Pattern step 2 - assembly progress Pride Rainbow Gnome Amigurumi Pattern step 3 - details and accessories Pride Rainbow Gnome Amigurumi Pattern step 4 - final assembly and finishing

Switch Things Up

I love customizing this gnome by swapping color order for a unique stripe pattern; try pastel or neon palettes for different moods.

I sometimes make a miniature version by using fingering weight yarn with a smaller hook for tiny keychain gnomes.

I also enjoy using bulky yarn and a larger hook to create a chunky, squishy gnome that feels like a plush toy.

I change the beard style oftenβ€”longer yarn strands give a wild look while shorter strands create a tidy beard.

I will occasionally embroider small motifs or initials on the hat to personalize it for gifts or special events.

I have added tiny felt patches or buttons to the body as decorative accents that add charm and texture.

I sometimes add wire inside the hat or limbs to make the hat posable or to give the gnome a playful bend in its posture.

I recommend experimenting with different cardboard shapes in the base to change how the gnome sitsβ€”oval bases can tilt the body slightly forward.

I enjoy mixing yarn textures like a fuzzy mohair beard with a smooth acrylic body to emphasize contrast in the finished piece.

I often create sets by making matching mini gnomes in complementary colorways for themed decorations or gifts.

Common Mistakes & How to Fix Them

βœ— Not changing colors cleanly at the end of a round causes visible jogs; fasten off and weave in ends or use a continuous color change technique to keep stripes tidy. βœ— Forgetting to cut and insert the cardboard for the body bottom makes the gnome unable to sit flat; cut a cardboard circle to size at round 8 and insert it before stuffing. βœ— Skipping the BLO rounds for the hat attachment area will make sewing the hat awkward; work the specified back or front loop only rounds so you have loops to sew into. βœ— Understuffing or overstuffing the body leads to an unstable shape; stuff gradually, check the shape often, and stop when the body feels firm but slightly compressible.

Pride Rainbow Gnome Amigurumi Pattern

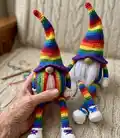
Make a joyful Pride Rainbow Gnome with this complete crochet pattern. Youll work bright color changes to create a tall, whimsical gnome with hat, beard, arms and boots. The pattern includes materials, abbreviations, step-by-step rounds and assembly instructions so you can finish a charming handmade gift.

Intermediate 5-7 Hours

Materials Needed for Pride Rainbow Gnome Amigurumi Pattern

β€” Main Fabric

  • 01
    Yarn (I used Red Heart Super Saver) - purple
  • 02
    Yarn (I used Red Heart Super Saver) - blue
  • 03
    Yarn (I used Red Heart Super Saver) - green
  • 04
    Yarn (I used Red Heart Super Saver) - yellow
  • 05
    Yarn (I used Red Heart Super Saver) - orange
  • 06
    Yarn (I used Red Heart Super Saver) - red
  • 07
    Yarn (I used Red Heart Super Saver) - white or beige

β€” Tools Required

  • 01
    Crochet hook - I used C/2 - 2.75 mm
  • 02
    Tapestry needle
  • 03
    Stuffing (I used Premium Polyester Fiber Fill)
  • 04
    Scissors
  • 05
    Piece of cardboard (for the bottom of the body to make it flat)

Progress Tracker

0% Complete

β€” Hat :

Round 27 :

sc in each st (30)

Round 28 :

(9 sc, 1 inc) x 3 (33)

Info :

Change to yellow.

Round 29 :

sc in each st (33)

Round 30 :

(10 sc, 1 inc) x 3 (36)

Info :

Change to green.

Round 31 :

(11 sc, 1 inc) x 3 (39)

Round 32 :

(12 sc, 1 inc) x 3 (42)

Info :

Change to blue.

Round 33 :

(13 sc, 1 inc) x 3 (45)

Round 34 :

(14 sc, 1 inc) x 3 (48)

Info :

Change to purple.

Round 35 :

FLO (7 sc, 1 inc) x 6 (54)

Round 36 :

(8 sc, 1 inc) x 6 (60)

Round 37-38 :

sc in each st around (60)

Round 39 :

crab stitch (reverse single crochet) in each st around (60) (see pictures 1-8) - Optional (you can do single crochet in each stitch around (60)).

Info :

Slip stitch in next stitch, fasten off, cut yarn.

β€” Body :

Info :

Start crocheting the body from the bottom with blue yarn.

Round 1 :

6 sc in magic circle (6)

Round 2 :

inc x 6 (12)

Round 3 :

(1 sc, 1 inc) x 6 (18)

Round 4 :

(2 sc, 1 inc) x 6 (24)

Round 5 :

(3 sc, 1 inc) x 6 (30)

Round 6 :

(4 sc, 1 inc) x 6 (36)

Round 7 :

(5 sc, 1 inc) x 6 (42)

Round 8 :

(6 sc, 1 inc) x 6 (48) (Cut out circle of cardboard to the size of your work). (see picture 9).

Round 9 :

BLO sc in each st (48)

Round 10 - 24 :

sc in each st (48)

Info :

Change to beige color. Insert cardboard. (see picture 10)

Round 25 :

BLO (6 sc, 1 dec) x 6 (42) (We're going to use front loops to sew hat to the body).

Round 26 :

(5 sc, 1 dec) x 6 (36)

Round 27 :

(4 sc, 1 dec) x 6 (30)

Round 28 :

(3 sc, 1 dec) x 6 (24)

Round 29 :

(2 sc, 1 dec) x 6 (18) - stuff body (see picture 11)

Round 30 :

(1 sc, 1 dec) x 6 (12)

Round 31 :

(1 dec) x 6 (6)

Info :

Fasten off, cut yarn, weave in yarn. (see picture 12)

β€” Nose :

Info :

Start crocheting with beige yarn.

Round 1 :

6 sc in magic circle (6)

Round 2 :

(sc, 1 inc) x 3 (9)

Round 3 :

(2 sc, 1 inc) x 3 (12)

Round 4 :

sc in each st around (12)

Round 5 :

(2 sc, 1 dec) x 3 (9)

Info :

Fasten off, cut yarn (leave long enough yarn to sew nose to body).

β€” Arm (make 2) :

Info :

Start crocheting the hand with white yarn.

Round 1 :

6 sc in magic circle (6)

Round 2 :

(1 sc, 1 inc) x 3 (9)

Round 3 :

(2 sc, 1 inc) x 3 (12)

Round 4 :

sc in each st (12)

Round 5 :

(2 sc, 1 dec) x 3 (9)

Info :

Change to purple. (Don't cut white yarn, leave it in front of work - see pictures 13-17).

Round 6 :

BLO (1 sc, 1 dec) x 3 (6)

Round 7 :

sc in each st (6)

Info :

Change to blue.

Round 8-9 :

sc in each st (6)

Info :

Change to green.

Round 10-11 :

sc in each st (6)

Info :

Change to yellow.

Round 12-13 :

sc in each st (6)

Info :

Change to orange.

Round 14-15 :

sc in each st (6)

Info :

Change to red.

Round 16 :

sc in each st (6)

Info :

Fold in half and crochet the edges together (3 sc). (see pictures 18-21).

Info :

Fasten off, cut yarn (leave long enough yarn for sewing arm to body). Go back to round 5.

Item Name (Cuff) :

Chain 1 with white yarn that was left in front of work through the first front loop holding leg upside down. Rnd 1: sc in first loop (same loop you did the chain), (1 inc, 1 sc) x 4, 1 inc, 1 sc (16) (see pictures 22-24). Slip stitch in next stitch, fasten off, cut yarn, weave in yarn.

β€” Leg (make 2) :

Info :

Start crocheting the boot with white yarn. Chain 5.

Round 1 :

sc in 2. stitch from hook, 2 sc, 3 sc in last stitch, 2 sc, 2 sc in last st (10) (see pictures below on next page for Rnd 1-3)

Round 2 :

3 sc, 1 inc, 3 hdc in next st, 1 inc, 3 sc, 3 sc in last st (16) (see picture below)

Round 3 :

5 sc, 1 inc, 1 hdc inc (2 hdc in same st), 1 hdc inc, 1 inc, 5 sc, 2 inc (22) (see picture below)

Round 4 :

BLO sc in each st (22)

Round 5 :

sc in each st (22)

Round 6 :

5 sc, 4 dec, 9 sc (18)

Round 7 :

4 sc, 3 dec, 8 sc (15)

Round 8 :

4 sc, 2 dec, 5 sc, 1 dec (12)

Round 9 :

sc in each st (12)

Round 10 :

(sc, 1 dec) x 4 (8)

Info :

Stuff boot. Change to purple. (Don't cut white yarn, leave it in front of work). (see pictures 13-17 for arm)

Round 11 :

BLO sc in each st (8)

Round 12 :

sc in each st (8)

Info :

Change to blue.

Round 13-14 :

sc in each st (8)

Info :

Change to green.

Round 15-16 :

sc in each st (8)

Info :

Change to yellow.

Round 17-18 :

sc in each st (8)

Info :

Change to orange.

Round 19-20 :

sc in each st (8)

Info :

Change to red.

Round 21-22 :

sc in each st (8)

Info :

Change to purple.

Round 23-24 :

sc in each st (8)

Info :

Change to blue.

Round 25-26 :

sc in each st (8)

Info :

Change to green.

Round 27-28 :

sc in each st (8)

Info :

Change to yellow.

Round 29-30 :

sc in each st (8)

Info :

Change to orange.

Round 31-32 :

sc in each st (8)

Info :

Change to red.

Round 33 :

sc in each st (8)

Info :

Fold in half and crochet the edges together (4 sc). (see pictures 18-21 for arm)

Info :

Fasten off, cut yarn (leave long enough yarn for sewing leg to body). Go back to round 11.

Item Name (Cuff) :

Chain 1 with white yarn that was left in front of work through the first front loop holding leg upside down. Rnd 1: 2 sc in first loop (same loop you did the chain), 7 inc (2 sc in each st around (16) (see pictures 22-23 for arm). Slip stitch in next stitch, fasten off, cut yarn, weave in yarn.

β€” Assembly and decoration :

Info :

Sew nose on body.

Info :

Sew hands on both sides of body (approx. 5 stitches from nose on each side).

Info :

Sew hat on body.

Info :

Sew legs to the bottom of the body. Add shoe laces.

Info :

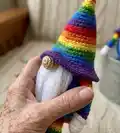
Beard: cut about 15 pieces of yarn about 10 inches long. Tie yarn pieces on both sides of the nose (about 4 on each side) and under the nose (about 6-7 pieces). Separate yarn threads and comb with a brush.

Info :

Sew on any decorations you'd like to (buttons, embellishments, etc.).

Assembly Instructions

  • Sew nose on body in center front and secure with small stitches so it sits slightly over the beard area.
  • Sew hands on both sides of the body approximately 5 stitches from the nose on each side, angling slightly downward for a natural pose.
  • Sew hat onto the top of the body using the front loops from rounds 25-26 as anchor points for a secure attachment.
  • Sew legs to the bottom of the body evenly spaced for stability, then add shoe laces to boots to finish the look.
  • Create the beard by cutting about 15 yarn pieces about 10 inches long; tie yarn pieces to both sides of the nose (about 4 each side) and under the nose (about 6-7) then comb out.

Important Notes

  • πŸ’‘Cut a cardboard circle to fit the inside bottom at round 8 and insert it before stuffing so the gnome will sit flat.
  • πŸ’‘Leave long yarn tails when fastening off pieces so you have enough length to sew parts together securely.
  • πŸ’‘Work the BLO and FLO rounds as directed so you have the correct loops available for sewing the hat and attaching cuffs.

This Pride Rainbow Gnome pattern brings bright color and playful charm to your crochet projects. Its tall hat, striped limbs, and fluffy beard make it a joyful display piece or a heartfelt handmade gift. Enjoy stitching the rainbow and personalizing details for a truly unique creation. 🧢🌈✨

You ask,

we answer.

FAQs

What size will the finished piece be?

The finished gnome measures approximately 17 inches (43 cm) tall when using the recommended yarn and 2.75 mm hook.

Can I use different yarn weights for this pattern?

Yes, you can use different yarn weights but the finished size will change; choose an appropriate hook size for your yarn and expect a different scale.

Do I need prior crochet experience for this pattern?

This pattern is rated intermediate, so basic knowledge of single crochet, increases, decreases and working in the round is recommended.

How long does this project typically take to complete?

Most crocheters complete this project in 5-7 hours, though time may vary based on experience level and how many color changes you work.