🧢 Beautiful ✨ Detailed πŸ’ Adorable

Positive Potato Amigurumi Pattern

Positive Potato Amigurumi Pattern
4.3β˜… Rating
2-3 Hours Time Needed
1.5K Made This
βœ‚οΈ

Beginner Friendly Level

Perfect for those just starting their crochet journey, with clear instructions and simple techniques

⏱️

Bite-Sized Project

Finishes in 2-4 hoursβ€”perfect for an afternoon of creative relaxation.

🎁

Tiny Treasure

Small, sweet, and gift-worthy creations that fit perfectly in the palm of your hand with detailed charm.

About This Positive Potato Amigurumi Pattern

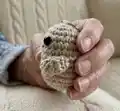
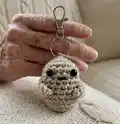
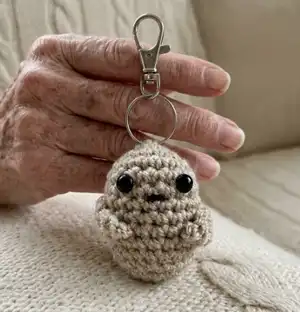
This pattern teaches you how to crochet a tiny Positive Potato amigurumi keychain about 7 cm tall. It uses simple DC (US SC) stitches worked in the round, plus small sewn arms and a printed saying to attach. Ideal as a classroom reward, pocket gift, or tiny handmade present.

Positive Potato Amigurumi Pattern crochet pattern - detailed view of completed project

The design is quick and beginner-friendly, letting you make multiples in one session. Step-by-step rounds, arm instructions and assembly notes are included for straightforward finishing.

Why You'll Love This Positive Potato Amigurumi Pattern

I absolutely love this pattern because it is quick to make and makes a delightful little gift that brightens someone's day. I enjoy how small changes like eye placement or embroidered mouths instantly change the personality of each potato. The printed sayings add a sweet personal touch that kids and adults both adore. Making a set of these is addictive and perfect for using up small amounts of yarn.

Positive Potato Amigurumi Pattern step 1 - construction progress Positive Potato Amigurumi Pattern step 2 - assembly progress Positive Potato Amigurumi Pattern step 3 - details and accessories Positive Potato Amigurumi Pattern step 4 - final assembly and finishing

Switch Things Up

I love changing up the colours to make a whole family of potatoes; try pastel tones for a soft look or bright colours for playful versions.

I often swap safety eyes for embroidered eyes to make them safer for small children and to give a softer appearance.

To make a larger potato, I use a bulkier yarn and a larger hook and add more rounds for a chunkier, cuddlier result.

I like to add tiny accessories like a crocheted hat or bow to give each potato its own personality.

I sometimes embroider tiny freckles or blush with a light touch of fabric-safe marker to add character.

For portability, replace the printed saying with a small crocheted sign or felt tag sewn into the arms.

I like to experiment with eye placement and mouth styles to change expressions from surprised to sleepy to smiling.

Consider adding a small bell or jingle bead inside for a fun sensory keychain version suitable for older children.

Make a set using different sayings and package them as encouraging gift packs for classmates or coworkers.

I also enjoy turning this into magnets by sewing a small magnet into the base instead of adding a keyring for fridge decorations.

Common Mistakes & How to Fix Them

βœ— Skipping the place marker will make counting rounds difficult; place a marker at the start of every round and move it after you complete each round to maintain accurate stitch counts. βœ— Forgetting to place the safety eyes before closing decreases placement options; insert and secure the eyes between rows 5 and 6 with three stitches between them before stuffing more. βœ— Overstuffing the potato can distort the shape and make sewing the final stitches hard; stuff gradually and top up only until the shape is full but still soft enough to shape. βœ— Not leaving long yarn ends for arms and finishing means you cannot sew them in securely; always leave a long end when finishing arms so you can stitch them firmly in place.

Positive Potato Amigurumi Pattern

Create a tiny, charming Positive Potato keychain that spreads smiles. This quick and simple crochet pattern uses DK/8ply yarn and a 3.5mm hook to make a 7 cm potato with cute arms, safety eyes and a printable encouraging 'saying'. Perfect for gifts, classroom prizes, or a pocket-sized pick-me-up.

Beginner Friendly 2-3 Hours

Materials Needed for Positive Potato Amigurumi Pattern

β€” Main Fabric

  • 01
    20g 8ply (DK) yarn in beige or any potato-coloured yarn (any yarn and crochet hook can be used as size is unimportant)
  • 02
    Black yarn to embroider mouth (small amount)
  • 03
    Stuffing - small amount to fill a 7 cm amigurumi
  • 04
    2 x 8mm safety eyes (embroider if making for a child under 3)
  • 05
    Printed paper 'sayings' sheet (print and cut multiple sayings) and adhesive tape to strengthen

β€” Tools Required

  • 01
    Crochet hook size 3.5mm (UK 9, US 4)
  • 02
    Safety eyes 8mm (2 pieces)
  • 03
    Scissors
  • 04
    Yarn needle for sewing and weaving ends
  • 05
    Stitch marker
  • 06
    Pins for assembly and positioning
  • 07
    Sticky tape (to strengthen printed sayings)
  • 08
    Small clip or clasp or keyring chain for attaching to backpacks (optional)
  • 09
    Printer and paper to print sayings

Progress Tracker

0% Complete

β€” Body :

Round 1 :

With 3.5 hook and 8ply yarn, 6dc into magic circle (6)

Round 2 :

2dc in each around, (12), PM and move after every round

Round 3 :

(dc, 2dc) around, (18)

Round 4-8 :

dc around, (5 rounds)

Info :

Place eyes between rows 5 and 6 with 3 sts in between.

Round 9 :

(dc 5, 2dc) around, (21)

Round 10 :

dc around, (21)

Round 11 :

(dc 6, 2dc) around, (24)

Round 12 :

dc around, (24)

Round 13 :

(dc 6, dc dec) around, (21)

Round 14 :

(dc 5, dc dec) around, (18)

Round 15 :

(dc, dc dec) around, (12)

Info :

Stuff potato

Round 16 :

(dc dec) around, (6), top up stuffing, cut yarn and thread through the last 6sts and pull up tight, FO

β€” Arms/hand :

Arms/hand (P1) :

Make 2. Leaving a long end, ch 3, turn. 1. dc in 2nd ch from hook, dc, (2), turn. 2. ch 1, dc 2 (rows 3-4). 3. dc dec, FO leaving a long end of yarn.

Info :

Print the sheet of 'sayings'. Cut out your chosen 'saying' leaving a margin on each side. Place a piece of sticky tape across the 'saying' to strengthen it.

β€” Assembly :

Info :

Centre the 'saying' on the body of the potato, place the arms on each side so that the hands are on the margin of the 'saying'. Pin the arms in place and using the long yarn end, stitch firmly across the end.

Info :

Using the long end of yarn, at the hand end, and holding the 'saying' in place, push the needle through the 'saying' in the middle of the margin, secure the end firmly by weaving through the body.

Info :

Make a mouth using black yarn by embroidering a small line between the eyes.

Info :

Attach a clasp or keyring chain, (optional)

Assembly Instructions

  • Centre the printed and taped 'saying' on the body of the potato and pin it in place before sewing to ensure correct placement.
  • Position the two arms on either side of the 'saying' so the hands rest on the saying margin, then stitch each arm firmly using the long yarn end left when finishing the arm.
  • Using the long yarn tail at the hand, push the needle through the middle of the saying margin and weave the yarn through the body to secure the saying permanently.
  • Embroider a small mouth with black yarn centered between the eyes for expression.
  • Attach a small clip, clasp or keyring through the top loop or secure to the top of the potato for a keychain (optional).

Important Notes

  • πŸ’‘Place safety eyes between rows 5 and 6 with three stitches separating them for correct facial proportions.
  • πŸ’‘If making for a young child under 3, replace safety eyes with embroidered eyes for safety.
  • πŸ’‘Leave long yarn ends when finishing the arms so you have enough length to sew them to the body securely.
  • πŸ’‘Top up stuffing gradually and avoid overstuffing which can distort the potato shape.

This tiny Positive Potato is perfect for gifting, classroom rewards, or a small handmade pick-me-up. Create a stack of encouraging keychains and spread smiles wherever you go. Make them for friends, students, or keep a few in your bag for instant cheer. πŸ₯”βœ¨

You ask,

we answer.

FAQs

What size will the finished piece be?

The finished amigurumi measures approximately 7 cm (2.75") tall when using the recommended 8ply/DK yarn and a 3.5mm hook.

Can I use different yarn weights for this pattern?

Yes, you can use different yarn weights but the final size will change; use an appropriate hook size to match the yarn and adjust stuffing accordingly.

Do I need prior crochet experience for this pattern?

This pattern is beginner friendly, but you should be comfortable working in the round, using single crochet (DC in UK terms) and basic increases and decreases.

How long does this project typically take to complete?

Most crocheters complete a single Positive Potato in around 2-3 hours, though time may vary depending on experience and finishing details.