🧢 Beautiful ✨ Detailed πŸ’ Adorable

Pokeball Amigurumi Pattern

Pokeball Amigurumi Pattern
3.9β˜… Rating
2-3 Hours Time Needed
1.4K Made This
βœ‚οΈ

Intermediate Level

Ideal for those with basic crochet experience, featuring slightly more advanced stitches and techniques to expand your skills.

⏱️

Bite-Sized Project

Finishes in 2-4 hoursβ€”perfect for an afternoon of creative relaxation.

🎁

Tiny Treasure

Small, sweet, and gift-worthy creations that fit perfectly in the palm of your hand with detailed charm.

About This Pokeball Amigurumi Pattern

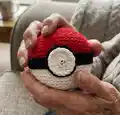
This pattern creates a handmade Pokeball amigurumi using worsted weight yarn and simple amigurumi techniques. It features a two-color body, a black felt band, and a crocheted white button for authentic detail. The rounds are written out clearly so you can follow each step easily to shape the ball.

Pokeball Amigurumi Pattern crochet pattern - detailed view of completed project

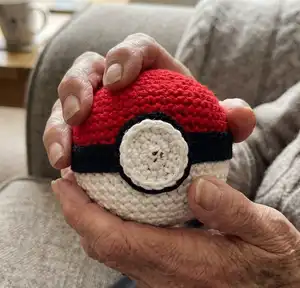
Includes a materials list, abbreviation guide, and full round-by-round instructions. Finish with felt and glue to achieve the classic Pokeball look.

Why You'll Love This Pokeball Amigurumi Pattern

I absolutely love this pattern because it is a quick and satisfying make that still looks impressively neat. I enjoy the color change band and the tiny crocheted button which gives the Pokeball its character. I also love that it doesn't take long to complete, so you can make a few as gifts or keep one for display. The shaping is straightforward but yields a very polished round shape that I am proud to show off. I hope you enjoy making it as much as I do!

Pokeball Amigurumi Pattern step 1 - construction progress Pokeball Amigurumi Pattern step 2 - assembly progress Pokeball Amigurumi Pattern step 3 - details and accessories Pokeball Amigurumi Pattern step 4 - final assembly and finishing

Switch Things Up

I often change the color palette to make custom versions; try pastels or team colors for a fun twist.

I like to make keychain versions by using thinner yarn and a smaller hook to create miniature Pokeballs.

I sometimes add a decorative embroidered line around the felt band instead of gluing for a stitched look.

I recommend experimenting with yarn weight: bulky yarn produces a squishier, larger ball while sport weight makes a tiny collectible.

I sometimes sew the felt band instead of gluing it to create a removable accessory that can be washed.

I like to add a metal keyring or cord loop at the top if I make these as bag charms or zipper pulls.

I enjoy customizing the button by adding tiny beads or a contrasting round of yarn for extra detail.

I sometimes stuff a little more firmly when I want a very round, display-ready ball, or a bit less for a softer, squishier toy.

I also try decorative surface crochet stitches on the white section to add texture and make a unique version.

I encourage you to combine techniques: change colors earlier or later to make different stripe widths and play with scale to create a whole Pokeball family.

Common Mistakes & How to Fix Them

βœ— Skipping the magic ring step can create a hole in the center that is hard to close; always start with a tight magic ring and pull it closed before continuing. βœ— Switching colors without securing ends can lead to loose loops showing through; weave in your starting tails and secure color changes carefully before stuffing. βœ— Using a hook that is too large will leave gaps where stuffing shows through; use a tight gauge and smaller hook if necessary to hide the stuffing. βœ— Not stuffing gradually results in lumps or uneven shape; add stuffing in small amounts and shape as you go to keep a smooth surface.

Pokeball Amigurumi Pattern

Make a charming Pokeball amigurumi you can gift or display. This pattern walks you through every round and assembly step so you can crochet a neat two-color ball with a center button and felt band. Perfect for fans and crafters who enjoy quick, satisfying projects. Follow the rounds exactly for a polished, professional finish.

Intermediate 2-3 Hours

Materials Needed for Pokeball Amigurumi Pattern

β€” Main Fabric

  • 01
    Worsted weight yarn - Vanna's Choice in Black (as needed)
  • 02
    Worsted weight yarn - Vanna's Choice in White (as needed)
  • 03
    Worsted weight yarn - Vanna's Choice in Cranberry (as needed)

β€” Tools Required

  • 01
    Crochet hook size D/3.25 mm
  • 02
    Polyester fiberfill stuffing
  • 03
    Black felt sheet
  • 04
    Darning needle
  • 05
    Scissors
  • 06
    Hot glue (for felt attachment)

Progress Tracker

0% Complete

β€” Base :

Info :

Diagram shows rounds worked in continuous rounds; oval = CH (chain). X = SC (single crochet). V symbol = increase 2 in 1 stitch.

β€” Head :

Info :

Create a "magic ring" using "cranberry" yarn

Round 1 :

[SC] x6 inside ring and tighten loop (6)

Round 2 :

[INC] x6 (12)

Round 3 :

[SC, INC] x6 (18)

Round 4 :

[SC2, INC] x6 (24)

Round 5 :

[SC3, INC] x6 (30)

Round 6 :

[SC4, INC] x6 (36)

Round 7 :

[SC5, INC] x6 (42)

Round 8 :

[SC6, INC] x6 (48)

Round 9 :

[SC7, INC] x6 (54)

Round 10-14 :

[SC] around (54)

Info :

* I cut a long inch wide band of black felt and cover where these two colors meet. I then also cut a small felt circle for behind the button and I use hot glue to attach both of these to the amigurumi.

Round 15-19 :

With white yarn, [SC] around (54)

Round 20 :

[SC7, DEC] x6 (48)

Round 21 :

[SC6, DEC] x6 (42)

Round 22 :

[SC5, DEC] x6 (36)

Round 23 :

[SC4, DEC] x6 (30)

Round 24 :

[SC3, DEC] x6 (24)

Round 25 :

[SC2, DEC] x6 (18)

Round 26 :

[SC1, DEC] x6 (12)

Round 27 :

[DEC] x6 (6)

Info :

Slip stitch off, and make sure you leave enough yarn to sew into last 6 stitches. Weave in tails

β€” Button :

Info :

Create a "magic ring" using White yarn

Round 1 :

[SC] x6 inside ring and tighten loop. (6)

Round 2 :

[INC] x6 (12)

Round 3 :

[SC1, INC] x6 (18)

Round 4 :

[SC2, INC] x6 (24)

Round 5 :

[SC3, INC] x6 (30)

Info :

Sl st. and attach to front of ball.

Assembly Instructions

  • Attach the small crocheted white button to the front center of the ball using a slip stitch and then secure with a few stitches, covering the seam with the felt circle behind it.
  • Cut a long one-inch wide band from the black felt and wrap it around the ball where the red and white colors meet, then glue securely with hot glue.
  • Position the button over the felt band and glue or sew through the felt circle to secure both the button and felt to the amigurumi.
  • When closing the final rounds, leave a long tail and sew through the last 6 stitches to fully close the opening, then weave in all yarn ends.
  • Pin the felt band in place before gluing to ensure even placement around the circumference of the ball.

Important Notes

  • πŸ’‘Hook size is less important than maintaining tight stitches so stuffing does not show through the stitches.
  • πŸ’‘Stuff the ball firmly but in small increments to avoid lumps and achieve a smooth round shape.
  • πŸ’‘Leave a long tail when finishing the final rounds so you can sew the last stitches closed securely.
  • πŸ’‘Use hot glue carefully when attaching felt and avoid getting glue on the yarn surface where visible.

This Pokeball amigurumi pattern is a fun, quick project that makes a cute gift or display piece. It combines simple shaping with a bold color-change and felt details for a polished finish. Try making a set in different sizes for a playful collection! 🎁🧢✨

You ask,

we answer.

FAQs

What size will the finished piece be?

The finished amigurumi measures roughly the size of a small hand-held ball depending on your tension and yarn; using worsted weight yarn with a 3.25 mm hook yields a compact ball about 8-10 cm across.

Can I use different yarn weights for this pattern?

Yes, you can use different yarn weights, but this will change the final size; choose an appropriate hook size for the yarn and expect a smaller result with thinner yarn and a larger, fluffier ball with bulky yarn.

Do I need prior crochet experience for this pattern?

This pattern is rated intermediate because it uses continuous round shaping and color changes; basic knowledge of magic ring, single crochet, increases and decreases is recommended.

How should I attach the felt band and button?

Cut a one-inch black felt band and a small felt circle, wrap the band around the ball at the color change and secure with hot glue, then place the felt circle behind the crocheted button and glue or sew the button to the front.