🧶 Beautiful ✨ Detailed 💝 Adorable

Planter Crochet Pattern

Planter Crochet Pattern
4.5★ Rating
5-7 Hours Time Needed
3.4K Made This
✂️

Intermediate Level

Ideal for those with basic crochet experience, featuring slightly more advanced stitches and techniques to expand your skills.

⏱️

Weekend Treat

Takes 5-7 hours, making it an enjoyable project to finish over a couple of days.

🧸

Cute Companion

An adorable friend to cherish, handcrafted with love to bring comfort and joy for years to come.

About This Planter Crochet Pattern

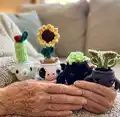
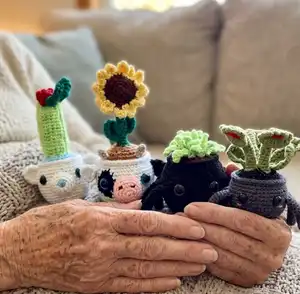
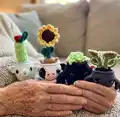
This pattern creates a set of small amigurumi planters with removable or sewn-in plants including succulents, a sunflower, cactus, and a venus fly trap. Each planter is constructed from the bottom up with clear round-by-round instructions and optional no-sew methods for legs and stems. You will learn how to shape tiny ears, noses, leaves, and decorative dirt textures.

Planter Crochet Pattern crochet pattern - detailed view of completed project

Perfect for making a small collection of whimsical planters or customizing singular characters. Includes material lists, abbreviations, assembly photos, and detailed finishing notes for professional-looking results.

Why You'll Love This Planter Crochet Pattern

I absolutely love this pattern because it combines simple amigurumi techniques with playful, characterful details that bring every planter to life. I enjoy designing small pieces that are customizable so you can change colors, eyes, and plants to create different personalities. The variety of plants included—sunflower, cactus, succulents, venus fly trap, and berries—keeps the project fun and varied. I also appreciate that the pattern gives options for a no-sew spider version, which makes construction flexible for different skill preferences.

Planter Crochet Pattern step 1 - construction progress Planter Crochet Pattern step 2 - assembly progress Planter Crochet Pattern step 3 - details and accessories Planter Crochet Pattern step 4 - final assembly and finishing

Switch Things Up

I love how easy it is to customize these planters by swapping yarn colors and eye sizes to create very different personalities.

I often change the plant type or color to match seasons—try pastel greens and yellows for spring or deep, moody tones for fall.

To make a mini keychain version, use fingering weight yarn and a smaller hook, adjusting safety eye size or embroidering eyes instead.

I sometimes add wire or pipe cleaners inside stems or legs to make them posable; it gives the piece a playful, floppable look.

If you want a sturdier display piece, insert a short wooden dowel into the stem and anchor it in the pot before sewing closed.

Try embroidering freckles, eyelashes, or tiny hearts on the pots to add character and express different moods.

Make a matching set with coordinated colors and different plants for a shelf display or gift set—each one can have a unique face or nose color.

I also like to swap safety eyes for embroidered eyes on plush or baby-safe versions to keep them soft and washable.

For a textured look, use boucle or chenille yarn for the dirt or plant base; it creates a fluffy, realistic soil texture that looks great with succulents.

Experiment with different stitch patterns in the pot (like alternating BLO/FLO rows) to add subtle ridges or decorative bands around the pot body.

Common Mistakes & How to Fix Them

✗ Skipping the stitch marker when working in a continuous spiral causes you to lose track of rounds; place a marker at the start of each round and move it up as you work. ✗ Forgetting to count stitches after increases leads to an incorrect stitch count which affects shaping; count your stitches at the end of each round to confirm accuracy. ✗ Overstuffing the pot or plant bases can distort the shape and make sewing difficult; stuff gradually and keep a firm but not overly tight fill for best results. ✗ Not securing color changes properly will make seams and gaps visible; fasten off carefully and weave in ends or carry color neatly when switching yarns. ✗ Skipping placement notes for eyes results in misaligned features; place safety eyes between the specified rounds and spaces indicated to ensure correct positioning.

Planter Crochet Pattern

Create a collection of adorable crocheted planters with charming faces and a variety of plants. This pattern includes detailed instructions for pots, leaves, flowers, succulents, stems, and character details so you can customize each planter. Perfect for making gifts or a small display of handmade décor, these planters bring personality to any shelf or desk.

Intermediate 5-7 Hours

Materials Needed for Planter Crochet Pattern

— Main Fabric

  • 01
    Worsted weight yarn (#4), approximately 75g of main color
  • 02
    Accent colors: approximately 25g for spots, noses, and details
  • 03
    Bulky weight yarn for plush versions (optional) - adjust hook size accordingly
  • 04
    Colors vary depending on planter (brown for dirt, green for stems and leaves, yellow and brown for sunflower, pink for cow nose, white/black for cow/polar bear bodies)

— Tools Required

  • 01
    Crochet hook size 3.25 mm (D) - recommended for worsted weight
  • 02
    Crochet hook size 3.75 mm (F) - recommended for bulky yarn (optional)
  • 03
    Safety eyes: 16 mm for worsted, 21 mm for bulky spider, 24 mm for cow, 20 mm for polar bear
  • 04
    Scissors
  • 05
    Yarn needle for sewing
  • 06
    Stitch markers
  • 07
    Polyester fiberfill stuffing
  • 08
    Pins for assembly and blocking pieces
  • 09
    Wooden dowel or cake dowel (optional) for stems
  • 10
    Pipe cleaners (optional) for shaping legs or stems

Progress Tracker

0% Complete

— Pot :

Info :

Crocheted from bottom to top For the spider, if you want to attach the legs as you work, make the legs first(pg. 4). The cow color changes are located below.

With Pot Color Round 1 :

Make 8 sc into a magic ring= 8

Round 2 :

Increase in each st around= 16

Round 3 :

(sc, inc) x 8= 24

Round 4 :

(3 sc, inc) x 6= 30

Round 5 :

(4 sc, inc) x 6= 36

Round 6 :

BLO sc in each st around

Round 7 :

sc in each st around

Round 8 :

(5 sc, inc) x 6= 42

Round 9 :

sc in each st around

Round 10 :

(6 sc, inc) x 6= 48

Info :

*for the spider, The no sew version: Round 14: 2 sc, (work 3 sc on the leg and pot, sc) x 4, 11 sc, (work 3 sc on the leg and pot, sc) x 4, 3 sc

Rounds 11-16 :

sc in each st around

Info :

For spiders: Place eyes between rounds 14 and 15, leaving 8 holes apart For Cow: Place eyes between rounds 14 and 15, leaving 10 holes apart For Polar Bear: Place eyes between rounds 14 and 15, leaving 10 holes apart

Round 17 :

(6 sc, dec) x 6= 42

Round 18 :

(5 sc, dec) x 6= 36

Round 19 :

sc in each st around

Round 20 :

FLO ch 1, hdc in each st around

Info :

F/O

— Cow Pot :

Round 12 :

White: 20 sc, Black: 3 sc, White: 25 sc

Round 13 :

White: 19 sc, Black: 7 sc, White: 22 sc

Round 14 :

White: 19 sc, Black: 7 sc, White: 22 sc

Round 15 :

White: 19 sc, Black: 6 sc, White: 23 sc

Round 16 :

White: 20 sc, Black: 5 sc, White: 23 sc

Round 17 :

White: (6 sc, dec) x 2, 5 sc, Black: sc, dec, White: (6 sc, dec) x 3= 42

— Spider Legs (Make 8) :

Round 1 :

Make 7 sc into a magic ring= 7

Rounds 2-12 :

sc in each st around

Info :

Do not stuff the legs (if you want, add a pipe cleaner into the legs for some shaping) Fold the legs in half and sc the opening closed. F/O and leave a long tail for sewing if you did not want to make the no sew version

— Polar Bear Ears (Make 2) :

With White Round 1 :

Make 6 sc into a magic ring- 6

Round 2 :

Increase in each st around= 12

Round 3 :

(sc, inc) x 6= 18

Round 4 :

sc in each st around

Round 5 :

(sc, dec) x 6= 12

Info :

Do not stuff the ears. Fold the ears in half and sc the opening closed. F/O and leave a long tail for sewing

— Dirt on Pot :

Info :

Attach dirt colored yarn to back loops of round 20

Round 1 :

(4 sc, dec) x 6= 30

Note :

*for the cow the round will make the horns:

Detail :

1. Dirt color: 4 sc, dec, 3 sc, Horn Color: Ch 4, inc3 in 2nd ch from hook, hdc in next ch, dc in next ch, Dirt Color: sc, dec, 4 sc, dec, 2 sc, Work a horn, Dirt color: 2 sc, dec, (4 sc, dec) x 2= 30

Round 2 :

(3 sc, dec) x 6= 24

Round 3 :

(2 sc, dec) x 6= 18

Round 4 :

(sc, dec) x 6= 12

Round 5 :

dec x 6= 6

Info :

If you are making the cow, do not F/O! If you are not making the cow, F/O and sew the hole closed

Change to green :

1-18. sc in each st around

Info :

Insert a wooden dowel or something similar inside the stem. F/O and sew the hole closed.

— Polar Bear Nose :

With white Round 1 :

Make 6 sc into a magic ring= 6

Round 2 :

Increase in each st around= 12

Round 3 :

(sc, inc) x 6= 18

Rounds 4-5 :

sc in each st around

Info :

Place 18 mm nose between rounds 1 and 2. F/O and leave a long tail for sewing

— Cow Ears (Make 2) :

Info :

One in black, one in white:

Round 1 :

Make 6 sc into a magic ring= 6

Round 2 :

Increase in each st around= 12

Round 3 :

(sc, inc) x 6= 18

Instruction :

Skip 4 st, sl st in next st Sl st across the top to give the ear a pinched look. F/O and leave a long tail for sewing

— Cow Nose :

With Pink :

Ch 4

Round 1 :

inc in 2nd ch from hook, sc, inc3, Working on the opposite side of the chain: 3 sc= 9

Round 2 :

inc x 2, 2 sc, inc x 3, sc, inc= 15

Round 3 :

(sc, inc) x 2, 2 sc, (sc, inc) x 3, 2 sc, inc= 21

Rounds 4-5 :

sc in each st around

Info :

F/O and leave a long tail for sewing

— Sunflower :

With Brown Round 1 :

Make 5 sc into a magic ring= 5

Round 2 :

Increase in each st around= 10

Round 3 :

(sc, inc) x 5= 15

Round 4 :

(2 sc, inc) x 5= 20

Round 5 :

(3 sc, inc) x 5= 25

Change to Yellow Round 6 :

(Ch 5, sc in 2nd ch from hook, hdc in next ch, dc in next ch, tr in next ch, Sl st in next 2 st) around

Info :

F/O and leave a long tail for sewing

— Sunflower Leaf #1 :

With Green :

Ch 7

Instruction :

Dc + tr in 3rd ch from hook 2 tr in next ch 2 dc in next ch Hdc in next ch sc in last ch F/O and leave a long tail for sewing

— Sunflower Leaf #2 :

With Green :

Ch 7

Instruction :

Sc in 3rd ch from hook Hdc in next ch 2 dc in next ch 2 tr in next ch tr + dc in last ch F/O and leave a long tail for sewing

— Spider Succulent :

Info :

Attach green yarn with a sl st in between rounds 2 and 3.

Instruction :

*Ch 7 1. sl st in 2nd ch from hook, sc in next ch, hdc in next ch, dc in next 2 chains, tr in next ch, sl st in next 2 stitches.* Repeat from * to * around until you get to the middle of the pot.

— Venus Fly Trap :

Stem (make 4) With Green Round 1 :

Make 6 sc into a magic ring= 6

Rounds 2-16 :

sc in each st around

Info :

Do not stuff the stems. If you want, place a cake dowel in the stem. F/O and leave a long tail for sewing

Trap (Make 4 in red, 4 in green) Starting with Red Round 1 :

Make 6 sc into a magic ring= 6

Round 2 :

Increase in each st around= 12

Info :

Do not F/O the green! Place back sides of green and red pieces together.

With green Round 3 :

(sc, inc) x 6= 18

Round 4 :

(2 sc, inc) x 6= 24

Round 5 :

(ch 3, sl st in same st, sl in next 2 st) around F/O and leave a long tail for sewing

Leaves (Make 3) :

Ch 15 1. sc in 2nd ch from hook, 2 hdc, 2 dc, 4 tr, 2 dc, 2 hdc, inc in last ch, Working on the opposite side of the chain: sc, 2 hdc, 2 dc, 4 tr, 2 dc, 2 hdc, sc F/O and leave a long tail for sewing

— Polar Bear Cactus :

With Green :

Ch 20 1. sc in 2nd ch from hook and across= 19 2- 16. BLO Ch 1, turn, sc in each st across F/O and leave a very long tail for sewing

Holly Leaves (Make 2) With green :

Ch 10 1. sc in 2nd ch from hook, sc, hdc, dc, dc-inc, dc, hdc, sc, inc3 in last ch, Working on the opposite side of the chain: sc, hdc, dc, dc-inc, dc, hdc, sc, sl in last st 2. sc, *ch 3, sl st in same st*, 4 sc, * to*, 4 sc, * to*, 2 sc, * to *, 4 sc, * to *, 3 sc, sl st to 1st st F/O and leave a long tail for sewing

Berries (Make 2) With red :

1. Make 6 sc into a magic ring= 6 2. Sc in each st around 3. Dec x 3= 3 Sew the berry closed. F/O and leave a long tail for sewing

Assembly Instructions

  • Attach the cow nose onto the front of the pot between the eyes; sew the nose onto the pot and embroider two nostrils.
  • Pin and sew the ears onto the side of the pot for cow and polar bear versions, ensuring symmetry and a natural angle.
  • For the spider: either sew the legs onto the side of the pot or attach them as you crochet (no-sew version). Position and sew legs evenly spaced.
  • Sew plants to stems: pin leaves, cactus, sunflower, or venus fly trap to the top of the stem and sew securely, then attach the stem into the dirt area and sew closed.
  • Insert wooden dowel or pipe cleaner into stems if desired for extra support, then sew the stems into the pot and secure firmly.

Important Notes

  • 💡Do not join rounds unless stated; work in a continuous spiral for smooth amigurumi shaping.
  • 💡Use a stitch marker to mark the beginning of each round and move it up as you complete each round.
  • 💡All stitches are worked in both loops unless stated otherwise in the pattern (BLO or FLO will be specified).
  • 💡Place safety eyes between the rounds indicated in the instructions to ensure correct spacing and character expression.
  • 💡Fold smaller pieces (ears, leaves) and sc the opening closed as instructed; leave long tails for easy sewing and placement.

This charming planter collection brings tiny handmade personality to your home with cuddly pots and playful plants. Whether you make a cow, spider, polar bear, or a sunny sunflower friend, each piece is full of detail and heart. Share them as gifts or keep them for your shelf — they make delightful companions. 🧶🌱✨
You ask,

we answer.

FAQs

What size will the finished piece be?

The finished planter measures approximately 6 inches from bottom to top of plant when using worsted weight yarn and a 3.25 mm hook, though size varies by plant and stuffing.

Can I use different yarn weights for this pattern?

Yes — you can use bulky yarn for a larger, plush planter but be sure to adjust hook size and eye size accordingly; the pattern provides hook recommendations for worsted and bulky yarns.

Do I need prior crochet experience for this pattern?

This pattern is rated intermediate and assumes familiarity with single crochet, increases, decreases, and working in the round. Basic amigurumi experience is recommended for best results.

How long does this project typically take to complete?

Most crocheters finish a single planter including a plant in about 5-7 hours, depending on complexity of the plant and assembly time.

Are there no-sew options in the pattern?

Yes, the spider includes a no-sew option where legs can be worked into the pot; otherwise pieces are sewn on and instructions note when to leave long tails for sewing.