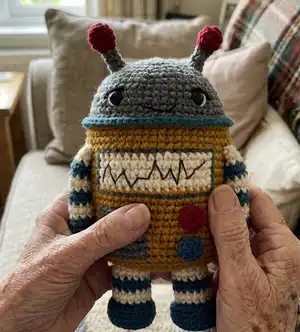
Make a charming Pixie the Robot amigurumi with this easy, photo-guided crochet pattern. You will create a 9 in. (23 cm) tall robot made in separate pieces and sewn together, featuring a striped arms and legs, embroidered display screen and control flap. The pattern uses Lion Brand Wool-Ease and includes full round-by-round instructions, finishing and assembly details so you can complete a polished handmade toy.
Progress Tracker
0% Complete
— Notes :
Infos :
1. Robot is worked in 9 pieces: Body, 2 Arms, 2 Legs, 2 Antennae, and 2 Knobs, then sewn together. 2. Body is worked from the head downwards. 3. Body, Arms, Legs, Antennae and Knobs are all worked in continuous rnds (spiral). Do not join first st of rnds to last st and do not turn at the beg of rnds. 4. Yarn color is changed to form control flap and display screen. To change yarn color, work last st of old color to last yarn over. Yarn over with new color and draw through all loops on hook to complete st. Proceed with new color. When using more than one yarn color within a rnd, do not cut the old color. Carry color not in use along tops of sts of previous rnd and work sts of current rnd over the carried strand, enclosing it inside the fabric. 5. Small details are embroidered onto Robot. 6. Exact gauge is not essential for this project. We worked tightly with a small hook so that stuffing wouldn't show through.
Info :
Safety Note: If Robot is intended for a baby or child, be certain that all pieces have been very securely sewn together. Don’t leave a baby or child unattended with the Robot!
— Head :
Info :
With A, make a magic ring.
Round 1 :
Rnd 1 (RS): Work 8 sc in ring; do not join, work in continuous rnds (spiral).
Info :
Gently but firmly, pull tail to tighten center of ring.
Info :
Place a marker in last st made to indicate end of rnd. Move marker up as each rnd is completed.
Round 2 :
Rnd 2: Work 2 sc in each st around – 16 sc.
Round 3 :
Rnd 3: * Sc in next st, 2 sc in next st; rep from * around – 24 sc.
Round 4 :
Rnd 4: * Sc in next 2 sts, 2 sc in next st; rep from * around – 32 sc.
Round 5 :
Rnd 5: * Sc in next 3 sts, 2 sc in next st; rep from * around – 40 sc.
Round 6 :
Rnd 6: * Sc in next 4 sts, 2 sc in next st; rep from * around – 48 sc.
Round 7 :
Rnd 7: Sc in each st around.
Round 8 :
Rnd 8: * Sc in next 5 sts, 2 sc in next st; rep from * around – 56 sc.
Round 9 :
Rnds 9 and 10: Sc in each st around.
Round 11 :
Rnd 11: * Sc in next 6 sts, 2 sc in next st; rep from * around – 64 sc.
Round 12 :
Rnds 12 and 13: Sc in each st around and change to B in last st of Rnd 13.
Round 13 :
Rnd 14: With B, working in front loops only, sc in each st around; join with sl st in first sc of this rnd.
— Body :
Round 14 :
Rnd 15: From RS, join C with sc in back loop of first st of Rnd 13, sc in each st around.
Round 15 :
Rnds 16-18: With C, sc in each st around.
— Display Screen :
Rounds 16 :
Rnds 19-22: With C, sc in next 24 sts; with D, sc in next 16 sts; with C, sc in next 24 sts – 64 sc.
Round 17 :
Rnds 23-25: With C, sc in each st around.
— Control Flap :
Rounds 18 :
Rnds 26-31: With C, sc in next 24 sts; with A, sc in next 8 sts; with C, sc in next 32 sts – 64 sc.
Info :
Work remainder of Body with C only.
Round 19 :
Rnds 32 and 33: Sc in each st around.
Info :
Insert plastic safety eyes on front of Head between Rnds 10 and 13, about 9 sts apart.
Round 20 :
Rnd 34: Working in back loops only, * sc in next 6 sts, sc2tog; rep from * around – 56 sc.
Info :
Begin stuffing piece and continue stuffing until piece is complete.
Round 21 :
Rnd 35: * Sc in next 5 sts, sc2tog; rep from * around – 48 sc.
Round 22 :
Rnd 36: * Sc in next 4 sts, sc2tog; rep from * around – 40 sc.
Round 23 :
Rnd 37: * Sc in next 3 sts, sc2tog; rep from * around – 32 sc.
Round 24 :
Rnd 38: * Sc in next 2 sts, sc2tog; rep from * around – 24 sc.
Round 25 :
Rnd 39: * Sc in next st, sc2tog; rep from * around – 16 sc.
Round 26 :
Rnd 40: * Sc2tog; rep from * around – 8 sc.
Info :
Fasten off, leaving a long yarn tail. Thread tail through top of sts of last rnd, pull to close opening and knot securely.
— Knobs (make 2 – 1 each with B and E) :
Info :
Leaving a long beg tail, make a magic ring.
Round 27 :
Rnd 1: Work 10 sc in ring; do not join, work in continuous rnds (spiral).
Info :
Gently but firmly, pull tail to tighten center of ring.
Round 28 :
Rnd 2: Working in back loops only, sc in next 10 sts; join with sl st in first sc of this rnd.
Info :
Fasten off, leaving a long tail for sewing Knob to Body.
— Antennae (make 2) :
Info :
With E, make a magic ring.
Round 29 :
Rnd 1: Work 6 sc in ring; do not join, work in continuous rnds (spiral).
Info :
Gently but firmly, pull tail to tighten center of ring.
Info :
Place a marker in last st made to indicate end of rnd. Move marker up as each rnd is completed.
Round 30 :
Rnd 3: (Sc in next st, 2 sc in next st) 3 times – 9 sc.
Round 31 :
Rnd 4: Sc in next 9 sts.
Round 32 :
Rnd 5: Sc in next st, (sc2tog) 4 times and change to A in last st – 5 sc.
Round 33 :
Rnds 6 and 7: With A, sc in next 5 sts.
Round 34 :
Rnd 8: With A, sc in next st, 2 sc in next st, sc in next st, 2 sc in next st, sc in next st – 7 sc.
Info :
Fasten off, leaving a long tail for sewing Antennae to head.
— Legs (make 2) :
Info :
With B, make a magic ring.
Round 35 :
Rnd 1: Work 8 sc in ring; do not join, work in continuous rnds (spiral).
Info :
Gently but firmly, pull tail to tighten center of ring.
Info :
Place a marker in last st made to indicate end of rnd. Move marker up as each rnd is completed.
Round 36 :
Rnd 2: Work 2 sc in each st around – 16 sc.
Round 37 :
Rnd 3: * Sc in next st, 2 sc in next st; rep from * around – 24 sc.
Round 38 :
Rnd 4: Working in back loops only, sc in each st around.
Round 39 :
Rnds 5 and 6: Sc in each st around.
Info :
Note: When changing yarn color to make stripes, do not fasten off old color until instructed. Carry color not in use along WS of piece.
Round 40 :
Rnd 7: Working in back loops only, * sc in next st, sc2tog; rep from * around and change to D in last st – 16 sc.
Info :
Begin stuffing piece and continue stuffing until piece is complete.
Round 41 :
Rnd 8: With D, working in front loops only, sc in each st around.
Round 42 :
Rnd 9: With D, sc in each st around and change to B in last st.
Round 43 :
Rnds 10 and 11: With B, sc in each st around and change to D in last st of Rnd 11.
Round 44 :
Rnds 12 and 13: With D, sc in each st around.
Info :
Fasten off, leaving a long tail for sewing Leg to Body.
— Arms (make 2) :
Info :
With B, make a magic ring.
Round 45 :
Rnd 1: Work 5 sc in ring do not join, work in continuous rnds (spiral).
Info :
Gently but firmly, pull tail to tighten center of ring.
Round 46 :
Rnd 2: Work 2 sc in each st around – 10 sc.
Round 47 :
Rnd 3: Working in back loops only, sc in each st around.
Info :
Note: When changing yarn color to make stripes, do not fasten off old color until instructed. Carry color not in use along WS of piece.
Round 48 :
Rnd 4: Sc in each st around and change to D in last st.
Round 49 :
Rnds 5 and 6: With D, sc in each st around and change to B in last st of Rnd 6.
Round 50 :
Rnds 7 and 8: With B sc in each st around and change to D in last st of Rnd 8.
Info :
Begin stuffing piece and continue stuffing until piece is complete.
Round 51 :
Rnds 9-16: rep Rnds 5-8 twice.
Round 52 :
Rnd 17: With D, sc in each st around.
Round 53 :
Rnd 18: With D, (sc in next 3 sts, sc2tog) twice – 8 sc.
Info :
Fasten off, leaving a long tail for sewing Arm to Body.
— Finishing :
Item Name (Embroidery) :
Note: Use straight or back sts to embroider Robot details, using 2 or more strands of floss as desired. With D, embroider curves along outer edges of safety eyes for whites of eyes. With F, embroider lines along upper edges of safety eyes. With black embroidery floss, embroider a V-shaped mouth between Rnds 11 and 14, about 5 sts in length. With black embroidery floss, embroider graphs onto display screen (white section). With B, embroider a back stitch border around the display screen. With A, embroider a back stitch border around the control flap (gray section). With F, embroider straight stitch hinges and handle onto control flap.
Item Name (Assembly) :
Stuff Knobs with beg yarn tails. With ending yarn tails, sew Knobs to Robot, between Rnds 25 and 29, and between Rnds 30 and 33. With D, sew Arms to sides of Body, between Rnds 18 and 20. With D, sew Legs to bottom of Body. With A, sew Antennae to top of Robot, between Rnds 4 and 7. Weave in ends.
— Abbreviations :
Info :
beg = begin; ch = chain; rep = repeat; rnd(s) = round(s); RS = right side; sc = single crochet; sl st = slip stitch; st(s) = stitch(es).
Pixie the Robot is a lovable, handcrafted amigurumi designed to delight kids and grown-up collectors alike. This easy pattern walks you through each round, color change, and finishing touch so you can create a polished toy with playful personality. Whether you make one for a gift or for your own shelf, Pixie brings handmade charm and a pop of color to any space. 🧶🤖✨