🧢 Beautiful ✨ Detailed πŸ’ Adorable

Pillow Reindeer Amigurumi Pattern

Pillow Reindeer Amigurumi Pattern
4.6β˜… Rating
5-7 Hours Time Needed
3.2K Made This
βœ‚οΈ

Intermediate Level

Ideal for those with basic crochet experience, featuring slightly more advanced stitches and techniques to expand your skills.

⏱️

Weekend Treat

Takes 5-7 hours, making it an enjoyable project to finish over a couple of days.

🧸

Cute Companion

An adorable friend to cherish, handcrafted with love to bring comfort and joy for years to come.

About This Pillow Reindeer Amigurumi Pattern

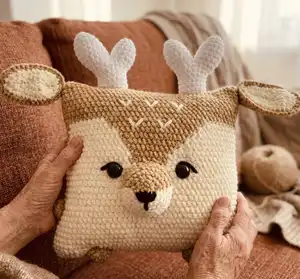
This pattern makes a 30 x 35 cm reindeer pillow (including antlers) using super bulky velvet yarn for ultra-soft texture. You will crochet the square pillow body in rounds, then create ears, a nose, legs, arms and antlers to sew on. It includes color-change placement for the forehead detail and clear assembly notes to finish a delightfully expressive face.

Pillow Reindeer Amigurumi Pattern crochet pattern - detailed view of completed project

The instructions use simple amigurumi techniques and working-in-the-round construction with clear round-by-round counts. Photos and sewing placement tips are included to help you position eyes, nose and features accurately.

Why You'll Love This Pillow Reindeer Amigurumi Pattern

I absolutely love this pattern because it turns cozy velvet yarn into a playful and tactile home accessory that doubles as a toy. I enjoy the way color changes create the reindeer face without complicated shaping. The small parts (ears, nose, antlers) are quick to crochet yet give so much personality when assembled. Making this pillow feels like a relaxing weekend project that yields a handmade gift perfect for holidays or nursery decor.

Pillow Reindeer Amigurumi Pattern step 1 - construction progress Pillow Reindeer Amigurumi Pattern step 2 - assembly progress Pillow Reindeer Amigurumi Pattern step 3 - details and accessories Pillow Reindeer Amigurumi Pattern step 4 - final assembly and finishing

Switch Things Up

I love how easy it is to customize this reindeer pillow by switching yarn colors; try pastel shades for a nursery-friendly look or deep autumn tones for seasonal decor.

You can change the size by using a different yarn weight and adjusting the initial chainβ€”use bulky yarn and a larger hook for a larger pillow or lighter yarn for a mini version.

I often swap the loop-back button eyes for safety eyes or embroidered eyes depending on who the pillow is for; embroidered eyes make it safer for small children.

Try embroidering different expressionsβ€”tilt the eyelids or change the checkmarks on the forehead to create a sleepy or surprised reindeer.

For a different texture, mix velvet yarn with a regular acrylic in the body rounds so the face is plush but the background is slightly firmer.

I sometimes add a zipper to the bottom seam so the pillow cover can be removed and washed; this is great for gifts that need laundering.

Want a festive version? Add tiny crocheted bells, a ribbon collar, or a small crocheted scarf around the neck for a holiday-ready piece.

I recommend trying different eye sizes to change personalityβ€”a smaller eye makes a delicate look, while larger eyes look more playful and bold.

If you want posable antlers, consider inserting a thin wire armature inside them before closing and stuffing, then bend to pose after sewing in place.

I like to create a matching set by making several smaller pillows with different facial expressions; they stack nicely and make a cute display on a sofa or bed.

Common Mistakes & How to Fix Them

βœ— Not counting stitches after each round can cause misaligned color changes and face placement; count your stitches at the end of every round to ensure you have the correct total. βœ— Skipping placement of the eyes before stuffing may shift them out of position later; place or mark eye positions (between rounds 17 and 18) and secure before final stuffing. βœ— Overstuffing the pillow will make seams tight and corners rounded awkwardly; stuff gradually and focus on corners first to keep crisp shape without stretching the stitches. βœ— Leaving short yarn tails when sewing parts makes finishing difficult and fragile; leave long yarn ends for sewing and weave them securely inside to hide and fasten them properly.

Pillow Reindeer Amigurumi Pattern

Create a whimsical pillow shaped like a sweet reindeer with this complete crochet pattern. You will work in plush velvet yarn to make a soft, cuddly pillow with ears, antlers, legs and a cute embroidered face. Clear step-by-step rounds and photo-supported instructions help you build each piece and assemble them into a charming decorative pillow.

Intermediate 5-7 Hours

Materials Needed for Pillow Reindeer Amigurumi Pattern

β€” Main Fabric

  • 01
    Super Bulky / Super Chunky / 14-ply velvet yarn: Himalaya Dolphin Baby (or YarnArt Dolce)
  • 02
    Beige - approximately 2 skeins (main face color)
  • 03
    Brown - approximately 1 skein (forehead, details, nose, limbs)
  • 04
    White - less than 1 skein (antlers, inner ear)
  • 05
    Small amount of black yarn for embroidered eyelids and nose details
  • 06
    Fiberfill (toy stuffing material) sufficient to fill a 30 x 35 cm pillow

β€” Tools Required

  • 01
    Crochet hook size 3.5 mm (you can use 4 mm)
  • 02
    Loop back black buttons for eyes (diameter 22-24 mm)
  • 03
    Needle with a wide eye for sewing pieces
  • 04
    Yarn needle for weaving in ends
  • 05
    Stitch markers
  • 06
    Scissors
  • 07
    Polyester stuffing (fiberfill)
  • 08
    Pins for positioning pieces while sewing (optional)

Progress Tracker

0% Complete

β€” Materials & Abbreviations :

Info :

Super Bulky/Super Chunky/14ply velvet yarn Himalaya Dolphin baby (or YarnArt Dolce). Colors: beige (2 skeins), brown (1 skein), white (less than 1 skein), a little of black color for eyelids.

Info :

Fiberfill (toys stuffing material). Hook size 3.5 mm (you can use 4 mm). Loop back buttons of black color for eyes (diameter of 22-24 mm). Needle with a wide eye for sewing pieces.

Info :

Work in a spiral (except the indicated moments). Abbreviations: sc – single crochet. inc – increase (2 sc in 1 stitch). dec – decrease (2 sc together). ch – chain.

β€” Pillow :

Round 1 :

ch90

Round 2 :

connect in a circle with the first stitch: 1 sc (it is the first stitch of a new round) and crochet further 89 sc {90}

Round 3 – 19 :

90 sc

Info :

Next, alternate colors for the forehead and top pattern.

Round 20 :

in beige: 18 sc, in brown: 8 sc, in beige: 64 sc {90}

Round 21 :

in beige: 18 sc, in brown: 8 sc, in beige: 64 sc {90}

Round 22 :

in beige: 17 sc, in brown: 10 sc, in beige: 63 sc {90}

Round 23 :

in beige: 16 sc, in brown: 12 sc, in beige: 60 sc, in brown: 1 sc, in beige: 1 sc {90}

Round 24 :

in beige: 15 sc, in brown: 14 sc, in beige: 16 sc, in brown: 1 sc, in beige: 42 sc, in brown: 2 sc {90}

Round 25 :

in beige: 14 sc, in brown: 16 sc, in beige: 14 sc, in brown: 2 sc, in beige: 42 sc, in brown: 2 sc {90}

Round 26 :

in brown: 1 sc, in beige: 12 sc, in brown: 19 sc, in beige: 11 sc, in brown: 3 sc, in beige: 42 sc, in brown: 2 sc {90}

Round 27 :

in brown: 2 sc, in beige: 10 sc, in brown: 21 sc, in beige: 9 sc, in brown: 4 sc, in beige: 42 sc, in brown: 2 sc {90}

Round 28 – 37 :

(10 Rounds): in brown: 46 sc, in beige: 42 sc, in brown: 2 sc {90}

Info :

Leave a long yarn tail for sewing and sew up the top of the pillow. Fasten off, hide the yarn end inside. (If you secure eyes before stuffing the pillow, then insert them between rounds 17 and 18, counting from the bottom; the distance between the eyes is 12-13 sc).

Info :

Stuff the pillow, especially the corners. Sew up the bottom of the pillow, fasten off, hide it inside.

β€” Ears (make 2) :

Info :

Crochet with beige yarn.

Row 1 :

ch13

Row 2 :

from the second chain on the hook: 11 sc, 3 sc in the last chain, on the other side of the chain: 12 sc, ch1, turn

Row 3 :

from the second stitch on the hook: 13 sc, 3 sc in 1 stitch, 12 sc, ch1, turn

Row 4 :

from the second stitch on the hook: 14 sc, 3 sc in 1 stitch, 13 sc

Info :

Fasten off, cut the yarn.

Info :

Crochet with brown yarn for the outer edge and matching shaping.

Row 1 :

ch13 (with brown yarn for the outer piece)

Row 2 :

from the second stitch on the hook: 11 sc, 3 sc in the last chain, on the other side of the chain: 12 sc, ch1, turn

Row 3 :

from the second stitch on the hook: 13 sc, 3 sc in 1 stitch, 12 sc, ch1, turn

Row 4 :

from the second stitch on the hook: 14 sc, 3 sc in 1 stitch, 13 sc, ch1

Info :

Do not cut the yarn. Fold both pieces together and crochet through both pieces with brown yarn. Hide the ends inside.

Row :

15 sc, 3 sc in 1 stitch, 14 sc (to finish the joining with brown yarn)

Info :

Leave a long yarn end for sewing. Fold the bottom of the ear in half and sew up the edges.

Info :

Sew the ears to the upper corners of the pillow. Fix the thread and hide inside.

β€” Nose :

Info :

Crochet with brown and beige yarn, alternating colors.

Round 1 :

in brown: 6 sc in an amigurumi ring {6}

Round 2 :

in beige: 3 inc, in brown: 3 inc {12}

Round 3 :

in beige: (1 sc, inc) – repeat 3 times, in brown: 6 sc {15}

Round 4 :

in beige: (2 sc, inc) – repeat 3 times, in brown: (1 sc, inc) – repeat 3 times {21}

Round 5 :

in beige: (3 sc, inc) – repeat 3 times, in brown: (2 sc, inc) – repeat 3 times {27}

Round 6 :

in beige: (4 sc, inc) – repeat 3 times, in brown: (3 sc, inc) – repeat 3 times {33}

Round 7 :

in beige: (5 sc, inc) – repeat 3 times, in brown: (4 sc, inc) – repeat 3 times {39}

Info :

Stuff the nose, sew it between rounds 10 and 18 of the pillow, leave a small hole for embroidering and fixing thread. Sew on the eyes between rounds 17 and 18 (distance between eyes 12-13 sc).

Info :

Take black yarn to embroider a nose and eyelids (you can glue eyelids with transparent glue for extra fixation). With beige yarn embroider checkmarks on the forehead. Sew up holes and hide thread inside.

β€” Legs (make 2) :

Info :

Crochet with brown yarn.

Round 1 :

6 sc in an amigurumi ring {6}

Round 2 :

(inc) – repeat 6 times {12}

Round 3 :

(1 sc, inc) – repeat 6 times {18}

Round 4 :

18 sc

Info :

Leave a long yarn end for sewing.

β€” Arms (make 2) :

Info :

Crochet with brown yarn.

Round 1 :

6 sc in an amigurumi ring {6}

Round 2 :

(inc) – repeat 6 times {12}

Round 3 :

12 sc

Info :

Leave a long yarn end for sewing.

β€” Antlers (make 2) :

Info :

Crochet with white yarn. Each antler is worked from two small pieces that are joined.

Piece 1 - Round 1 :

6 sc in an amigurumi ring {6}

Piece 1 - Round 2 :

(inc) – repeat 6 times {12}

Piece 1 - Round 3 :

(1 sc, inc) – repeat 6 times {18}

Piece 1 - Round 4 – 7 :

(4 rounds): 18 sc

Info :

Do not fasten off on piece 1, leave the loop open and a long tail for sewing.

Piece 2 - Round 1 :

6 sc in an amigurumi ring {6}

Piece 2 - Round 2 :

(inc) – repeat 6 times {12}

Piece 2 - Round 3 :

(1 sc, inc) – repeat 6 times {18}

Piece 2 - Round 4 – 5 :

(2 rounds): 18 sc

Info :

Do not cut the yarn, continue crocheting connecting both pieces.

Connecting Round 1 :

Along piece 1: 4 sc (crochet the first stitch with 2 loops of both pieces), dec, 2 sc, dec, 2 sc, dec, 2 sc, dec. Along piece 2: 4 sc, dec, 2 sc, dec, 3 sc, dec, 1 sc, dec {28}

Connecting Round 2 :

(2 sc, dec) – repeat 7 times {21}

Connecting Round 3 :

11 sc, dec, 6 sc, dec {19}

Connecting Round 4 – 5 :

19 sc

Info :

Leave a long yarn end for sewing. Stuff the antlers and sew them to the top of the pillow.

β€” Assembly :

Item :

Sew the nose between rounds 10 and 18 of the pillow; leave a small hole for embroidering and fix the thread through it.

Item :

Sew on the eyes between rounds 17 and 18 (distance between eyes 12-13 sc), fix securely and hide threads inside the nose or head.

Item :

Sew on the arms between rounds 7 and 10, stuff them tightly and sew on the legs at the bottom; fix all threads and hide inside the pillow.

Item :

Attach ears to the upper corners, sew antlers to the top center, embroider eyelids and nose with black yarn and embroidery checkmarks on the forehead with beige yarn; hide and secure all threads inside.

Assembly Instructions

  • Sew the nose to the pillow between rounds 10 and 18, leaving a small hole for embroidering; finish embroidery, then sew up the hole and hide the thread inside.
  • Position and secure the eyes between rounds 17 and 18 (distance should be 12-13 sc), either sew or glue eyelids before final placement to prevent slipping.
  • Attach arms between rounds 7 and 10; stuff them tightly and sew them in place so they sit naturally at the sides of the pillow.
  • Sew legs to the bottom corners with long yarn tails for a secure attachment and even spacing for stability when the pillow sits.
  • Attach ears to the upper corners and antlers to the top center; pin parts first to check symmetry before permanently sewing them in place.

Important Notes

  • πŸ’‘Work in a spiral unless otherwise indicated to keep seamless rounds and consistent texture.
  • πŸ’‘Place eyes before final stuffing if using buttons, and use the recommended distance (12-13 sc) to match photos.
  • πŸ’‘Leave long yarn tails for sewing to make assembly easier and hide ends securely inside the pillow pieces.
  • πŸ’‘Stuff corners first to preserve square shape and avoid over-stretching stitches when finishing seams.

This delightful Pillow Reindeer makes a heartwarming gift and charming home accent. Handmade with plush velvet yarn, it adds cozy personality to any room and is perfect for nurseries or holiday decor. Whether you gift it or keep it, this little reindeer will bring smiles and cuddles. 🧢🧸✨

You ask,

we answer.

FAQs

What size will the finished piece be?

The size of the pillow is approximately 30 x 35 cm including the antlers when using the recommended super bulky velvet yarn and hook size.

Can I use different yarn weights for this pattern?

Yes, you can use different yarn weights but the final size and texture will change; if you use a lighter yarn, choose a smaller hook and expect a smaller, denser pillow.

Do I need prior crochet experience for this pattern?

This pattern is rated intermediate and assumes you know basic amigurumi techniques, working in a spiral, increases and decreases, and simple sewing of pieces.

How long does this project typically take to complete?

Most crocheters complete this project in 5-7 hours depending on experience and assembly time; detailed sewing and embroidery may add to the total time.

Can I machine wash the finished pillow?

Because this pattern uses plush velvet yarn and sewn-on buttons for eyes, spot cleaning or gentle hand washing is recommended; remove any glued elements before washing.