🧶 Beautiful ✨ Detailed 💝 Adorable

Pillow-panda Amigurumi Pattern

Pillow-panda Amigurumi Pattern
4.6★ Rating
5-7 Hours Time Needed
2.8K Made This
✂️

Intermediate Level

Ideal for those with basic crochet experience, featuring slightly more advanced stitches and techniques to expand your skills.

⏱️

Weekend Treat

Takes 5-7 hours, making it an enjoyable project to finish over a couple of days.

🧸

Cute Companion

An adorable friend to cherish, handcrafted with love to bring comfort and joy for years to come.

About This Pillow-panda Amigurumi Pattern

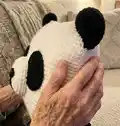
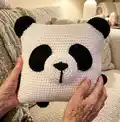
This pattern teaches you how to crochet a square panda pillow with plush yarn and simple amigurumi pieces. Youll make the pillow panel, ears, arms, legs, spots and a round nose, then assemble and embroider the facial details. The finished pillow is soft and child-friendly, sized around 29x29 cm depending on yarn and hook. It uses basic crochet stitches and provides clear, photographed steps for guidance.

Pillow-panda Amigurumi Pattern crochet pattern - detailed view of completed project

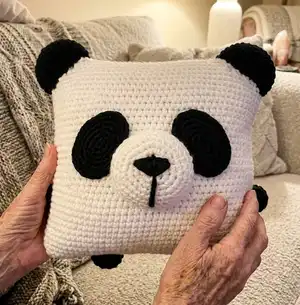
Perfect for gifting or brightening your home, this pillow combines soft texture with playful panda details. The pattern is written with round-by-round instructions and helpful assembly notes.

Why You'll Love This Pillow-panda Amigurumi Pattern

I absolutely love this pattern because it transforms simple stitches into a lovable, tactile character that feels delightful to hold. I enjoy working with plush yarn for its luxurious, squishy finish and this design highlights that texture beautifully. Sewing the little ears, spots and nose brings the pillow to life, and I find the assembly process relaxing and rewarding. Making these small details lets me personalize each pillow — I often experiment with eye placement and embroidery to create different expressions.

Pillow-panda Amigurumi Pattern step 1 - construction progress Pillow-panda Amigurumi Pattern step 2 - assembly progress Pillow-panda Amigurumi Pattern step 3 - details and accessories Pillow-panda Amigurumi Pattern step 4 - final assembly and finishing

Switch Things Up

I love customizing this pillow by changing the color palette to create different animal friends; swapping black for brown or gray gives charming variations.

Try using a thicker plush yarn and a larger hook to make a chunkier, more cushioned pillow thats great for toddlers.

Make a mini version by using a smaller hook and thinner plush yarn to create keychain-sized pandas or small decorations.

I often add embroidered eyelashes or a small mouth to change the panda's expression and give each pillow a unique personality.

For a safer childrens version, replace beads with embroidered eyes and firmly secure all parts with extra stitching.

Experiment with textured stitches on the pillow panel to add visual interest, like alternating rows of single crochet and half double crochet.

I sometimes create coordinating accessories like a tiny scarf or bow tie using leftover yarn to make a set of matching decor pieces.

Try adding a zipper closure on the back panel so you can remove the stuffing for washing or to change filling firmness as needed.

You can also embroider initials or a small name above the nose to personalize the pillow as a gift for babies or kids.

If you want posable limbs, insert a small gauge wire into the arms and legs before stuffing, then close and hide the wire ends securely inside the pillow.

Common Mistakes & How to Fix Them

✗ Skipping stitch markers during the pillow rounds makes counting difficult; use a marker at the start of each round to maintain consistent stitch counts. ✗ Overstuffing the pillow can distort the square shape and make seams hard to close; stuff gradually and evenly, checking the corners carefully to keep the shape balanced. ✗ Not leaving long sewing tails for parts like ears and nose will make assembly fiddly; leave long thread ends and use them to securely attach pieces before hiding the ends. ✗ Forgetting to secure and hide embroidery threads can cause loose ends later; fasten the thread well and hide it inside the nose or pillow to prevent unraveling.

Pillow-panda Amigurumi Pattern

Make a soft, cuddly panda pillow with this easy-to-follow crochet pattern. Youll create a square plush pillow with charming panda features — ears, spots, nose, arms and legs — perfect as a gift or cozy home accent. The pattern uses plush yarn for a squishy texture and clear step-by-step rounds so you can follow along without fuss. Ideal for an afternoon of crafting or a relaxing weekend project.

Intermediate 5-7 Hours

Materials Needed for Pillow-panda Amigurumi Pattern

— Main Fabric

  • 01
    YarnArt Dolce yarn (plush) 120 m / 100 g - White (2 skeins)
  • 02
    YarnArt Dolce yarn (plush) 120 m / 100 g - Black (1 skein)
  • 03
    Polyester filler / hollofayber - enough to fill a 29x29 cm pillow
  • 04
    Black beads or buttons for eyes - 22 mm (2 pieces)

— Tools Required

  • 01
    Crochet hook size 3.5 mm (I used 3.5 mm)
  • 02
    Scissors
  • 03
    Yarn needle for sewing and embroidery
  • 04
    Stitch markers or pins to fix the beginning of each round
  • 05
    Polyester stuffing (hollofayber)
  • 06
    Black beads or buttons 22 mm for eyes
  • 07
    Pins for assembly (optional)

Progress Tracker

0% Complete

— Pillow :

Info :

Use white plush yarn

Round 1 :

90 ch, connect with the first loop

Round 2-37 :

90 sc (90)

Info :

Leave a long thread and sew the top of the pillow. We fasten the thread and hide inside the pillow. Fill tightly and evenly. Fill the angle of the pillow well. Sew and fasten the thread and hide inside the pillow.

— Ear (2 details) :

Round 1 :

6 sc in magic Ring {6}

Round 2 :

(inc) – repeat 6 times {12}

Round 3 :

(1 sc, inc) – repeat 6 times {18}

Round 4 :

(2 sc, inc) – repeat 6 times {24}

Round 5 :

(3 sc, inc) – repeat 6 times {30}

Round 6 :

(4 sc, inc) – repeat 6 times {36}

Round 7 :

(5 sc, inc) – repeat 6 times {42}

Round 8 :

42 sc

Round 9 :

(19 sc, dec) – repeat 2 times {40}

Info :

Leave a long thread for sewing

— Arm (2 details) :

Round 1 :

6 sc in magic Ring {6}

Round 2 :

(inc) – repeat 6 times {12}

Round 3 :

12 sc

Info :

Leave a long thread for sewing

— Spot (2 details) :

Round 1 :

12 ch

Round 2 :

We begin to work from the second loop from the hook: 10 sc, 3 sc in 1 loop. On the other side of the chain: 10 sc, sl st

Round 3 :

1 ch, we begin to work from the second loop from the hook: inc, 9 sc, inc, 1 sc, inc, 11 sc, sl st

Round 4 :

1 ch, we begin to work from the second loop from the hook: 1 sc, inc, 4 sc, hdc, 5 dc, hdc, 1 sc, sl st

Info :

We fasten the thread and leave a long thread for sewing

— Assembly :

Sew ears (P1) :

Sew ears: we put ears on the angles of the pillow. Sew and fill. Fasten the thread and hide inside the pillow.

Sew nose (P2) :

Sew nose between 13 and 21 rounds. Do not sew up to the end. Fill and leave a small hole. We will embroider the nose.

Info :

Use black plush yarn and needle. Embroider the nose. We start from the center. We fasten the thread and hide inside the nose, fill and sew a hole.

Sew spots (P3) :

Sew spots and fasten the thread and hide inside the pillow.

Sew eyes and limbs (P4) :

Sew eyes on spots and sew arms and legs. Fasten the thread and hide inside the pillow.

Info :

Your pillow is ready!

Assembly Instructions

  • Sew ears to the four corners of the pillow, fill the ear tops as you attach them, then fasten the thread and hide the ends inside the pillow.
  • Sew the round nose between rounds 13 and 21 on the front panel, do not sew completely closed, stuff the nose lightly, then embroider the nose and fasten the thread, hiding ends inside the nose.
  • Sew the black spots onto the face in the correct positions, then attach the black beads/buttons for eyes onto the spots and secure the threads inside the pillow.
  • Attach arms and legs symmetrically at the lower sides and bottom of the pillow, sew securely with long sewing tails, fasten the thread and hide the ends inside the pillow.

Important Notes

  • 💡Do not forget to fix the beginning of each new circle with a pin or thread to prevent shifting and ensure accurate rounds.
  • 💡Use stitch markers to keep track of round starts and maintain an even stitch count throughout the project.
  • 💡Stuff the pillow and facial parts evenly and firmly but not overly tight to keep a soft, square shape and avoid distortion.
  • 💡Leave long sewing tails on all small parts to make assembly easier and more secure before hiding the threads.

This adorable panda pillow makes a sweet handmade gift or a cozy accent for your home. 🧶 Soft plush yarn and simple shaping create a huggable, child-friendly toy-pillow thats easy to customize. 🐼 Give it as a thoughtful present or keep it to brighten your sofa or nursery — happy crocheting! ✨

You ask,

we answer.

FAQs

What size will the finished piece be?

The finished pillow measures approximately 29x29 centimeters when using YarnArt Dolce and a 3.5 mm hook, though size may vary with different yarns and hooks.

Can I use different yarn weights for this pattern?

Yes, you can use other plush yarns like Himalaya Dolphin Baby or different weights, but your finished size and texture will change; adjust hook size accordingly.

Do I need prior crochet experience for this pattern?

This pattern is rated intermediate, so basic knowledge of single crochet, increases and decreases is recommended for best results.

How long does this project typically take to complete?

Most crafters finish the pillow in about 5-7 hours, depending on experience, yarn choice, and how much time you spend on assembly and embroidery.

What should I use for the eyes?

Use black beads or buttons about 22 mm as specified, or small safety eyes if you prefer; always secure them well when intended for childrens items.