๐Ÿงถ Beautiful โœจ Detailed ๐Ÿ’ Adorable

Pillow-koala Amigurumi Pattern

Pillow-koala Amigurumi Pattern
4.0โ˜… Rating
5-7 Hours Time Needed
4.0K Made This
โœ‚๏ธ

Intermediate Level

Ideal for those with basic crochet experience, featuring slightly more advanced stitches and techniques to expand your skills.

โฑ๏ธ

Weekend Treat

Takes 5-7 hours, making it an enjoyable project to finish over a couple of days.

๐Ÿงธ

Cute Companion

An adorable friend to cherish, handcrafted with love to bring comfort and joy for years to come.

About This Pillow-koala Amigurumi Pattern

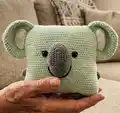
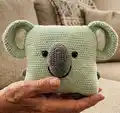
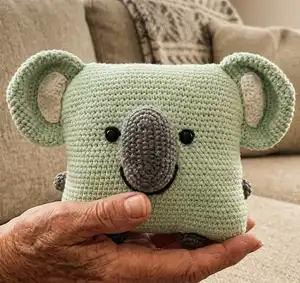
This pattern creates a charming koala-shaped pillow worked mostly in single crochet with plush yarn for a super soft finish. Youll make a square pillow body, two large ears with inner white details, a 3D nose, four small legs/arms and a hidden back pocket. The instructions include counts for every round and clear assembly guidance so you can finish confidently.

Pillow-koala Amigurumi Pattern crochet pattern - detailed view of completed project

Perfect as a gift for kids or a cozy accent for your home, the pillow uses Himalaya Dolphin Baby or similar plush yarn. Photos and placement notes are included to help you position ears, nose, eyes, and the secret pocket accurately.

Why You'll Love This Pillow-koala Amigurumi Pattern

I absolutely love this pattern because it turns a simple pillow into a playful koala friend that brightens any room. The plush yarn makes it incredibly soft and tactile โ€” perfect for cuddling or displaying. I enjoy how the pattern combines flat crochet for the pillow with amigurumi techniques for the ears, nose, and limbs. Sewing and finishing bring the character to life, and the secret pocket is a fun, practical detail that I always like to add.

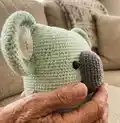
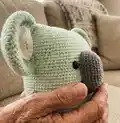
Pillow-koala Amigurumi Pattern step 1 - construction progress Pillow-koala Amigurumi Pattern step 2 - assembly progress Pillow-koala Amigurumi Pattern step 3 - details and accessories Pillow-koala Amigurumi Pattern step 4 - final assembly and finishing

Switch Things Up

I love to change yarn colors to give the koala a unique personality; try pastel pinks, mint, or a soft beige instead of the original light green.

You can make the pillow larger or smaller by switching yarn weight and hook size; bulky yarn with a larger hook gives a chunky cozy pillow while thinner yarn makes a mini version.

I often add embroidered freckles or cheek blushing using a few strands of embroidery thread for extra character and cuteness.

Try replacing the 3D nose with a felt or stitched-on flat nose for a different finish that is simpler to attach.

Swap the large bead eyes for safety eyes, buttons, or embroidered eyes depending on the recipient and safety needs.

To personalize, embroider initials on the back panel before assembling the secret pocket and button.

For a more posable toy, add flexible wire inside the arms or legs, but make sure to encase wire ends safely before inserting into the pillow.

Create a whole family by making matching pillows in different colors and sizesthe same pattern scales well.

Add accessories like a tiny crocheted scarf, a bow, or a tiny hat to change the mood of the koala instantly.

I recommend testing pocket size for the button youll use: adjust the chain count in row 32 of the pocket to fit the button snugly for a clean closure.

Common Mistakes & How to Fix Them

โœ— Skipping the stitch count checks during the pillow panel rounds leads to lopsided edges; count stitches after each row to ensure you have 90 sc every round as specified. โœ— Not securing the start of your foundation chain can cause the square to stretch or open; fix the beginning of each new circle or chain with a pin or a short length of thread. โœ— Stuffing too loosely makes the pillow collapse while overstuffing distorts the corners; stuff evenly, filling angles well and adjusting gradually to get a square shape. โœ— Forgetting to leave long sewing tails on small parts prevents easy assembly; always leave a long thread for sewing on ears, nose, arms, and legs and weave it inside when finished.

Pillow-koala Amigurumi Pattern

Make a soft, cuddly koala pillow using plush yarn โ€” perfect as a decorative cushion or a lovable toy. This pattern includes full step-by-step rounds for the pillow body, ears, nose, arms, legs, and a secret pocket. Youll learn shaping, simple increases and decreases, and how to assemble all parts for a professional finish.

Intermediate 5-7 Hours

Materials Needed for Pillow-koala Amigurumi Pattern

โ€” Main Fabric

  • 01
    Himalaya Dolphin Baby plush yarn (120 m / 100 g) - Light green (approximately 3 skeins)
  • 02
    Himalaya Dolphin Baby plush yarn - Gray (small amount for nose, legs, arms)
  • 03
    White plush yarn - less than 1 skein for inner ear details
  • 04
    Black yarn - small amount for smile and eyelids
  • 05
    Polyester filler (hollofayber) - enough to stuff a 29x46 cm pillow

โ€” Tools Required

  • 01
    Hook No 3.5-4 mm (I used 3.5 mm)
  • 02
    Filler (hollofayber)
  • 03
    Black beads or buttons for eyes (22 mm)
  • 04
    Needle for sewing
  • 05
    Pins (to fix the beginning of rounds or for positioning pieces)
  • 06
    Yarn needle for weaving ends and sewing parts
  • 07
    Scissors

Progress Tracker

0% Complete

โ€” Pillow :

Info :

Use light green plush yarn

Round 1 :

90 ch, connect with the first loop

Round 2 139 :

90 sc (90)

Info :

Leave a long thread and sew the top of the pillow. We fasten the thread and hide inside the pillow.

Info :

Fill tightly and evenly. Fill the angle of the pillow well. Sew and fasten the thread and hide inside the pillow.

โ€” Ear (2 details) :

Info :

Use light green plush yarn

Round 1 :

6 sc in magic Ring {6}

Round 2 :

(inc) 13 repeat 6 times {12}

Round 3 :

(1 sc, inc) 13 repeat 6 times {18}

Round 4 :

(2 sc, inc) 13 repeat 6 times {24}

Round 5 :

(3 sc, inc) 13 repeat 6 times {30}

Round 6 :

(4 sc, inc) 13 repeat 6 times {36}

Round 7 :

(5 sc, inc) 13 repeat 6 times {42}

Round 8 :

(6 sc, inc) 13 repeat 6 times {48}

Round 9 :

(7 sc, inc) 13 repeat 6 times {54}

Round 10 - 14 :

54 sc (5 rounds)

Round 15 :

(7 sc, dec) 13 repeat 6 times {48}

Round 16 :

(6 sc, dec) 13 repeat 6 times {42}

Round 17 :

42 sc

Info :

Leave a long thread for sewing

โ€” Ear inner detail (white) :

Info :

Use white yarn and make 2 details for ears

Row 1 :

5 sc in Magic ring, turn

Row 2 :

(inc) 13 repeat 5 times, turn {10}

Row 3 :

10 sc, turn

Row 4 :

(2 sc, inc) 13 repeat 3 times, sc, turn {13}

Row 5 :

(3 sc, inc) 13 repeat 3 times, sc, turn {16}

Row 6 :

16 sc, crochet along the bottom of the ear: inc, 10 sc

Info :

Leave a long thread for sewing

โ€” Nose :

Info :

Use gray plush yarn

Round 1 :

make 11 ch

Round 2 :

we begin to work from the second loop from the hook: 9 sc, 3 sc in 1 loop, 8 sc, inc {22}

Round 3 :

inc, inc, 9 sc, 3 sc in 1 loop, 11 sc {27}

Round 4 :

inc, inc, inc, 11 sc, inc, inc, inc, 10 {33}

Round 5 :

inc, sc, inc, sc, inc, 12 sc, inc, sc, inc, sc, inc, 11 sc {39}

Round 6 :

2 sc, inc, 2 sc, inc, 2 sc, inc, 12 sc, inc, 2 sc, inc, 2 sc, inc, 11 sc {45}

Round 7 :

45 sc

Info :

Leave a long thread for sewing

โ€” Leg (2 details) :

Info :

Use gray plush yarn

Round 1 :

6 sc in magic Ring {6}

Round 2 :

(inc) 13 repeat 6 times {12}

Round 3 :

(1 sc, inc) 13 repeat 6 times {18}

Round 4 :

18 sc

Info :

Leave a long thread for sewing

โ€” Arm (2 details) :

Info :

Use gray plush yarn

Round 1 :

6 sc in magic Ring {6}

Round 2 :

(inc) 13 repeat 6 times {12}

Round 3 :

12 sc

Info :

Leave a long thread for sewing

โ€” Secret pocket :

Row 1 :

make 35 ch

Row 2 131 :

we begin to work from the second loop from the hook: 34 sc, turn (30 rows)

Row 32 :

we begin to work from the second loop from the hook: 16 sc, make 4 ch, skip 2 loops of the previous row and crochet 16 sc (You can make more or less chain. It depends on the size of the button)

โ€” Assembly :

Info :

Sew ears: we put ears edge on the angles of the pillow. Sew with pillow and then sew the ear in circle

Info :

Sew nose (and fill) between 12 and 27 rounds.

Info :

Sew arms and legs. Sew eyes between 22 and 23 rounds

Info :

Use black yarn and make eyelids. Leave the long end of the thread to make a smile. Insert a needle between 17 and 18 rounds. Leaving a long end for a smile. We withdraw the needle to the left of the eye and make a seam above the eye.

Info :

We make an eyelid for the second eye. Make a smile and fix the thread and hide all the ends inside the pillow.

Info :

Sew white details on ears.

Info :

Sew a secret pocket and a button on the back of the pillow.

Info :

Your pillow is ready!

Assembly Instructions

  • Sew ears: place each ear edge on the top corner of the pillow, sew the ear edge to the pillow and then sew around the ear base in a circle to secure it firmly.
  • Sew the nose between rounds 12 and 27 of the pillow front, stuffing the nose slightly as you attach it so it sits in 3D.
  • Position and sew arms and legs along the bottom sides; attach legs to the base for stability and arms slightly higher on the side seams.
  • Sew eyes between rounds 22 and 23; use black beads or sew black yarn eyelids, leaving a long thread to embroider the smile as instructed.
  • Sew white inner ear details onto the green ears, aligning and tucking edges before stitching to ensure neat placement.
  • Attach the secret pocket to the back: sew three sides leaving the top open, add a button and make a small loop with chains for closure.

Important Notes

  • ๐Ÿ’กDo not forget to fix the beginning of each new circle with a pin or thread to prevent twisting and keep your rounds aligned.
  • ๐Ÿ’กStuff the pillow evenly and fill the corners well for a neat square shape; overstuffing can distort the shape so add filling gradually.
  • ๐Ÿ’กLeave long sewing tails on ears, nose, arms and legs to make assembly easier and weave the ends inside the pillow when finished.

This koala pillow pattern turns soft plush yarn into a lovable cuddly companion you can display or gift. ๐Ÿงถ It includes detailed rounds for every piece, a secret pocket on the back, and photo-guided assembly for easy finishing. ๐Ÿงต Whip one up for a child, a friend, or a charming home accent
You ask,

we answer.

FAQs

What size will the finished piece be?

The finished pillow measured approximately 29x46 centimeters in the sample (46 cm width with ears), but size will vary with yarn and hook choice.

Can I use different yarn weights for this pattern?

Yes, you can use different plush yarns but this will affect the final size and look; adjust your hook size accordingly for correct fabric density.

Do I need prior crochet experience for this pattern?

This pattern is rated intermediate and assumes basic knowledge of single crochet, increases, decreases and working in the round.

How long does this project typically take to complete?

Most crocheters finish this pillow in about 5-7 hours depending on experience, assembly time, and how many details you add.