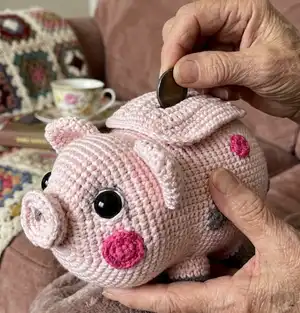
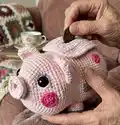
Make a charming handmade piggy bank that doubles as a cute amigurumi and a functional coin holder. You will crochet and assemble a soft pig with a removable cover, inner capacity, sewn-on spots and facial details. The pattern includes full round-by-round instructions, materials, and helpful assembly photos to guide you every step of the way.
Progress Tracker
0% Complete
— Head :
Info :
Place row marker here.
Round 3 :
(1sc, inc) *6 (18)
Round 4 :
(2sc, inc) *6 (24)
Round 5 :
(3sc, inc) *6 (30)
Round 6 :
(4sc, inc) *6 (36)
Round 7 :
(5sc, inc) *6 (42)
Round 8 :
(6sc, inc) *6 (48)
Round 9 :
(7sc, inc) *6 (54)
Round 10 :
(8sc, inc) *6 (60)
Round 11 :
(9sc, inc) *6 (66)
Round 12 :
(10sc, inc) *6 (72)
Round 13-22 :
72sc (10 rounds) (72)
— Body :
Round 23 :
(10sc, dec) *6 (66)
Round 25 :
(10sc, inc) *6 (72)
Round 26 :
(11sc, inc) *6 (78)
Round 27 :
(12sc, inc) *6 (84)
Round 29 :
Next, skip stitches for hole for the capacity. Before skipping, make ch1 and push the part inside the loop (to get a knot). Fix all yarn tails at the end. 15sc, skip 10sc, 59sc (74)
Round 30-32 :
15sc, skip 10sc, 59sc (3 rounds) (74)
Round 33 :
13sc, inc, sc, skip 10sc, 2sc, inc, (13sc, inc) *4 (80)
Round 34-41 :
16sc, skip 10sc, 64sc (8 rounds) (80)
Round 42 :
16sc, ch10, 64sc (90)
Round 43 :
16sc, 10sc on the chain, 64sc (90)
Round 45 :
(13sc, dec) *6 (84)
Round 46 :
(12sc, dec) *6 (78)
Round 47 :
(11sc, dec) *6 (72)
Round 48 :
(10sc, dec) *6 (66)
Round 49 :
(9sc, dec) *6 (60)
Round 50 :
(8sc, dec) *6 (54)
Round 51 :
(7sc, dec) *6 (48)
Round 52 :
(6sc, dec) *6 (42)
Round 53 :
(5sc, dec) *6 (36)
Round 54 :
(4sc, dec) *6 (30)
Round 55 :
(3sc, dec) *6 (24)
Round 56 :
(2sc, dec) *6 (18)
Round 57 :
(1sc, dec) *6 (12)
Info :
Fasten off, cut the yarn, weave in the ends.
Info :
Cut the threads on the hole for the capacity and fix them. Insert the eyes between rounds 11-12 at a distance of 18-20 sc.
— Capacity :
Round 1 :
ch11. Start in the second chain from the hook: inc, 8sc, 3sc in the last chain, 9sc (22)
Info :
Place row marker here.
Round 2 :
2inc, 8sc, 3inc, 8sc, inc (28)
Round 3 :
2inc, 11sc, 3inc, 11sc, inc (34)
Round 4 :
2inc, 14sc, 3inc, 14sc, inc (40)
Round 5 :
(4inc, 16sc) *2 (48)
Round 6-25 :
48sc (20 rounds) (48)
Info :
Cut the yarn. Turn the part face inwards.
Info :
Stuff the piggy with fiberfill: stuff the head tightly, insert the capacity into the body, pushing the fiberfill apart on the sides.
Info :
Sew the capacity into the hole with a light pink thread.
— Cover (make 2) :
Round 1 :
ch15. Start in the second chain from the hook: 14sc, turn (14)
Round 2-4 :
ch1, 14sc, turn (3 rows) (14)
Round 5 :
make a slot: ch1, 2sc, cut the yarn and fasten off, skip 10 stitches, attach the light pink yarn, 2sc, turn.
Round 6 :
ch1, 2sc, ch10, 2sc, turn (14)
Round 7 :
ch1, 2sc, 10sc on the chain, 2sc, turn (14)
Round 8-10 :
ch1, 14sc, turn (3 rows) (14)
Info :
Continue crocheting from one Light pink piece.
— Connect the parts :
Round 1 :
inc in the corner, 12sc, inc in the corner, 10sc, inc in the corner, 12sc, inc in the corner, 10sc, sl st (52)
Round 2 :
ch1, inc the corner, 13sc, inc in the corner, 11sc, inc in the corner, 13sc, inc in the corner, 11sc, sl st (56)
Round 3 :
ch1, 56sc, sl st. Cut the yarn.
Info :
Connect the parts together along the hole: sew the parts together with a light pink thread.
— Hooves - Legs (make 4) :
Info :
Place row marker here.
Round 3 :
(1sc, inc) *6 (18)
Round 6 :
Change color to Light Pink. BLO 18sc (18)
Round 7 :
(5sc, inc) *3 (21)
Round 8 :
(6sc, inc) *3 (24)
Info :
Cut out an oval insole from plastic and put inside. Stuff with fiberfill. Leave a long tail for sewing.
Info :
Place the legs on the bottom of the body, fix them with pins. Make sure that the pig is standing. Sew the legs to the body.
Info :
Tighten the cheeks following the pictures below.
— Eyes & Embroidery :
Info :
Embroider the whites of the eyes with white thread.
— Snout :
Info :
Place row marker here.
Round 3 :
(1sc, inc) *6 (18)
Round 4 :
(2sc, inc) *6 (24)
Round 6 :
(2sc, dec) *6 (18)
Info :
Leave a long tail for sewing. Do not stuff.
Info :
Fix the snout with pins to the head. Sew the snout.
Info :
Embroider the eyelids with a gray thread.
Info :
Embroider the nostrils with a gray thread.
— Ears (make 2) :
Info :
Place row marker here.
Round 2 :
(1sc, inc) *3 (9)
Round 3 :
(2sc, inc) *3 (12)
Round 4 :
(1sc, inc) *6 (18)
Round 5 :
(2sc, inc) *6 (24)
Round 6-8 :
24sc (3 rounds) (24)
Info :
Do not stuff, leave a long tail for sewing.
Info :
Mark the location of the ears with pins. Sew the ears to the head.
— Tail :
Round 1 :
Ch11. Start in the second chain from the hook: 10sl st, leave a long tail for sewing.
Info :
Sew the tail to the body.
— Cheeks (make 2) :
Round 2 :
6inc, sl st, leave a long tail for sewing.
Info :
Mark the location of the cheeks with pins. Sew the cheeks to the head.
— Spots (make 6) :
Info :
Crochet 2 pieces in Bright Pink color and 4 pieces in Gray color. 6sc in a MR, sl st, leave a long tail for sewing.
Info :
Cut off 4 narrow strips of Velcro. Glue the hard part of the Velcro around the opening on the body; glue the soft part of the Velcro to the cover. Dry the glue well. Attach the cover to the body.
Info :
Fix the spots evenly over the body with pins. Sew the spots to the body.
This Piggy Bank amigurumi is a fun blend of craft and practicality, perfect for gifting or decorating a nursery. The removable cover and inner capacity make it useful, while sewn spots and embroidered details add lots of personality. Make one in your favorite colors and share handmade joy with someone special. 🧶🐷