๐Ÿงถ Beautiful โœจ Detailed ๐Ÿ’ Adorable

Phone Bag with Pocket Crochet Pattern

Phone Bag with Pocket Crochet Pattern
3.9โ˜… Rating
5-7 Hours Time Needed
4.1K Made This
โœ‚๏ธ

Intermediate Level

Ideal for those with basic crochet experience, featuring slightly more advanced stitches and techniques to expand your skills.

โฑ๏ธ

Weekend Treat

Takes 5-7 hours, making it an enjoyable project to finish over a couple of days.

โœจ

Stylish Touch

An elegant detail to elevate any look, combining traditional techniques with contemporary design sensibilities.

About This Phone Bag with Pocket Crochet Pattern

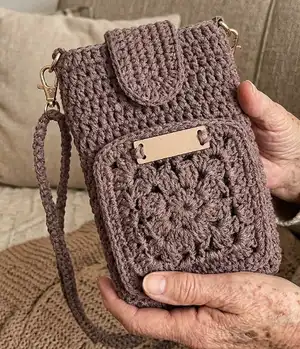
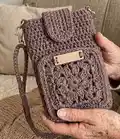
This pattern walks you through crocheting a compact phone bag with a decorative popcorn pocket, magnetic closure, and an optional hook buckle. Clear step-by-step rounds and photo references guide you from the pocket motif through to the bag body, strap closure and Romanian cord handle. Perfect for crafters who enjoy small accessories with detailed finishing.

Phone Bag with Pocket Crochet Pattern crochet pattern - detailed view of completed project

Includes instructions for special stitches (popcorn, DC2TOG, DC3TOG), invisible join technique and assembly steps. Finished dimensions and gauge are provided so you can match the sample size.

Why You'll Love This Phone Bag with Pocket Crochet Pattern

I absolutely love this pattern because it turns a simple crochet motif into a functional and beautiful accessory. I enjoy the popcorn pocket detail โ€” it adds texture and personality while still being practical. I designed the pattern so you can finish it without complicated shaping, but with professional-looking joins and a neat strap. Sewing and assembly steps are included because I know stitching pieces together can make or break a project, and I wanted you to feel confident at the end.

Phone Bag with Pocket Crochet Pattern step 1 - construction progress Phone Bag with Pocket Crochet Pattern step 2 - assembly progress Phone Bag with Pocket Crochet Pattern step 3 - details and accessories Phone Bag with Pocket Crochet Pattern step 4 - final assembly and finishing

Switch Things Up

I love how easily you can customize this phone bag by changing colors โ€” try bold contrasting colors for the pocket and body for a graphic look.

If you want a mini version, use thinner cotton thread and a smaller hook to create a delicate, tiny pouch perfect for cards.

For a sturdier bag, use a slightly bulkier yarn and a larger hook to get a chunky textured style that feels cozy and durable.

I often add lining to my bags for extra structure; cut a cotton lining to size and sew it in by hand for a polished interior finish.

Swap the magnetic button for a snap or a small decorative button to change the closure style and add personality to your bag.

Make the Romanian cord shorter to use as a wristlet or longer to wear crossbody; I like experimenting with different lengths depending on how I plan to use the bag.

Try adding small pockets inside the bag for cards or earbuds โ€” tiny stitched pouches are useful and easy to attach before sewing the lining.

Replace the leather label with a small crocheted motif or embroidered initial for a completely handmade look I love giving as gifts.

If you want a boho vibe, fringe the bottom or add a short tassel to the strap for movement and texture.

I also enjoy mixing yarn types โ€” a cotton body with a metallic thread accent gives a subtle shimmer that suits evening looks beautifully.

Common Mistakes & How to Fix Them

โœ— Skipping the gauge check can result in a bag that is too small or too large; measure a swatch and adjust hook size to match the gauge before starting. โœ— Not leaving a long yarn tail after fastening off makes sewing the pieces difficult; always cut and leave a long tail for secure sewing and weaving. โœ— Ignoring the invisible join technique creates a visible seam at the edge; follow the invisible join steps carefully to produce a neat finish. โœ— Sewing the pocket only through the front loops will make the seam weak; sew through the back loops of the pocket or stitch front-to-back for a strong seam.

Phone Bag with Pocket Crochet Pattern

Make a stylish, compact phone bag with a decorative popcorn-pocket and a sturdy Romanian cord strap. This pattern gives you clear step-by-step instructions, helpful photos, and finishing tips so you can sew and assemble with confidence. Create a wearable handmade accessory perfect for gifts or everyday use โ€” small, elegant, and practical.

Intermediate 5-7 Hours

Materials Needed for Phone Bag with Pocket Crochet Pattern

โ€” Main Fabric

  • 01
    Polyester yarn 2mm thickness or lightweight yarn or cotton yarn - approximately +/- 100 meters
  • 02
    Use a single yarn color for main sample (quantity depends on color and skein size, approx 100 g total)

โ€” Tools Required

  • 01
    Crochet hook 3.5mm
  • 02
    Tapestry needle
  • 03
    Bag hook buckle - 33mm long (optional)
  • 04
    Magnetic button - 14mm
  • 05
    Stitch marker
  • 06
    Scissors
  • 07
    Yarn needle for sewing

Progress Tracker

0% Complete

โ€” Special Stitches :

Info :

POPCORN: Work 5 double crochet (DC) stitches into the same stitch. Drop the loop from your hook. Insert your hook from front to back under the top 2 loops of the first double crochet of the group. Grab the dropped loop with your hook and pull it through the stitch. You have completed the POPCORN stitch.

Info :

DOUBLE CROCHET 2 TOGETHER (DC2TOG): (Yarn over, insert hook in next stitch, yarn over and pull up loop, yarn over, draw through 2 loops) x 2 times, so now you have 3 loops on hook, yarn over, draw through all loops on hook. You have completed the DC2TOG stitch.

Info :

DOUBLE CROCHET 3 TOGETHER (DC3TOG): (Yarn over, insert hook in next stitch, yarn over and pull up loop, yarn over, draw through 2 loops) x 3 times, so now you have 4 loops on hook, yarn over, draw through all loops on hook. You have completed the DC3TOG stitch.

โ€” Pocket :

Round 1 :

Start with MR CH2, [DC2TOG, CH 1] X 8 times. SLST on top of CH 2.

Round 2 :

Working only in each of the CH 1-SP. SLST into next CH 1 SP, CH 2 [POPCORN into the CH 1-SP, CH3] x 8 times. SLST on top of the 1st POPCORN.

Round 3 :

SLST into next CH 3-SP, CH 2, DC3TOG into CH 3-SP, [CH 2, *SC, CH 2, SC* into next CH 3-SP, CH 2, *DC3TOG, CH 3, DC3TOG* into next CH 3-SP] x 3 times, CH 2, *SC, CH 2, SC* into next CH 3-SP, CH 2, DC3TOG into the same CH 3-SP of the 1st DC3TOG, CH 3, SLST into top of the 1st DC3TOG.

Round 4 :

SLST into next CH 2-SP, CH 2 count as 1st DC, 2 DC in to the same CH 2-SP, 3 DC in next 2 CH 2-SP, *3 DC, CH 3, 3 DC* into CH 3-SP. [3 DC in to each of the next 3 CH 2-SP, *3 DC, CH 3, 3 DC* into CH 3-SP] x 3 times, SLST into top of CH 2 from the beginning.

Round 5 :

CH 1, 11 SC, 3 SC into CH 3-SP, [15 SC, 3 SC into CH 3-SP] x 3 times. 4 SC, SLST into the top of CH 1.

Round 6 :

CH 1, SLST on the both loops along the edge until the end. Use invisible join technique to join the round. Fasten off, cut the yarn and leave long yarn for sewing.

โ€” Invisible Join Technique :

Info :

Once you've finished your last slip stitch, cut the yarn and draw it out through the loop, leaving about 10 cm (4"). Thread the end onto a tapestry needle and insert the needle from the front underneath both loops of the 1st slip stitch. Now bring the needle up and insert it from the top into the middle of the last slip stitch of the round. Pull it tight enough that the loop you've made looks like the others.

โ€” Bag body :

Round 1 :

CH 22, DC into 3rd chain from hook, 18 DC, 3 DC into last CH. Working on the opposite side of the chain, 18 DC, 2 DC into last CH, SLST into 1st DC from the beginning. (42)

Round 2-16 :

CH 2, DC into the base of CH 2, 41 DC, SLST into top of CH 2 from the beginning. (42)

Round 17 :

CH 1, SLST along the edge of the bag. Use invisible join technique to join the round. Fasten off, cut the yarn and hide the yarn end inside the bag.

โ€” Bag strap closure :

Round 1 :

CH 18, SC into 2nd chain from hook, 15 SC, 3 SC into last CH. Working on the opposite side of the chain, 16 SC. (35) CH 1, turn.

Round 2 :

16 SC, INC x 3 times, 15 SC (37). CH 1, turn.

Round 3 :

16 SC, INC, 2 SC, INC, 17 SC (39). CH 1, turn.

Round 4 :

[SLST into the next ST, CH 1] repeat until the end of the strap. Fasten off, cut the yarn and leave long yarn for sewing.

โ€” Shoulder Strap (Romanian cord) :

Info :

Top handle โ€“ Romanian Cord: Leave 20 cm long yarn before beginning the CH as you need to attach the handle to the bag. Start with a slip knot. CH 2, 1SC in 2nd CH from hook, turn your work from right to left and you will work in the one loop on the bottom ST. 1 SC through the one loop on the bottom of ST. Turn your work from right to left again, this time you need to work through 2 loops in the next row. 1 SC through 2 loops. Repeat until 90 cm long or your desired length. Fasten off, leave a yarn tail for sewing.

โ€” Assembling :

Info :

Place the strap closure around 3cm inside the bag's center. Sew the strap onto the bag, refer to red dot for sewing line.

Info :

Place the pocket to the bottom center of the bag. Sew it to the bag through the back loops of the pocket. Feel free to stitch through the front to back for a strong seam.

Info :

Sew the magnetic button inside of the strap so they match up to the magnet button on the bag.

Info :

Sew the leather label to the above center of the pocket.

Info :

Sew the shoulder strap on to the hook bucket. Push the ring gate to attach the strap to the bag.

Info :

If you do not have the hook bucket, sew the strap direct to both side of the bag.

Assembly Instructions

  • Place the strap closure around 3cm inside the bag's center and sew the strap onto the bag following the marked sewing line for alignment.
  • Position the pocket at the bottom center of the bag and sew it through the back loops; optionally stitch front-to-back for extra strength.
  • Sew the magnetic button into the inside of the strap so it matches the magnet piece on the bag body for secure closure.
  • Attach the leather label to the center top area of the pocket using small, neat stitches so it sits flat and centered.
  • Sew the shoulder strap to the hook buckle and push the ring gate to secure the strap to the bag; if no buckle is available, sew strap directly to both sides.

Important Notes

  • ๐Ÿ’กUse stitch markers to mark the start of rounds and special stitch placements for accurate positioning of pockets and closure.
  • ๐Ÿ’กLeave a long yarn tail after fastening off for easy sewing; hide ends inside the bag to keep a clean finish.
  • ๐Ÿ’กFollow the invisible join instructions to create a seamless finish along edges for a professional look.
  • ๐Ÿ’กSew the pocket using the back loops for a stronger seam and consider reinforcing by stitching front-to-back for extra durability.

This delightful phone bag pattern gives you a stylish, textured pocket and a sturdy Romanian cord strap for everyday use. ๐Ÿงถ It is small, practical and looks beautiful made in cotton or lightweight polyester yarn. โœจ Make one for yourself or give it as a thoughtful handmade gift โ€” enjoy every stitch! ๐Ÿ‘œ

You ask,

we answer.

FAQs

What size will the finished piece be?

The finished phone bag measures approximately Width = 11 cm (4.33") and Height = 16 cm (6.30") when using the recommended yarn and 3.5mm hook.

Can I use different yarn weights for this pattern?

Yes, you can use different yarn weights, but this will affect the final size; adjust your hook accordingly and check gauge before proceeding.

Do I need prior crochet experience for this pattern?

The pattern is rated intermediate; familiarity with DC, SC, popcorn and working in rounds will help, and photo references are included for guidance.

How long does this project typically take to complete?

Most crocheters complete this project in about 5-7 hours, depending on experience level and how long you spend on assembly and finishing.

How long should the Romanian cord strap be?

Make the Romanian cord up to 90 cm long or adjust to your desired strap length; leave a tail for sewing when fastening off.