🧢 Beautiful ✨ Detailed πŸ’ Adorable

Paris At Night Shawl Pattern

Paris At Night Shawl Pattern
4.4β˜… Rating
8-10 Hours Time Needed
3.0K Made This
βœ‚οΈ

Beginner Friendly Level

Perfect for those just starting their crochet journey, with clear instructions and simple techniques

⏱️

All-Day Adventure

Requires 8-10 hours, ideal for a full day of immersive crocheting.

🌟

Elegant Drape

Soft flow with graceful movement, designed to flatter all body types with sophisticated comfort.

About This Paris At Night Shawl Pattern

This pattern creates a delicate triangular shawl worked in 4ply/sock weight yarn and adorned with size 6 beads and a fringe edging. It uses simple lace and increase/decrease techniques to create an elegant V-shaped shawl. The design is written row-by-row with no charts and is suitable for a beginner with some experience.

Paris At Night Shawl Pattern crochet pattern - detailed view of completed project

The pattern uses a single 100g skein (approx 400m) of a silk/merino blend and a 3.75mm needle. Detailed notes are included for placing beads and creating the fringe edging.

Why You'll Love This Paris At Night Shawl Pattern

I absolutely love this pattern because it captures a romantic, vintage feel with modern yarn and beads. I enjoy how the simple repeats build into a beautifully shaped winged shawl that drapes so well. The bead placements add a little sparkle without complicated techniques, which makes it fun and accessible. I also love that it uses just one skein, so it feels special but is economical to make.

Paris At Night Shawl Pattern step 1 - construction progress Paris At Night Shawl Pattern step 2 - assembly progress Paris At Night Shawl Pattern step 3 - details and accessories Paris At Night Shawl Pattern step 4 - final assembly and finishing

Switch Things Up

I love how easily you can change the look by swapping yarn colors β€” try a tonal gradient for a softer, romantic effect.

For a more subtle shimmer, use matte beads or smaller seed beads instead of larger lustre beads.

If you want a chunkier shawl, use a heavier yarn and larger needles; this will create a cosier, quicker-to-finish version.

To make a mini scarf version, work fewer repeat sections and shorten the fringe proportionally for a neckerchief size.

I often experiment with placing beads in different sections; try adding beads only along the outer edge for accent rather than in the inner eyelet rows.

Consider using contrasting color for the fringe to frame the shawl β€” a darker fringe adds boldness while a lighter one softens the edge.

For a dressier look, pick beads that match the outfit you plan to wear; crystal or metallic beads add evening sparkle.

Want a more vintage feel? Try a neutral, hand-dyed yarn with subtle speckling to enhance the delicate lace rows.

I recommend blocking more aggressively for open lace, or more gently for a denser drape depending on the final look you want to achieve.

Try adding a small brooch or shawl pin at the top point to wear it as a stole; it gives you another styling option with minimal effort.

Common Mistakes & How to Fix Them

βœ— Misplacing stitch markers can disrupt the centre spine and pattern symmetry; place and check markers after every set-up and when you reach them on subsequent rows. βœ— Skipping the bead presentation step leads to beads not sitting correctly on the right side; slide the bead up the yarn to the needle and keep it close while knitting the stitch that catches it. βœ— Forgetting to pick up the correct bar for M1R/M1L will skew increases; always pick the bar between stitches from the direction specified and knit into the correct side. βœ— Cutting fringe pieces too short or uneven will give an inconsistent edge; cut all fringe pieces to the same length (approx. 23cm) and even them after attaching. βœ— Ignoring blocking will leave the eyelet section closed and uneven; block the shawl open to show the lace and eyelets before adding fringe.

Paris At Night Shawl Pattern

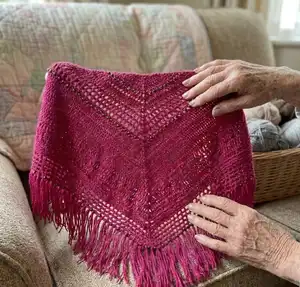
Make an elegant, beaded triangular shawl inspired by Parisian nights. This lightly lacy shawl is worked in 4ply/sock yarn, embellished with small beads and finished with a fringed edge. The written, row-by-row pattern is friendly for knitters with some experience and includes clear instructions for beads and fringe.

Beginner Friendly 8-10 Hours

Materials Needed for Paris At Night Shawl Pattern

β€” Main Fabric

  • 01
    4ply / Sock weight yarn suitable for 3.75mm needles - approximately 1 x 100g (400m)
  • 02
    Green Tea Yarns colourway Bush Berries on White Cloud base (example used)
  • 03
    Yarn composition used: 50% silk, 50% merino (100g = 400m)
  • 04
    Overall yarn used approx. 400m

β€” Tools Required

  • 01
    Knitting needles 3.75 mm (US 5)
  • 02
    2 stitch markers
  • 03
    Beads size 6 (I used 188 smoke gray lustre by Green Tea Yarns)
  • 04
    Crochet hook (for fringe)
  • 05
    Scissors
  • 06
    Tapestry/yarn needle for weaving in ends
  • 07
    Measuring tape
  • 08
    Pins for blocking

Progress Tracker

0% Complete

β€” Abbreviations :

Info :

K...Knit. P...Purl. SLP1... slip the next stitch without working it from the left needle to the right as if you were knitting it. K2tg.. knit the next two stitches together. PM.. place a marker. SM.. slip the marker. Pb.. place a bead, to do this slide the next presenting bead on your yarn up to the needle where you are due to make your next stitch and keeping the bead close to your work knit the stitch catching the bead within it. M1R.. pick up the bar between the stitch just worked and the next one from the back of the work and knit into the front of the stitch. M1L.. pick up the bar between the stitch just worked and the next one from the front of the work and knit into the back of the stitch. The figures after each section in the brackets refer to the number of stiches you should have either side of the centre spine.

β€” Gauge/Notes :

Info :

Gauge if you wish to use is 12sts x 15 rows using the stocking stitch pattern. Please have a read through the pattern instructions before starting your work.

β€” Set Up :

Round 1 :

Cast on 6sts

Round 2 :

K2, pm, k2, pm, k2

Round 3 :

Slp1, kfb, m1r, sm, k2, sm, m1l, k1

Round 4 :

Slp1, yo, k3, m1r, sm, k2, sm, m1l, k3, yo, k1 (14 sts)

β€” Main Pattern :

β€” Section 1 :

Round 1 :

Slp1, yo, kfb, (yo, k2, pass yo over the k2) repeat the bracket to the marker, m1r, sm, k2, sm, m1l, (yo, k2, pass yo over the k2) repeat the bracket to the last 2sts, kfb, yo, k1

Round 2 :

Slp1, yo, k1, purl to the marker, sm, k2, sm, purl to the last 2sts, k1, yo, k1

Info :

Repeat these 2 rows another 4 times (26.2.26)

β€” Section 2 :

Round 1 :

Slp1, yo, kfb, (yo, pb, k2tg) repeat the bracket to the marker, m1r, sm, k2, sm, m1l, (k2tg, pb, yo) repeat the bracket to the last 2sts, kfb, yo, k1

Round 2 :

Slp1, yo, (k2tg, yo) repeat the bracket to the marker, sm, k2, sm, (yo, k2tg) repeat the bracket to the last stitch, yo, k1

Round 3 :

Slp1, yo, kfb, knit to the marker, yo, sm, k2, sm, yo, knit to the last 2sts, kfb, yo, k1

Round 4 :

Slp1, yo, k1, purl to the marker, sm, k2, sm, purl to the last 2 sts, k1, yo, k1

Round 5 :

Slp1, yo, kfb, (yo, k2tg) repeat the bracket to the marker, m1r, sm, k2, sm, m1l, (k2tg, yo) repeat the bracket to the last 2sts, kfb, yo, k1

Round 6 :

Slp1, yo, (k2tg, yo) repeat the bracket to the marker, sm, k2, sm, (yo, k2tg) repeat the bracket to the last st, yo, k1

Round 7 :

Slp1, yo, kfb, knit to the marker, yo, sm, k2, sm, yo, knit to the last 2sts, kfb, yo, k1

Round 8 :

Slp1, yo, k1, purl to the marker, sm, k2, sm, purl to the last 2 sts, k1, yo, k1

Round 9 :

Slp1, yo, kfb, knit to the marker, yo, sm, k2, sm, yo, knit to the last 2sts, kfb, yo, k1

Round 10 :

Slp1, yo, k1, purl to the marker, sm, k2, sm, purl to the last 2 sts, k1, yo, k1 (46.2.46)

β€” Section 3 :

Round 1 :

Slp1, yo, kfb, (yo, k2, pass the yo over the k2) repeat the bracket to the marker, m1r, sm, k2, sm, m1l, (yo, k2, pass the yo over the k2) repeat the bracket to the last 2sts, kfb, yo, k1

Round 2 :

Slp1, yo, k1, purl to the marker, sm, k2, sm, purl to the last 2 sts, k1, yo, k1

Round 3 :

Slp1, yo, kfb, k1, (k2tg, yo) repeat the bracket to the last stitch before the marker, kfb, sm, k2, sm, kfb, (yo, k2tg) repeat the bracket to the last 3 sts, k1, kfb, yo, k1

Round 4 :

Slp1, yo, knit to the marker, sm, k2, sm, knit to the last stitch, yo, k1

Info :

Repeat these 4 rows another 3 times (78.2.78)

β€” Section 4 :

Round 1 :

Slp1, yo, kfb, (yo, pb, k2tg) repeat the bracket to the marker, m1r, sm, k2, sm, m1l, (k2tg, pb, yo) repeat the bracket to the last 2sts, kfb, yo, k1

Round 2 :

Slp1, yo, (k2tg, yo) repeat the bracket to the marker, sm, k2, sm, (yo, k2tg) repeat the bracket to the last stitch, yo, k1

Info :

Repeat these 2 rows another 12 times (130.2.130)

β€” Section 5 :

Round 1 :

Slp1, kfb, yo, knit each stitch twice to the marker, yo, sm, k2 twice, sm, yo, knit each stitch twice to the last 2 sts, yo, kfb, k1

Round 2 :

Slp1, yo, k1, purl each stitch twice to the marker, sm, p2 twice, sm, purl each stitch twice to the last 2sts, k1, yo, k1

Info :

Repeat these 2 rows twice more (142.2.142)

β€” Section 6 :

Round 1 :

Slp1, yo, kfb, knit to the marker, yo, sm, k2, sm, yo, knit to the last 2 sts, kfb, yo, k1

Round 2 :

Slp1, yo, knit to the marker, sm, k2, sm, knit to the last stitch yo, k1

Info :

Repeat these 2 rows another 3 times (158.2.158)

β€” Section 7 :

Round 1 :

Slp1, yo, kfb, (yo, k2tg) repeat the bracket to the marker, yo, sm, k2, sm, yo, (k2tg, yo) repeat the bracket to the last 2sts, kfb, yo, k1

Round 2 :

Slp1, yo, knit to the marker, sm, k2, sm, knit to the last stitch, yo, k1

Info :

Repeat these 2 rows another 3 times (174.2.174)

β€” Section 8 :

Round 1 :

Slp1, yo, kfb, (yo, k2tg) repeat the bracket to the marker, yo, sm, k2, sm, yo, (k2tg, yo) repeat the bracket to the last 2sts, kfb, yo, k1

Round 2 :

(k4, pb) repeat the bracket across the row removing the markers

Round 3 :

Knit across the row

Round 4 :

Cast off all stitches

β€” Finishing :

Info :

I have blocked the shawl to open, in particular, the bottom eyelet section.

Info :

To create the fringe edging you need to cut pieces of yarn approx. 23cm long and then using a crochet hook and two strands, make a tassel through each of the bottom eyelets along the edge, adjusting any of the beads that have slipped to the wrong side as you work.

Info :

Finished dimensions are approx. 128cm wingspan by 42cm excluding the fringe

Assembly Instructions

  • Block the shawl to open the lace and eyelet sections, pinning the edges evenly and allowing to dry completely before adding fringe.
  • Create the fringe by cutting pieces approx. 23cm long and using a crochet hook with two strands to make tassels through each bottom eyelet along the edge.
  • Adjust any beads that have slipped to the wrong side as you attach the fringe and before final blocking to ensure beads sit on the right side.
  • Weave in all ends neatly along the garter sections and inside the shawl so they are hidden before blocking.
  • Remove stitch markers after Section 8 when the instruction instructs to remove markers and cast off all stitches.

Important Notes

  • πŸ’‘Use stitch markers to identify the centre spine and section markers; this keeps increases and decreases aligned for a symmetric shawl.
  • πŸ’‘Slide beads onto the yarn before starting and present them when instructed so bead placement is smooth and consistent.
  • πŸ’‘Block the shawl after finishing to open the eyelets and shape the V, as blocking greatly improves the final drape and lace definition.
  • πŸ’‘Measure fringe lengths before attaching and attach evenly for a professional-looking border.

This Paris At Night shawl is a beautiful, beaded triangular wrap that makes a stunning statement piece for weddings or evening wear. The design uses simple repeating rows to build elegant shaping and small beads for subtle sparkle. Finished with a soft fringe, it is both romantic and wearable. 🧢✨

You ask,

we answer.

FAQs

What size will the finished piece be?

The finished shawl measures approximately 128cm wingspan by 42cm excluding the fringe.

What yarn and quantity are required?

Use 4ply/sock weight yarn suitable for 3.75mm needles; approximately 1 x 100g skein (400m) of a silk/merino blend is used in the sample.

Do I need experience with beads to make this shawl?

No; the pattern is suitable for a beginner with some experience. The bead technique is explained and beads are placed by sliding the presenting bead on the yarn before knitting the stitch.

How long does this project typically take to complete?

This shawl typically takes around 8-10 hours depending on your knitting speed and familiarity with the techniques.