🧢 Beautiful ✨ Detailed πŸ’ Adorable

Nymphs Bag Pattern

Nymphs Bag Pattern
4.2β˜… Rating
12-15 Hours Time Needed
1.5K Made This
βœ‚οΈ

Intermediate Level

Ideal for those with basic crochet experience, featuring slightly more advanced stitches and techniques to expand your skills.

⏱️

Multi-Day Project

A rewarding 12+ hour journeyβ€”perfect for dedicated crafters who love detailed work.

✨

Stylish Touch

An elegant detail to elevate any look, combining traditional techniques with contemporary design sensibilities.

About This Nymphs Bag Pattern

This pattern teaches you how to crochet the Nymphs Bag using polyester macrame cord and single crochet thermal stitch techniques. The bag features a structured front and back, a triangular shaping for the flap area, and a separate side part for depth. Detailed photos and step-by-step row instructions help you stitch, shape and finish a professional looking bag.

Nymphs Bag Pattern crochet pattern - detailed view of completed project

Included are full row-by-row instructions for the front, back and side panels, plus materials, gauge and finishing tips. The pattern uses simple increases and decreases and shows how to hide ends and process polyester cord for a clean finish.

Why You'll Love This Nymphs Bag Pattern

I absolutely love this pattern because it transforms simple macrame cord into a polished, wearable bag with great structure. I enjoy the thermal stitch technique used here β€” it creates a dense, durable fabric that holds shape beautifully. The step-by-step photos and row-by-row guidance make shaping the flap and sides much less intimidating. I also love that the design lets you customize hardware and lining to suit your personal style, so every finished bag feels unique and special.

Nymphs Bag Pattern step 1 - construction progress Nymphs Bag Pattern step 2 - assembly progress Nymphs Bag Pattern step 3 - details and accessories Nymphs Bag Pattern step 4 - final assembly and finishing

Switch Things Up

I love how easily you can customize the Nymphs Bag by changing cord color and hook size β€” try bold contrasts for a modern look or tonal shades for elegance.

To make the bag larger or smaller, I change the cord weight and use a larger or smaller hook; bulky cord yields a chunky, quick version, while thinner cord creates a delicate purse.

I often swap the metal chain for a braided cord strap or a leather strap to change the bag's vibe and comfort when worn.

Try adding a lining pocket or a zipper for extra functionality; I hand-sew a small inside pocket to keep keys or cards secure.

Experiment with different hardware finishes like antiqued brass, matte black or silver to match your wardrobe and make the bag feel unique.

I sometimes add embroidery or a crocheted applique on the flap for a personal signature β€” it makes each finished bag one-of-a-kind.

If you want a softer edge, use a slip-stitch border instead of single crochet on the final rows; it gives a smoother finish that I love for casual styles.

I like to add riveted leather tabs where the chain attaches for extra strength; you could also reinforce with additional cord loops woven through the chain links.

For seasonal changes, I switch to lighter pastel cords for spring/summer and deep, rich tones for fall/winter β€” the same pattern looks completely different with color swaps.

Don't be afraid to mix materials: combining macrame cord with a small section of rope or ribbon can create interesting texture contrasts I often use to make a statement piece.

Common Mistakes & How to Fix Them

βœ— Not counting stitches after increases or decreases leads to uneven shaping; always count at the end of each row to keep the stitch count accurate. βœ— Crocheting into the wrong loop when doing the thermal stitch can break the textured pattern; focus on working the back loop and the front loop of the pre-previous row only as instructed. βœ— Pulling the polyester cord too tight can distort the shape and make assembly difficult; maintain even, moderate tension and check gauge often. βœ— Forgetting to reinforce and hide cord ends can result in unraveling over time; strengthen cut ends and hide them on the wrong side, then process with fire if using polyester cord.

Nymphs Bag Pattern

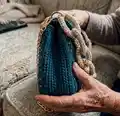
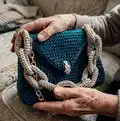
Create a stylish handcrafted Nymphs Bag using polyester macrame cord and a simple thermal stitch technique. This intermediate pattern walks you through each row with clear photos and measurements so you can recreate the structured, elegant bag shown. Youll learn how to shape the front, back and side panels, add lining and finish hardware for a polished result. Perfect for makers who enjoy thoughtful construction and a modern, wearable accessory.

Intermediate 12-15 Hours

Materials Needed for Nymphs Bag Pattern

β€” Main Fabric

  • 01
    Polyester cord 3 mm, approx 400 yards (350 m) - main color (example used: Shikimiki Matte Macrame polyester cord, ocean color)
  • 02
    Polyester cord 2 mm, approx 60 yards (50 m) - contrast/chain color (example used: Shikimiki PP Macrame Mini polyester cord, latte color)
  • 03
    Fabric for the lining: 20x20 inches (50x50 cm)
  • 04
    Chain for strap: 39-43 inches (1-1.2 m)
  • 05
    Snap hook rings 30-38 mm (2 pieces)
  • 06
    Small snake lock 1 1/2 inches (4 cm)
  • 07
    Double cap rivets 5 mm, 20 pieces (optional)

β€” Tools Required

  • 01
    Crochet hook size 3 mm
  • 02
    Crochet hook size 4 mm
  • 03
    Snap hook rings 30-38 mm (2 pieces)
  • 04
    Chain, 39-43 inches (1-1.2 m)
  • 05
    Small snake lock, 1 1/2 inches (4 cm)
  • 06
    Double cap rivets, 5 mm (20 pieces, optional)
  • 07
    4 stitch markers
  • 08
    Plastic needle with large eyelet
  • 09
    Sew needle and thread to match base color
  • 10
    Lighter (for processing polyester cord ends)
  • 11
    Scissors
  • 12
    Yarn needle for sewing lining and seams

Progress Tracker

0% Complete

β€” Front side :

Info :

Take the 3 mm cord and the 4 mm hook.

Round 1 :

Crochet 31 CH.

Round 2 :

1 row. 30 SC from the 2nd loop from the hook on the back loop of the chain only, CH (30)

Info :

Insert the hook in the last SC, pull out the end. Crochet in the end in the next row.

Info :

Next crochet a turning rows.

Round 3 :

2 row. Inc, 28 SC, Inc, on the back loop and the loop of the chain only, CH (=32)

Round 4 :

3 row. Inc, 30 SC, Inc, on the back loop and the front loop of the pre-previous row only, CH (=34)

Info :

When making the first increase and SC, as well as the last increase and SC, insert the hook on the same lower loop of the increase from the previous row.

Info :

Next, crochet SC of the each subsequent row on the back loop and the front loop of the pre-previous row only (thermal stitch).

Round 5 :

4 row. 34 SC, CH. When crocheting the first 2 SC and the last 2 SC, insert the hook on the same lower loop of the increase from the previous row.

Round 6 :

5 row. 34 SC, CH

Round 7 :

6-10 rows. 34 SC, CH

Round 8 :

11 row. Dec, 30 SC, Dec, CH (=32)

Round 9 :

12 row. 32 SC, CH. In this row and the subsequent rows after decreases, when crocheting the first and last SC, insert the hook on the two lower loops of the decrease from the previous row.

Round 10 :

13-16 rows. 32 SC, CH

Round 11 :

17 row. Dec, 28 SC, Dec, CH (=30)

Round 12 :

18 row. 30 SC, CH

Round 13 :

19 row. 30 SC, CH

Round 14 :

20 row. 30 SC, CH

Round 15 :

21 row. 30 SC, CH

Round 16 :

22 row. 30 SC, CH

Round 17 :

23 row. Dec, 26 SC, Dec, CH (=28)

Round 18 :

24 row. 28 SC, CH

Round 19 :

25 row. 28 SC, CH

Round 20 :

26 row. 28 SC, CH

Round 21 :

27 row. 28 SC, CH

Round 22 :

28 row. 28 SC, CH

Round 23 :

29 row. Dec, 24 SC, Dec, CH (=26)

Round 24 :

30 row. 26 SC, CH

Round 25 :

31 row. 26 SC, CH

Round 26 :

32 row. 26 SC, CH

Round 27 :

33 row. 26 SC, CH

Round 28 :

34 row. 26 SC, CH

Round 29 :

35 row. 26 SC. Crochet the last row on two loops and the front loop of the pre-previous row only.

Info :

Cut the thread, pull out the end. Strengthen and hide the end on the wrong side. Process with fire.

β€” Back side :

Info :

1-34 rows. Crochet similarly to rows 1-34 of the front side.

Round 30 :

35-47 rows. 26 SC, CH

Round 31 :

48 row. Dec, 22 SC, Dec, CH (=24)

Round 32 :

49 row. 24 SC, CH

Round 33 :

50 row. Dec, 20 SC, Dec, CH (=22)

Round 34 :

51 row. 22 SC, CH

Round 35 :

52 row. Dec, 18 SC, Dec, CH (=20)

Round 36 :

53 row. 20 SC, CH

Round 37 :

54 row. Dec, 16 SC, Dec, CH (=18)

Round 38 :

55 row. 18 SC, CH

Round 39 :

56 row. Dec, 14 SC, Dec, CH (=16)

Round 40 :

57 row. 16 SC, CH

Round 41 :

58 row. Dec, 12 SC, Dec, CH (=14)

Round 42 :

59 row. 14 SC, CH

Round 43 :

60 row. Dec, 10 SC, Dec, CH (=12)

Round 44 :

61 row. 12 SC, CH

Round 45 :

62 row. Dec, 8 SC, Dec, CH (=10)

Round 46 :

63 row. 10 SC, CH

Round 47 :

64 row. Dec, 6 SC, Dec, CH (=8)

Round 48 :

65 row. 8 SC, CH

Round 49 :

66 row. Dec, 4 SC, Dec, CH (=6)

Round 50 :

67 row. 6 SC, CH

Round 51 :

68 row. Dec, 2 SC, Dec, CH (=4)

Round 52 :

69 row. 4 SC, CH. Crochet the last row on two loops and the front loop of the pre-previous row only.

Info :

Cut the thread, pull out the end. Strengthen and hide the end on the wrong side. Process with fire.

β€” Side part :

Round 53 :

Crochet 6 CH

Round 54 :

1 row. 5 SC from the 2nd loop from the hook on the back loop of the chain only, CH

Assembly Instructions

  • Sew the side part to the front and back panels: align edges and pin, then whipstitch through the loops so the thermal stitch pattern remains consistent and the seams are even.
  • Attach the lining to the wrong side of the bag before closing the top: cut lining to 20x20 inches, sew corners, insert into the bag and hand-stitch the top edge to the bag opening.
  • Install hardware: attach snap hook rings to the bag mouth corners with double cap rivets or by sewing through a reinforced cord loop, then add the chain strap and snake lock.
  • Secure and hide cord ends: cut the thread, pull out the end, strengthen and hide the ends on the wrong side, and carefully process with fire to prevent fraying (use caution with flame).
  • Position any decorative rivets or external details evenly on the sides or flap and fasten them through both fabric and cord, ensuring the rivets are firmly closed and symmetrical.

Important Notes

  • πŸ’‘Use stitch markers to keep track of rows and the start of each row, especially during shaping and decreases.
  • πŸ’‘Work the thermal stitch carefully: crochet into the back loop and the front loop of the pre-previous row only for consistent texture.
  • πŸ’‘Hide and reinforce all cord ends on the wrong side and process polyester cord ends with fire for a neat, permanent finish.
  • πŸ’‘When decreasing at the edges, insert the hook into the two lower loops of the decrease from the previous row to maintain a neat edge.
  • πŸ’‘Pin parts before sewing to ensure correct placement and symmetry; check measurements and alignment against photos.

Make this elegant Nymphs Bag your next special project β€” structured, modern and full of handmade charm. The pattern uses durable polyester macrame cord and a thermal stitch that gives the bag great stability and texture. Perfect for gifting or keeping as a favorite everyday accessory. 🧢✨

You ask,

we answer.

FAQs

What size will the finished piece be?

The finished bag from the specified materials measures approximately 11 inches (27 cm) length, 8 inches (20 cm) height and 4 inches (10 cm) width, with a crochet chain length of about 22 inches (55 cm).

Can I use different yarn or cord weights for this pattern?

Yes, you can use different cord sizes but this will affect the final size and structure; match your hook size to the cord and expect differences in gauge and finished dimensions.

Do I need prior crochet experience for this pattern?

This pattern is rated intermediate, so basic knowledge of single crochet, increases, decreases and working into specific loops is recommended for best results.

How long does this project typically take to complete?

Most crocheters complete this project in 12-15 hours spread across multiple sessions, depending on experience and finishing work such as lining and hardware attachment.