🧶 Beautiful ✨ Detailed 💝 Adorable

Niahs Balloon Dog Amigurumi Pattern

Niahs Balloon Dog Amigurumi Pattern
4.3★ Rating
5-7 Hours Time Needed
3.6K Made This
✂️

Beginner Friendly Level

Perfect for those just starting their crochet journey, with clear instructions and simple techniques

⏱️

Weekend Treat

Takes 5-7 hours, making it an enjoyable project to finish over a couple of days.

🧸

Cute Companion

An adorable friend to cherish, handcrafted with love to bring comfort and joy for years to come.

About This Niahs Balloon Dog Amigurumi Pattern

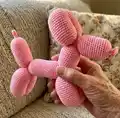
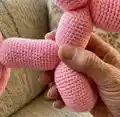
This pattern creates a charming Balloon Dog amigurumi crocheted from tail to nose using cotton 8/4 yarn. The design uses simple single crochet stitches worked in spirals to build the balloon segments and then shows you how to shape them into a dog. Clear round-by-round instructions and a photo shaping guide make assembly easy.

Niahs Balloon Dog Amigurumi Pattern crochet pattern - detailed view of completed project

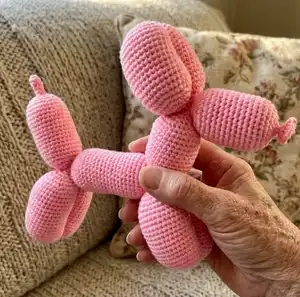
You will crochet a continuous balloon with bumps, stuff at key points, then sew designated joints together to form legs, ears and head. The finished dog measures about 20 cm tall and 23 cm from tail to nose.

Why You'll Love This Niahs Balloon Dog Amigurumi Pattern

I absolutely love this pattern because it turns a simple crocheted tube into a whimsical Balloon Dog with a few clever joins and shaping steps. I enjoy how the project uses only basic stitches—single crochet, increases and decreases—yet produces a playful, sculptural result. It is very satisfying to see the balloon transform into a dog as you sew the numbered joints together. I also love that it uses common cotton yarn and a small hook, making it accessible and portable for me to work on anywhere. This pattern always brings a smile when finished and makes a great gift or display piece.

Niahs Balloon Dog Amigurumi Pattern step 1 - construction progress Niahs Balloon Dog Amigurumi Pattern step 2 - assembly progress Niahs Balloon Dog Amigurumi Pattern step 3 - details and accessories Niahs Balloon Dog Amigurumi Pattern step 4 - final assembly and finishing

Switch Things Up

I love experimenting with color changes to create striped or multicolored balloon dogs; try alternating two colors every segment for a fun effect.

I sometimes use a slightly thicker cotton yarn and a larger hook to make a chunkier, more tactile version that works well as a doorstop or display piece.

If you want a tiny keychain, use thinner thread and a smaller hook to scale the pattern down to a pocket-sized version.

I often embroider small eyes or a nose on the head section for added expression instead of closing the tip tightly; this gives each dog personality.

Try adding a tiny crocheted collar or a bow by making a small chain and securing it around the neck for a cute accessory option.

I recommend experimenting with different stuffing amounts to vary how round or sleek the bumps look—less stuffing makes softer, squishier bumps.

To make the legs poseable, I sometimes insert a short piece of craft wire inside the leg segments before stuffing to allow gentle shaping.

For a festive look, use metallic or variegated yarns to give your balloon dog a party-ready shimmer and eye-catching texture.

I also enjoy making a whole set in different colors to create a parade of balloon animals—mix long necks or short noses by adjusting rounds slightly.

If you prefer a closed nose rather than tying a knot, sew the last stitches with an invisible stitch and hide the tail inside the tip for a neat finish.

Common Mistakes & How to Fix Them

✗ Skipping the gauge check can result in a dog that is much bigger or smaller than intended; measure 24 stitches over 10 cm and adjust hook size before you start. ✗ Not stuffing at the recommended points creates flat or misshapen bumps; add stuffing gradually and follow the pattern notes to stuff before closing segments. ✗ Forgetting to repeat rounds exactly as written leads to wrong stitch counts and uneven segments; count stitches after each round and follow the repeat markers carefully. ✗ Sewing the wrong joint numbers together will distort the shape of the dog; double-check the joint numbers on the picture guide before stitching joints 1 to 3, 4 to 6 and 7 to 9. ✗ Pulling yarn knots too tight when closing the nose can distort the tip and create lumps; either sew the hole closed neatly or tie a tight knot around the outside while maintaining shape.

Niahs Balloon Dog Amigurumi Pattern

Make a playful Balloon Dog amigurumi using simple single crochet stitches and step-by-step shaping instructions. This pattern guides you from the tail to the nose, with clear rounds and photo-based assembly tips. Perfect for a cute handmade gift or a fun decorative piece for your home. Follow the detailed shaping sequence to transform the crocheted balloon into a dog.

Beginner Friendly 5-7 Hours

Materials Needed for Niahs Balloon Dog Amigurumi Pattern

— Main Fabric

  • 01
    Cotton yarn 8/4 (50 g = about 170 m) - approximately 60 g (any brand or color you like)

— Tools Required

  • 01
    Crochet hook size 2.0-2.5 mm (US size B-1)
  • 02
    Needle (yarn needle) for sewing and weaving ends
  • 03
    Scissors
  • 04
    Stuffing (polyester filling)
  • 05
    Stitch markers (optional)

Progress Tracker

0% Complete

— Crochet pattern :

Info :

The balloon dog is crocheted in the same way as an actual balloon dog, by crocheting the balloon first, and then shaping it as a dog afterwards. The balloon dog is about 20 cm tall, and 23 cm from tail to nose.

— The balloon :

Info :

The balloon itself is made with bumps. It should end up looking like the picture on the right. It is crocheted from the tail to the nose. It is worked in spirals. Start off with a ml.

Round 1 :

6 sc in ml (6)

Round 2-6 :

sc all the way around (6) - 5 rounds (tip of the tail)

Round 7 :

*sc inc* x6 (12)

Round 8 :

*1 sc, sc inc* x6 (18)

Round 9 :

*2 sc, sc inc* x6 (24)

Round 10 :

*3 sc, sc inc* x6 (30)

Round 11-25 :

sc all the way around (30) - 15 rounds (tail)

Round 26 :

*3 sc, sc dec* x6 (24)

Round 27 :

*2 sc, sc dec* x6 (18)

Info :

Put some stuffing in it.

Round 28 :

*1 sc, sc dec* x6 (12)

Round 29 :

*sc dec* x6 (6)

Round 30 :

sc all the way around (6)

Round 31 :

*sc inc* x6 (12)

Round 32 :

*1 sc, sc inc* x6 (18)

Round 33 :

*2 sc, sc inc* x6 (24)

Round 34 :

*3 sc, sc inc* x6 (30)

Round 35-51 :

sc all the way around (30) - 17 rounds (leg 1)

Round 52-60 :

repeat round 26-34 (30)

Round 61-77 :

sc all the way around (30) - 17 rounds (leg 2)

Round 78-86 :

repeat round 26-34 (30)

Round 87-106 :

sc all the way around (30) - 20 rounds (body)

Round 107-115 :

repeat round 26-34 (30)

Round 116-132 :

sc all the way around (30) - 17 rounds (leg 3)

Round 133-141 :

repeat round 26-34 (30)

Round 142-158 :

sc all the way around (30) - 17 rounds (leg 3)

Round 159-167 :

repeat round 26-34 (30)

Round 168-179 :

sc all the way around (30) - 12 rounds (neck)

Round 180-188 :

repeat round 26-34 (30)

Round 189-203 :

sc all the way around (30) - 15 rounds (ear 1)

Round 204-212 :

repeat round 26-34 (30)

Round 213-227 :

sc all the way around (30) - 15 rounds (ear 2)

Round 228-236 :

repeat round 26-34 (30)

Round 237-249 :

sc all the way around (30) - 13 rounds (nose)

Round 250 :

*3 sc, sc dec* x6 (24)

Round 251 :

*2 sc, sc dec* x6 (18)

Info :

Put some stuffing in it.

Round 252 :

*1 sc, sc dec* x6 (12)

Round 253 :

*sc dec* x6 (6)

Round 254 :

sc all the way around (6)

Round 255 :

*sc inc* x6 (12)

Round 256 :

*1 sc, sc inc* x6 (18)

Info :

Slip st in the next stitch, cut the yarn pull it through and weave in the ends.

Info :

It should now look like the piece on the picture.

— Shaping the balloon :

Info :

To shape the balloon, follow the picture guide below. There is a description below each sequence of pictures.

Step 1 :

Throughout the picture guide I have given all the joints numbers, like on the picture above.

Step 2 :

For the first pair of legs, you will need to sew joint no 1 and 3 together, as shown on the pictures above.

Step 3 :

When they have been sewn together, it should look like the picture above.

Step 4 :

For the second pair of legs, you will need to sew joint no 4 and 6 together, as shown on the pictures above.

Step 5 :

When they have been sewn together, it should look like the picture above.

Step 6 :

For the ears, you will need to sew joint no 7 and 9 together, as shown on the pictures above.

Step 7 :

When they have been sewn together it should look like the picture above.

Step 8 :

The last thing to do is to close the hole at the tip of the nose. You can either sew it together, or you can tie a tight knot about the outside.

Info :

You balloon dog is now done!

Assembly Instructions

  • Sew joint no 1 and 3 together to form the first pair of legs, aligning the bumps and stitching securely through the rounds to hold the shape.
  • Sew joint no 4 and 6 together to form the second pair of legs, matching position with the first pair so the body sits evenly.
  • Sew joint no 7 and 9 together to form the ears (head attachment), aligning the nose and neck sections as shown in the picture guide.
  • Close the hole at the tip of the nose by sewing it together neatly or tie a tight knot around the outside to secure the end.
  • Stuff the balloon at the indicated points before finishing each section to ensure rounded bumps—add stuffing after rounds 27 and 251 as noted in the pattern.
  • After finishing the last round, slip stitch, cut the yarn, pull through and weave in all ends securely so the joins do not come undone.

Important Notes

  • 💡Use the recommended yarn weight and check gauge: 24 stitches over 10 cm (single crochet) to achieve the correct size.
  • 💡Stuff each bump gradually and at the recommended points to preserve shape and avoid lumps or overstuffing.
  • 💡Follow the numbered joint photo guide precisely when sewing joints together to get the correct Balloon Dog shape.
  • 💡Weave in ends and secure stitches at each join to prevent unraveling and to keep the dog stable and tidy.

This delightful Balloon Dog pattern turns simple crochet into a fun sculptural toy you can proudly display or gift. It uses basic stitches worked in spirals and a clever shaping guide to create a playful finished piece. Happy crocheting and enjoy your new handmade companion! 🎈🧶

You ask,

we answer.

FAQs

What size will the finished piece be?

The finished amigurumi measures approximately 20 cm tall and about 23 cm from tail to nose when using cotton 8/4 and the recommended hook.

Can I use different yarn weights for this pattern?

Yes, you can use different yarn weights, but this will affect the final size and the number of stitches per 10 cm, so check your gauge and adjust hook size accordingly.

Do I need prior crochet experience for this pattern?

This pattern is beginner friendly and uses basic stitches (single crochet, increases and decreases) but you should be comfortable working in the round and using a magic loop.

How long does this project typically take to complete?

Most crocheters complete this project in 5-7 hours, depending on experience level and how carefully you shape and sew the joints.